 Structures Workbench
Use
The group of transactions termed the
Structures Workbench
provides you with
role and task-specific
applications
, in particular for the following functions:
Editing organizational structures (organizational structure, command and support relationships)
Editing individual force elements and their properties
Assigning personnel categories, material categories, and logistical requirements
Material planning, personnel planning, relocation planning
Integration
From
Structures Workbench
transactions, you can navigate to various
additional functions and applications
.
You can use the menu to make user-specific settings .
The tab pages displayed in the
Structures Workbench
are based on Integrated Product and Process Engineering (iPPE) technology. For more information about the iPPE workbench, seeSAPLibrary and choose

SAPERP Central Component

Logistics
Production Planning and Control
Basic Data
Integrated Product and Process Engineering
 .
.
Prerequisites
In Customizing, under
Defense Forces & Public Security
Organizational Flexibility
Structures Workbench
, you have made the appropriate settings for the
Structures Workbench
transactions.
You can define your own role-specific and task-specific applications (transactions) and in each case specify:
which tab pages are available
which editing options (display/change) are available
which of the functions described below are available
Features
Transactions
In the standard system, the group of transactions termed the
Structures
Workbench
includes the following values:
Application |
Mode |
Transaction |
Use |
|---|---|---|---|
Organizational Structure and Tasks |
Change |
/ISDFPS/TOE1 |
|
Display |
/ISDFPS/TOE2 |
||
Personnel Organizational Basis |
Change |
/ISDFPS/TOEP1 |
|
Display |
/ISDFPS/TOEP2 |
||
Material Organizational Basis |
Change |
/ISDFPS/TOEM1 |
|
Display |
/ISDFPS/TOEM2 |
||
Accounting Organizational Basis |
Change |
/ISDFPS/TOEACC1 |
|
Display |
/ISDFPS/TOEACC2 |
||
Logistics Organizational Basis |
Change |
/ISDFPS/TOELOG1 |
|
Display |
/ISDFPS/TOELOG2 |
||
Task Organization |
Change |
/ISDFPS/TORG1 |
|
Display |
/ISDFPS/TORG2 |
||
Support Relationships |
Change |
/ISDFPS/SREL1 |
|
Display |
/ISDFPS/SREL2 |
||
Material Categories Planning |
Change |
/ISDFPS/LPL1 |
|
Display |
/ISDFPS/LPL2 |
||
Personnel Categories Planning |
Change |
/ISDFPS/PERS1 |
|
Display |
/ISDFPS/PERS2 |
||
Assignment of Technical Objects |
Change |
/ISDFPS/TOB1 |
|
Display |
/ISDFPS/TOB2 |
||
Relocation Planning |
Change |
/ISDFPS/PRELOC1 |
|
Display |
/ISDFPS/PRELOC2 |
||
Logistical Mission Support |
Change |
/ISDFPS/LSP1 |
|
Display |
/ISDFPS/LSP2 |
||
Command and Control Support |
Change |
/ISDFPS/TOEFU1 |
|
Display |
/ISDFPS/TOEFU2 |
||
Relocation Execution |
Change |
/ISDFPS/RELOC1 |
|
Display |
/ISDFPS/RELOC2 |
||
Infrastructure |
Change |
/ISDFPS/INFRA1 |
|
Display |
/ISDFPS/INFRA2 |
The
Structures Workbench
transactions always start in display mode. This ensures that when you are searching for required objects, you do not lock objects for other users also working with the structure. When you switch to change mode in a transaction, the object you are using is locked for all other users. This ensures data consistency.
 Note
Note
Depending on the Customizing settings, each transaction has only a certain number of the functions and editing options described below.
Screen Layout
The
Structures
Workbench
screen is divided into the following areas:
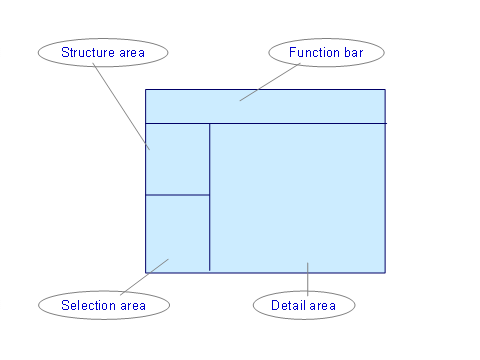
The different
Structures Workbench
screen areas are integrated, meaning that data changes or selections in one screen area are automatically transferred to each of the other screen areas, where relevant.
Status Display
If objects and assignments have a
status
, it is displayed in the screen areas of the
Structures Workbench
as described below:
Object Status
Inactive objects are displayed with object names in gray font.
Active objects (and objects with no status) are displayed with object names in black font.
Assignment Status
Inactive assignments are identified with the following icons:
 Planned
 Requested
 Approved
 Rejected
Active assignments are not identified since they are standard.
Structure Area
In the structure area, you can:
Select and display the different structures of your organization that consist of
 force elements
You define the structure selection and the evaluation paths for display purposes in Customizing, under
Defense Forces & Public Security
Organizational Flexibility
Command and Support Relationships
Define Usage Types
.
Search for individual force elements and display them together with their structural assignments (at the same time, you can navigate within structures and search for objects)
You can activate component-specific search help in Customizing under
Defense Forces & Public Security
Organizational Flexibility
Structures Workbench
BAdI: Search Help
.
Print structures
Create, copy, delete, and schedule force elements and structures
Display the key details of the selected force element(s)
Select force elements to edit
Change the status of force elements
Start reports under
Additional Reports
, for example, to:Generate CO objects and their assignments
Selection Area
In the
selection area
, the following assigned objects are displayed in a
function tree
for the force element selected in the structure area, depending on the transaction selected:
The
 tasks assigned to the force element are displayed in the
Tasks
folder.The
 chief positions and
 positions assigned to the force element are displayed in the
Authorized and Actual Personnel
folder.The
 persons assigned to a position or chief position are displayed in the
Actual Personnel
folder.The material objects assigned to a position or chief position are displayed in the
Authorized Materials
folder: Material planning objects
 Material containers
Furthermore, depending on the object type in the
Additional Data
folder, additional object assignments are displayed for the objects displayed in the function tree: Jobs
Jobs
 User
User
 Qualification
-
Task
 Work centers
 Role
Role
 Composite role
Assigned
 documents are displayed in the
Documents
folder.
The following object assignments of a force element are displayed in the
Authorized and Actual Materials
folder:-
Material planning object
-
Material container
 Equipment package
 Reportable item code
The
 provisions packages assigned to the force element are displayed in the
Provisions Packages
folder.The
 technical objects assigned to the force element are displayed in the
Technical Objects
folder.The
documents assigned to the force element are displayed in the
Documents
folder.The following object assignments of the force element are displayed in the
Infrastructure Objects
folder: RE search request
 Infrastructure planning object
 Real estate contracts
 Business entities
You define the
evaluation paths
for display purposes in Customizing under
Defense Forces & Public Security
Organizational Flexibility
Structures Workbench
Define Transactions for Structures Workbench
Evaluation Paths
node.
In Customizing, under
Defense Forces & Public Security
Organizational Flexibility
Structures Workbench
Define Transactions for Structures Workbench
Folders
node, you define how the
folders
are to be displayed.
You can display the assigned positions, jobs, persons, material planning objects (MPOs), and provisions packages (PPAs) from here. In the function tree, you can also:
Create, delimit, and delete positions
Create and delete assignments to MPOs and PPAs
Adjust the display by selecting evaluation paths
In Customizing, you define the functions in the object-specific
context menu
under
Defense Forces & Public Security
Organizational Flexibility
Structures Workbench
Define Transactions for Structures Workbench
Context Menu
node.
In addition to the function tree, the following views are provided:
You can use the Material List to perform an authorized/actual comparison for materials.
You can choose the
Authorized/Actual Comparison
pushbutton to display the following comparisons for the selected force element, its MRP area, or for the entire structure starting from the selected force element:Authorized/actual comparison for directly assigned authorized materials
Authorized/actual comparison for positions assigned to the authorized materials
Authorized/actual comparison for all authorized materials
Authorized/actual comparison for authorized materials identified as infrastructure material by the material indicator
In Customizing, under
Defense Forces & Public Security
Materials Management
Control Structure Explosion in Authorized/Actual Comparison
, you specify which levels of the structure are to be displayed.
You choose the
Authorized/Actual Details
pushbutton to go to the detail view of the authorized/actual comparison.
You can use the Personnel List to display a list of all lower-level persons.
In addition to the persons assigned in the currently selected structure (master personnel), you can also display the following information:
The system indicates currently assigned persons that are assigned to other force elements in other structures in parallel with the
Reduced
value in theDeviation
field.The system indicates persons that are additionally assigned to the force element in other structures with the
Increased
value in theDeviation
field.Use the
Deviations
function to select the required comparison structures.
You can use the Infrastructure Comparison to perform an authorized/actual comparison for the infrastructure.
You can use Relocation to:
 Assign relocations
Display the assigned
 relocation steps
In Customizing, you define which of these
views
are available in a transaction, by choosing
Defense Forces & Public Security
Organizational Flexibility
Structures Workbench
Define Transactions for Structures Workbench
Subcomponents
node.
You can trigger the following workflows from the selection area:
Detail Area (and Function Bar)
The
detail area
contains the following views:
Detail screens for each object selected (force element, position, person, MPO, and so on)
The
detail area
displays the header data of the object currently selected (such as the name and description), as well as object type-specific tab pages on which you:display and, if necessary, edit the properties of the object
make assignments
Functions and overviews for material planning
Tab pages for relocation planning
Search functions
If required, you can also choose the
Measure
pushbutton to select an
organizational measure
or direct change.
You define
tab pages
in Customizing, under
Defense Forces & Public Security
Organizational Flexibility
Structures Workbench
Tab Pages
.
The traffic light symbols indicate whether the tab page is ready for input (green) or in display mode only.
Activities
Action |
Function |
Screen Area |
|---|---|---|
Switch from display to change mode in a transaction |
|
Function bar |
Show and hide screen areas |
|
Function bar |
Call the views in the detail area |
|
Function bar |
Make personal settings |
Function bar |
|
Select a usage type |
|
Structure area |
Switch between the function tree, material list, and personnel list |
|
Selection area |
Change the order of objects in the function tree |
|
Selection area (function tree) |
Change layout of lists |
|
Selection area (lists) |
Select the display of object types or relationships |
|
Selection area (function tree, personnel list) |
Switch between different table displays (print preview, grid, Excel, Crystal Reports) |
|
Selection area Detail area (tab pages with tables) |
Export table data to one of the formats provided (such as Excel, HTML, Crystal Reports) |
|
Selection area (material list) Detail area (tab pages with tables) |
Sort table rows |
|
Selection area (lists) Detail area (tab pages with tables) |
Choose relationship type |
|
Detail area (tab pages with tables) |
Create relationship |
|
Detail area (tab pages with tables) |
Delete relationship |
|
Detail area (tab pages with tables) |
Delimit relationship |
|
Detail area (tab pages with tables) |
Show and hide columns |
|
Detail area (tab pages with tables) |
Print current view |
|
All |
Find objects |
|
All |
Specific functions, such as for creating and assigning objects, are documented separately.