Configuring Tableau Buttons
A tableau consists of a number of buttons that can be assigned to different functions.
Depending on the configuration, you can use tableau buttons to:
- Enter items
- Call POS functions
- Add an additional level to an existing tableau
- Call other tableaus
This chapter describes how to configure the different button types and how to edit and delete existing buttons.
Information on the following topics will be provided:
Creating an Item Button
Item buttons are used to enter an item directly.
To create an item button, proceed as follows:
- In the tableau preview, select the position where the new button should be created.
Free slots are displayed with a + ("plus") icon.
Your selection is highlighted by a colored frame.
- In the dialog Create Button, select the button type ITEM.
- The configuration dialog for the item button is shown on the right-hand side of the display.
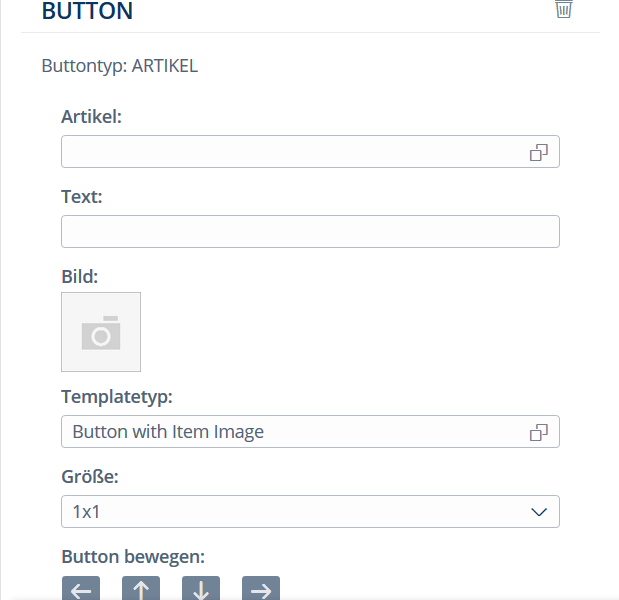
Enter the following data:
Item Item to be linked with the button. You can use the store, item number, item description and merchandise category to search for the item. It is also possible to manually enter an item number. This must have been configured appropriately, see Customizing Guide. In this case, even unknown items can be assigned to the button.
Text Button text Image Image to be displayed on the button. Note:A connection to the Digital Signage Server is required to download image content.
All images available on the Digital Signage Server will be displayed in the corresponding subfolders. You can then select an image.
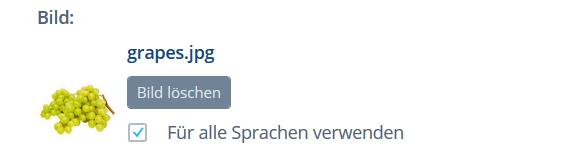
Once an image is selected, a preview and the image name appear.
Replace image
To replace the image on the button, click on the current image in the dialog. The dialog for selecting the image appears. After you have made your selection, the image is replaced accordingly.
Delete image
To delete the image, select the button Delete Image, which appears next to it. A confirmation prompt appears asking whether you really want to remove the image from the button.
Add image to all languages
You can add the image to all the languages in one step by ticking the checkbox "Applies to all languages". A confirmation prompt appears asking whether the existing images in all the other languages can be replaced by this image. You can decide if the assignment should apply to the current language only or to all languages.
If you wish to assign the images to all languages for all buttons in the current session, tick the checkbox "Remember decision for current session". After that, the prompt will no longer be displayed in the current session.

Template Type Layout of the button. Different types are available for selection, which vary by color and frame.
Size Size of the button. Note:For buttons sizes greater than 1x1, it must be ensured that the buttons below and to the right of the relevant button are not allocated yet.Therefore, the possible sizes depend on the space available below and to the right of the relevant button.

Move Button You can use the arrow keys to change a button's position. Note:When you are moving a button, the available space in the desired direction is checked first. If there is not enough space available, it will not be possible to move the button in this direction and an error message will appear. - Select the button Save in the bottom menu bar to confirm your changes.
✓ The button is created.
Creating a Function Button
Function buttons are used to call the POS functions.
To create a function button, proceed as follows:
- In the tableau preview, select the position where the new button should be created.
Free slots are displayed with a + ("plus") icon.
Your selection is highlighted by a colored frame. - In the dialog Create Button, select the button type
FUNCTION.
The configuration dialog for the function button is shown on the right-hand side of the display.
- Click on
 ("Selection") to open the dialog Select Function. Then, select
the function to be called by this button. As the cursor is in the search field when the
dialog opens, you can directly search for the desired function here.
("Selection") to open the dialog Select Function. Then, select
the function to be called by this button. As the cursor is in the search field when the
dialog opens, you can directly search for the desired function here. 
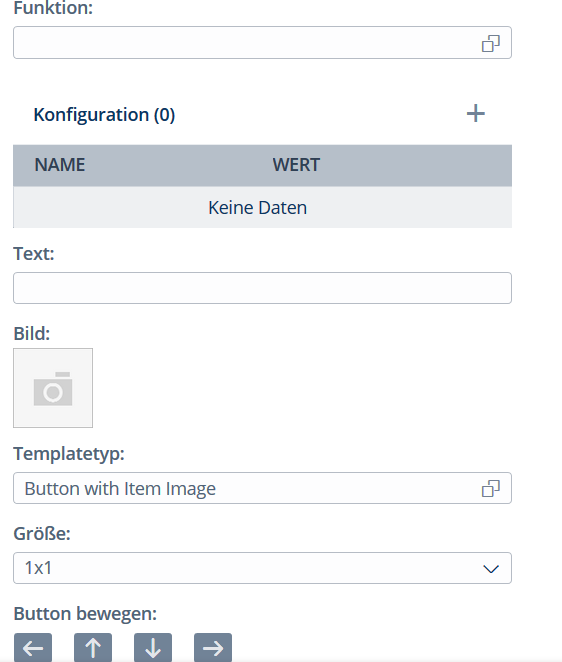
- Enter the following data:
Configuration Click on the + ("plus") icon to set the function parameters. If parameters can be defined for a function, the following dialog will appear: Configuring Function Parameters. Enter the parameters and select OK to confirm your entries.
Text Button text Image Image to be displayed on the button. Note:A connection to the Digital Signage Server is required to download image content.Template Type Layout of the button. Size Size of the button. - Select the button Save in the bottom menu bar to confirm your changes.
✓ The button is created.
Creating a Level Button
Level buttons are used to add new levels to multi-level tableaus.
To create a level button, proceed as follows:
- In the tableau preview, select the position where the new button should be created.
Free slots are displayed with a + ("plus") icon.
Your selection is highlighted by a colored frame.
- In the dialog Create Button, select the button type LEVEL.
- The configuration dialog for the level button is shown on the right-hand side of the display.
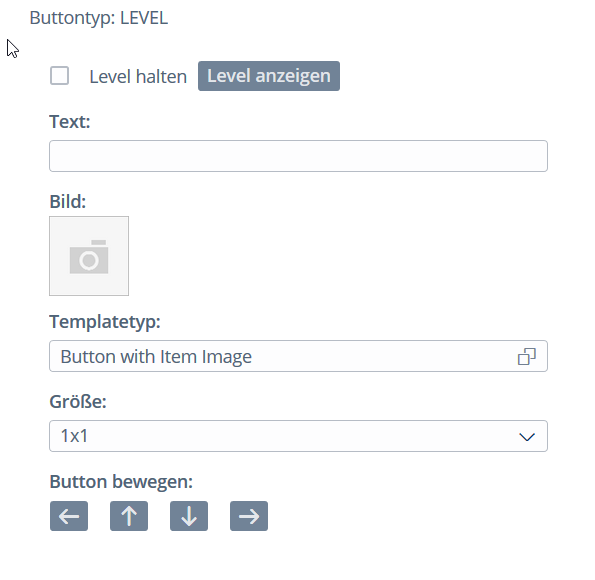
Enter the following data:
Keep Level If this option is enabled, the POS Client continues to display the current tableau after an item was entered. If this option is disabled, the POS Client returns to the next-higher level menu after an item was entered.
The configuration determines whether the flag is set by default, see "Customizing Reference - Menu Editor".
Auto open sublevel If this option is enabled, the sublevel is opened by default when the user opens the corresponding screen. Display Level Use this button to switch to the new level. Note:If the new level button is added directly to the applicable level bar in the tableau, this button will not be shown.
You can switch to the new level directly by clicking on the level button instead.
Text Button text Image Image to be displayed on the button. Note:A connection to the Digital Signage Server is required to download image content.Template Type Layout of the button. Size Size of the button. - Select the button Save in the bottom menu bar to confirm your changes.
✓ The button is created.
Creating a Tableau Button
Tableau buttons are used to navigate from one tableau to another tableau.
To create a tableau button, proceed as follows:
- In the tableau preview, select the position where the new button should be created.
Free slots are displayed with a + ("plus") icon.
Your selection is highlighted by a colored frame.
- In the dialog Create Button, select the button type TABLEAU.
- The configuration dialog for the tableau button is shown on the right-hand side of the display.
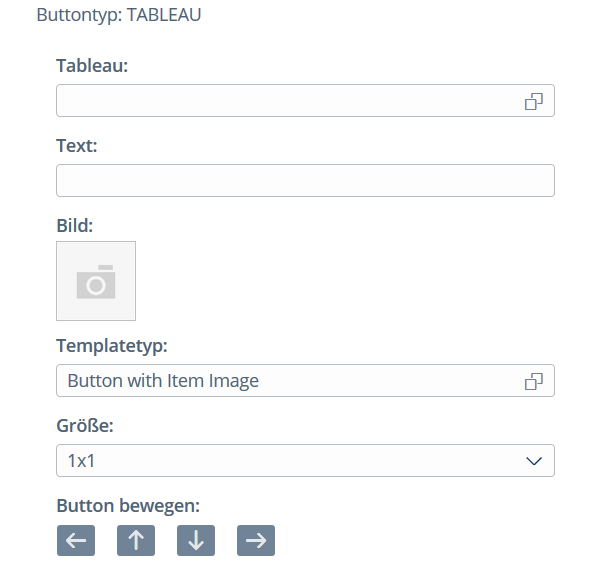 Tableau Button
- Enter the following data:
Tableau Select the desired tableau. Text Button text Image Image to be displayed on the button. Note:A connection to the Digital Signage Server is required to download image content.Template Type Layout of the button. Size Size of the button. - Click on
 ("Selection") and in the dialog Tableau Selection, select the tableau that will be called by this button.
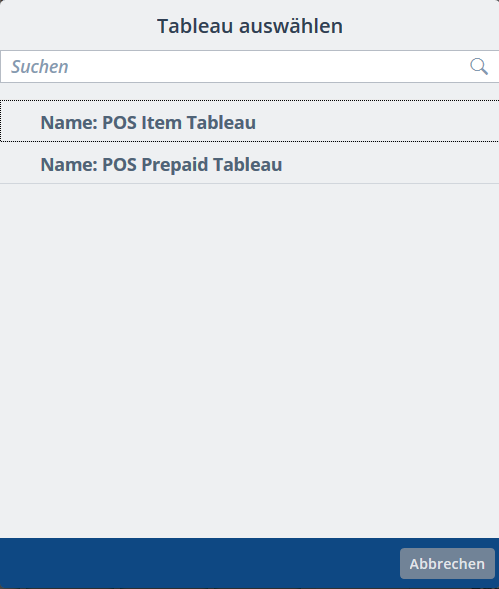
Select Tableau
All available tableaus are shown here.
✓ The button is created.
Copying and Pasting a Button
To copy a button, proceed as follows:
- In the tableau preview, select the button you want to copy.
The selected button is highlighted by a colored frame.
- Open the context menu and select Copy. Note:Several buttons can be copied to the clipboard. To do so, select the buttons you want to copy one by one and then call the context menu function Copy.
In the tableau preview, mark the position where the copied button should be pasted to.
Free slots are displayed with a + ("plus") icon.
- The following menu appears.
All the buttons that were copied to the clipboard are available for selection. The buttons which cannot be pasted to the new position due to a lack of space are marked accordingly.
To remove a button from the clipboard, click on the trash icon next to the corresponding button.
To remove all the buttons from the clipboard, select the button "Delete all copies".

✓ The button is copied with all its properties.
Changing a Button
To change a button, proceed as follows:
- In the tableau preview, select the button you want to edit.
The selected button is highlighted by a colored frame.
- The configuration dialog for the button is shown on the right-hand side of the display.
- Change the configuration as needed and select the button Save in the bottom menu bar to confirm your changes.
✓ The button is changed accordingly.
Deleting a Button
To delete a button, proceed as follows:
- In the tableau preview, select the button you want to delete.
The selected button is highlighted by a colored frame.
- The configuration dialog for the button is shown on the right-hand side of the display.
- Click on
 ("Delete") and select OK to acknowledge the confirmation prompt.
✓ The button is deleted.
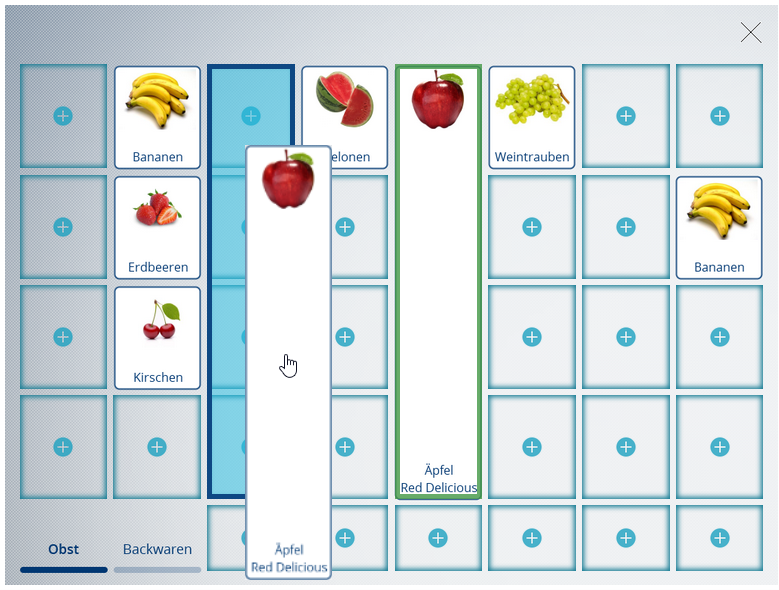
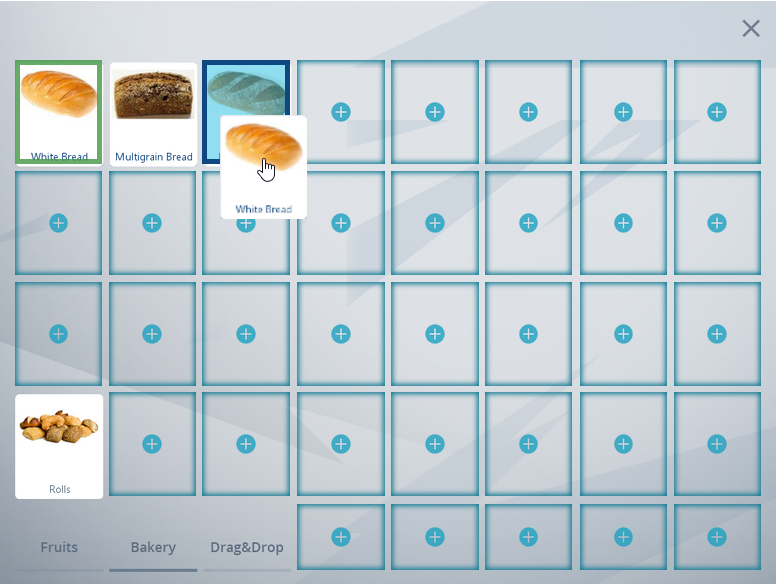
Moving a Button
You can change a button's position by using the arrow keys (see above) or by using the drag and drop function.
The possible new positions are highlighted by a blue frame.
The following options are available:
Moving to an Empty Position
To do so, proceed as follows:
- In the tableau preview, select the button you want to move.
- Hold down the left mouse button and drag the button to any new position.
- Release the left mouse button as soon as the new position is highlighted by a blue frame.
- Dragging a button to a new position is only possible if there is enough space to do so. Available slots are highlighted by a blue frame when you move the mouse over them.
- If you attempt to move the button to a position that does not have enough space, the button will return to its original position as soon as the left mouse button is released.
- Item buttons cannot be moved to the tab bar.
Replacing Buttons of the Same Size
It is possible to swap the positions of two buttons of the same size.
To do so, proceed as follows:
- In the tableau preview, select the button you want to move.
- Hold down the left mouse button and drag the button to a button of the same size.
- Release the left mouse button as soon as the new position is highlighted by a blue frame.
- The buttons are swapped after releasing the left mouse button.
Moving a Button In Between Two Existing Buttons
It is possible to move buttons to the space in between two existing buttons.
This is only possible when the button you want to move is in the same row or column as the existing buttons.
To do so, proceed as follows:
- In the tableau preview, select the button you want to move.
- Hold down the left mouse button and drag the selected button in the same row or column to the space where you wish to insert it.
- Release the left mouse button as soon as the new space is highlighted by a blue frame.
- The button will be positioned between the two existing buttons after releasing the left mouse button.

A button may also be moved to the space before the button at the far left or after the button at the far right. In this case, the blue frame will also appear at the point where you can insert the button.
Similarly, a button may also be moved to the space above the topmost or below the bottommost button. The blue frame will again appear accordingly.
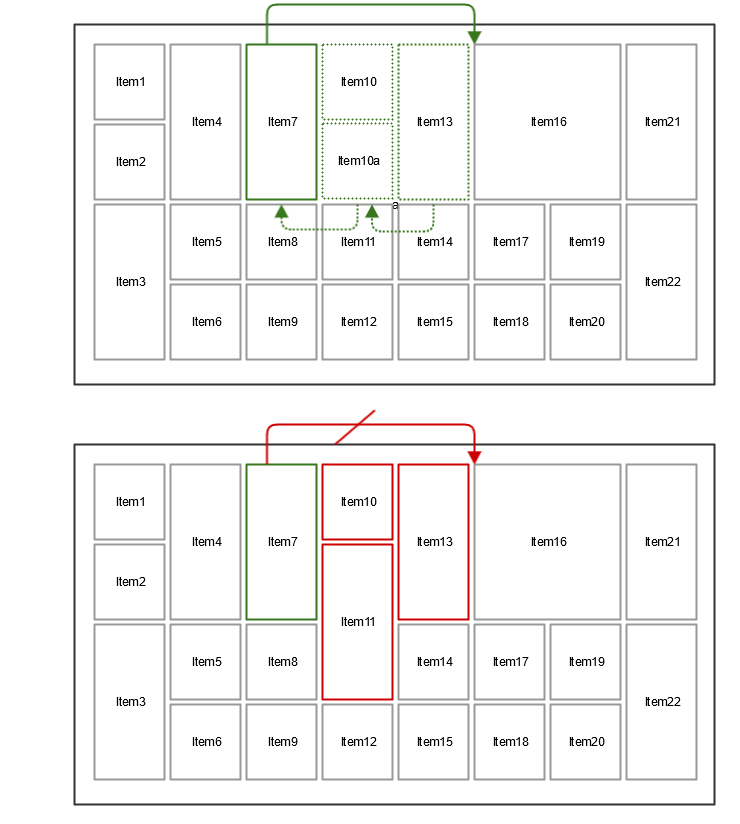
Moving Within the Same Row
Moving to the Right
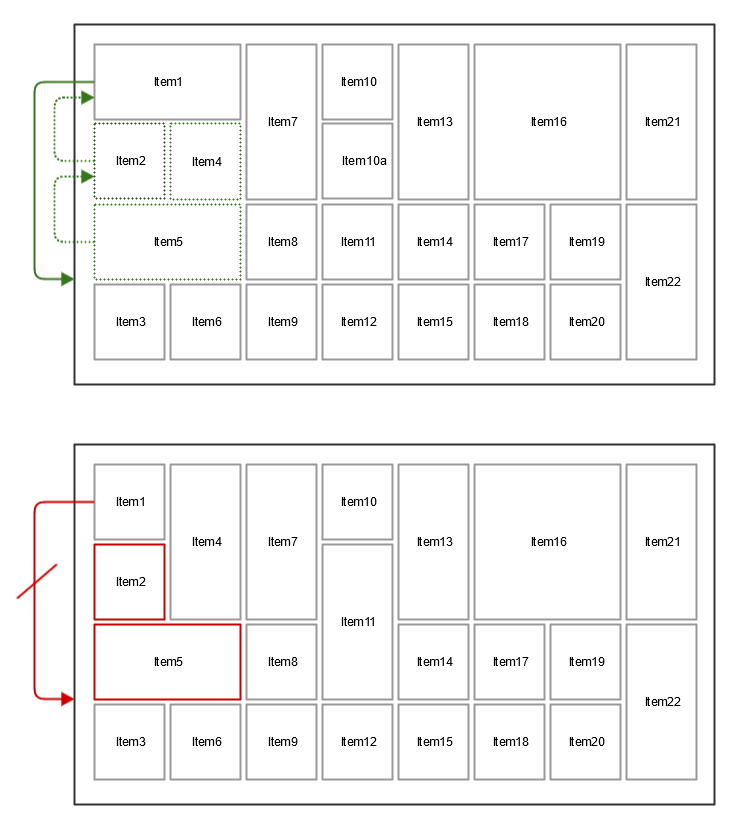
When moving a button to the right, all the buttons between the old position and the new position of the button you are moving will be pushed to the left.
Moving to the LeftWhen moving a button to the left, all the buttons between the old position and the new position of the button you are moving will be pushed to the right.

Moving a button to a new position is only possible if:
- all the buttons between the old and the new position of the button you are moving have the same row height. The column width of the buttons may be different, however.
- the buttons that will be moved to the old position have the same combined row height (see figure below, Item10 and Item10a have the same combined height as Item7).
Moving Within the Same Column
Moving Downwards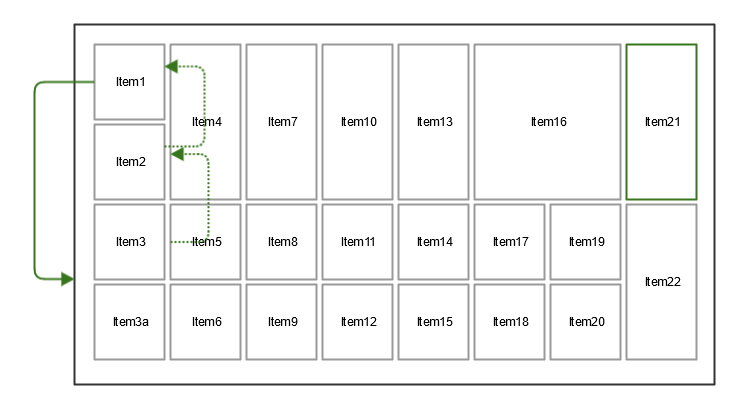
When moving a button downwards, all the buttons between the old position and the new position of the button you are moving will be pushed upwards.
Moving Upwards
When moving a button upwards, all the buttons between the old position and the new position of the button you are moving will be pushed downwards.
Notes on Moving Buttons Within a ColumnMoving a button to a new position is only possible if:
- all the buttons between the old and the new position of the button you are moving have the same column width. The row height of the buttons may be different, however.
- the buttons that will be moved to the old position have the same combined column width (see figure below, Item2 and Item4 have the same combined width as Item1).