Use the Employee Hub
Introduction
Employee Hub is an application that allows you to access and use different functions. It offers central functions such as single sign-on, which means that you only have to log in once to the Employee Hub to view and use all the applications included, depending on your permissions. It is possible to use it in a web or mobile version. The differences in their behavior are mentioned in each chapter.
Function Call for Web Version
The Employee Hub web version is called in the browser with the following command:
https://<hostname of application server>/employee-hub/app/index.htmlFunction Call with Tenant and Store Identification in the URL
If you do not want a tenant/store selection to be displayed after the function call, you can enter a tenant/store identification in the URL. In this case, you need to call:
https://<hostname of application server>/employee-hub/app/index.html?tenantId=<tenant Id>&storeId=<store Id>
Log in and Call an Application
To call an application from Employee Hub, simply select this application in the Employee Hub menu and click on the tile for the selected function.
- Start the Employee Hub mobile/web version.
- The login mask of Employee Hub is displayed. Enter correct data.
 Note:Tenant is visible for the web version in the case of multi-tenant installation. The mobile app contains information about the tenant in the configuration section.Note:If the credentials used are the initial ones, e.g. after password reset, you are forced to change your password directly after the next login.
If your password is about to expire, you will receive a corresponding message when you log in, giving you the option to change the password now or later.
- Press Log in. The store selection appears if multiple stores exist. You can easily find your store using the search function. You can search either by name or ID.

- Select a store. The menu screen appears with or without dashboards.
If there are any, all available dashboards are displayed in tabs in the header. Select the dashboard you want to use.
Note:On mobile devices, the dashboard selection can be done using the combo box at the top.
By default, the dashboard defined above in the Manage Dashboards function is displayed.

- To start a function, you have the following options:
- Click on the tile in the dashboard.
- Open the function via the sidebar. Here, you can also search for a function.
Sidebar Menu
- Start Employee Hub.
- The login mask of Employee Hub is displayed. Enter correct data.
- Click on the sidebar icon
 in the top left corner.
 - The sidebar menu appears.
It is also possible to search for a required function.

User Menu
- Start the Employee Hub mobile/web version.
- Log in.
- Click on the user menu icon
 on the right.
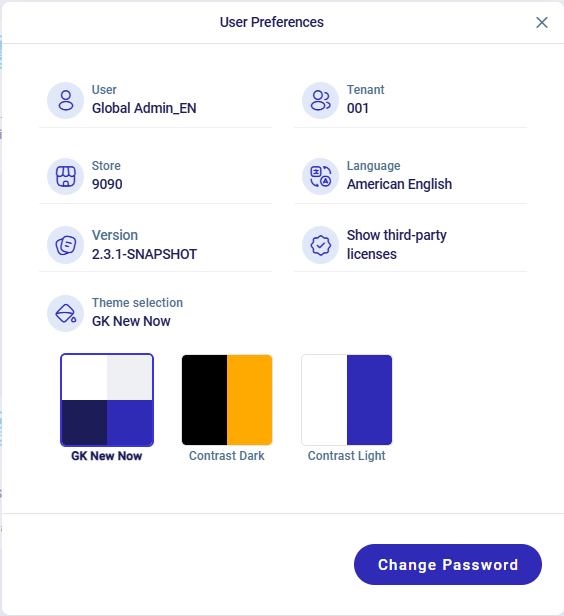
 - Select the menu entry User Preferences.
- Information about the account/user appears.
Change Language
- Start the Employee Hub mobile/web version.
- Log in.
- Click on the user menu icon on the right.
- Select the menu entry User Preferences.
- Click on "Language" in the Settings mask.
- A dialog appears where you can select a language. Use the search bar to search for a language.

- The language is changed and Employee Hub is shown in the selected language.
- Close the Settings mask.
Change Theme
- Start the Employee Hub mobile/web version.
- Log in.
- Click on the user menu icon on the right.
- Select the menu entry User Preferences.
- Click on "Theme selection" in the Settings mask.
Here you will see all available themes.
- Select the desired theme. The selected theme is used immediately.
- Close the Settings mask.
Change Password
- Start the Employee Hub mobile/web version.
- Log in.
- Click on the user menu icon on the right.
- Select the menu entry User Preferences.
- Click on the Change Password button in the Settings mask.
- Enter the old password, the new password and confirm the new password.
- Press the Change Password button. After successful validation, the new password is saved.
Change Store
- Start the Employee Hub mobile/web version.
- Log in.
- Click on the icon
 to change the store.
 - Select the store in the store list. Use the search bar to search for a store by name or ID.
Setup Label Printer

- Start the Employee Hub mobile version.
- Log in.
- Click on the user menu icon on the right.
- Click on Setup Label PrinterNote:The selected printer and its connection settings are automatically saved on the device after first successful connection. If you already have a personalized printer on your device, it will be automatically preselected and connected. The status Connected is shown.
- Select a printer.
- Select the connection type (Bluetooth or Wifi).

- Enter the MAC Address (Bluetooth) or IP Address and Port (Wifi).
- Press the button Connect to connect to the printer.
- A message informs about the successful connection and the status Connected is displayed.
Logout
To log out of Employee Hub, proceed as follows:
- Click on the user menu icon on the right.
- Click on Logout to log out. The login mask is displayed again.
Show Notification
- Start Employee Hub.
- Log in.
- To view and process a notification, simply click on the "bell icon".
- A window appears showing the available notifications.

The notifications can be switched on/off using the toggle button Banners.
The notifications can be closed individually using the X button or all notifications can be deleted at once using the Delete all button.
Create Dashboard
- Start Employee Hub.
- The login mask of Employee Hub is displayed. Enter correct data.
- Click on the user menu icon on the right.
- Click on the manage dashboards icon
 .
. - The mask where you can manage dashboards is displayed.

- Press the Create New Dashboard button.

- Enter a name and press Create. Additionally, you can select a dashboard template to use a predefined one.

- A new dashboard is created and is visible in the dashboard overview.
Change the Name of a Dashboard
- Start Employee Hub.
- Log in.
- Click on the user menu icon on the right.
- Click on the manage dashboards icon .
- Select a dashboard and click on the icon
 . Change the name and press Enter to confirm.
Export an Existing Dashboard
- Start Employee Hub.
- Log in.
- Click on the user menu icon on the right.
- Click on the manage dashboards icon .
- Select a dashboard and click on the icon
 .
. - Select a location in the file browser.
The JSON file format is used for the export.
Delete an Existing Dashboard
- Start Employee Hub.
- Log in.
- Click on the user menu icon on the right.
- Click on the manage dashboards icon .
- Select a dashboard and click on the icon
 .
. - Confirm the deletion.
Copy Dashboard
- Start Employee Hub.
- Log in.
- Click on the user menu icon on the right.
- Click on the manage dashboards icon .
-
Select a dashboard and click on the icon
 .
.The new dashboard is shown in the overview. The name pattern <original dashboard>+ - Copy is used.
Import Dashboard
- Start Employee Hub.
- Log in.
- Click on the user menu icon on the right.
- Click on the manage dashboards icon .
- Press the Import Dashboard button.
- Select an import file in the file browser or use drag and drop.
A message shows that the import was successful or that there were problems during the import. Confirm with the Done button.

Change the Order of Existing Dashboards
- Start Employee Hub.
- Log in.
- Click on the user menu icon on the right.
- Click on the manage dashboards icon .
- Click on the icon
 and press the left mouse button to move a dashboard. Drop it at the desired location in the overview.
Create Widget/Function
To create a widget in Employee Hub, proceed as follows:
- Start Employee Hub.
- Log in.
- In the header, select the dashboard for which you want to create a new widget/function.
- Click on the user menu icon on the right.
- Click on Edit Dashboards
 to enter edit mode.
 - Click on Add and then on Add New Widget/Add New Function.
- A pop-up window appears. Select the widget/function to be added. Use the search option.

- The new widget/function is created in the dashboard.
- Click on the Done button to complete the changes and exit edit mode.
Duplicate Widget
- Start Employee Hub.
- Log in.
- In the header, select the dashboard for which you want to duplicate a widget.
- Click on the user menu icon on the right.
- Click on Edit Dashboards to enter edit mode.
- Select the widget you want to duplicate.
- Click the 3 dots in the top right corner.
- Press Duplicate. The duplicated widget is shown in the dashboard and can be renamed.
- Click on the Done button to complete the changes and exit edit mode.
Delete Widget/Function
- Start Employee Hub.
- Log in.
- In the header, select the dashboard for which you want to delete a widget/function.
- Click on the user menu icon on the right.
- Click on Edit Dashboards to enter edit mode.
- Select the widget/function.
- Click the 3 dots in the top right corner.
- Press Delete to remove the widget/function from the dashboard.
Move Widget/Function
- Start Employee Hub.
- Log in.
- In the header, select the dashboard for which you want to move a function/widget.
- Click on the user menu icon on the right.
- Click on Edit Dashboards to enter edit mode.
- Select the function/widget you want to move.
- Move the function/widget with the left mouse click.
- Drop the function/widget tile at the desired location. Note:You can also use the keyboard to move a function/widget. Click on the 3 dots and press Move. The widget/function is then marked for moving. You can use the Tab key on the keyboard to move the widget/function around. Pressing the Enter key on the keyboard completes moving the widget/function.
- Click on the Done button to complete the changes and exit edit mode.
Change Size of Widget
- Start Employee Hub.
- Log in.
- In the header, select the dashboard for which you want to change the size of a widget.
- Click on the user menu icon on the right.
- Click on Edit Dashboards to enter edit mode.
- Click the 3 dots in the top right corner.
- Select the new widget size (the current size is marked in the menu).Note:The option is only available if different sizes are defined for a widget. The defined available sizes of the widget are shown for selection, e.g. 2x2, 4x2, 6x2, 6x4.
- Click on the Done button to complete the changes and exit edit mode.
Set Refresh Time Interval of a Widget
- Start Employee Hub.
- Log in.
- In the header, select the dashboard for which you want to set the refresh time interval for a widget.
- Click on the settings icon in the top right corner.
- Select the menu entry Edit Dashboards .
- Click the 3 dots in the top right corner.
- Select a refresh time interval. The manual option means that there is no automatic refresh, but it can be done manually.
Manual Refresh of a Widget
- Start Employee Hub.
- Log in.
- Go to the dashboard where the widget is located.
- Go to the widget you want to refresh manually.
- Press the refresh button
 in the bottom right corner of the widget.
Grouping of Functions
To group function tiles, you must complete the following steps:
- Start Employee Hub.
- Log in.
- In the header, select the dashboard for which you want to create a new group.
- Click on the settings icon in the top right corner.
- Select the menu entry Edit Dashboards .
- Click on Add and then on Add New Group.
- Enter the name of the group.
- Press OK.
- Now you can move a function tile to the group.
When a group is deleted, all function tiles it contains are also removed from the dashboard.
Rename Groups
To rename a group, you must perform the following steps:
- Start Employee Hub.
- Log in.
- In the header, select the dashboard for which you want to rename a group.
- Click on the settings icon in the top right corner.
- Select the menu entry Edit Dashboards to enter edit mode.
- Press the button Edit text
 next to the group name to rename the group.
 - Enter a new name.
- Press Enter or the Done button next to the group name to change the name.
- Press the Done button to complete the renaming and exit edit mode.
Delete Groups
To delete a group, you must perform the following steps:
- Start Employee Hub.
- Log in.
- In the header, select the dashboard for which you want to delete a group.
- Click on the settings icon in the top right corner.
- Select the menu entry Edit Dashboards to enter edit mode.
- Press the button next to the group name to delete the group.Note:If a dashboard contains only one group, then this group is not deletable.
- Confirm the deletion.
- Press the Done button to complete the deletion and exit edit mode.
Show/Hide Group Title
- Start the Employee Hub.
- Log in.
- In the header, select the dashboard for which you want to show/hide the title.
- Click on the settings icon in the top right corner.
- Select the menu entry Edit Dashboards to enter edit mode.
- Press the button
 to show the title. Press the button
  to hide the title of the group.
 - Press the Donebutton to complete the changes and exit edit mode.