Wall Configuration
This guide describes the standard configuration procedures for the Wall Device Manager (WDM). The configuration itself is done within the Storemanager Server UI. It has to be done per any store having a Wall Device Manager installed to it.
Once the application has been installed, some basic parameters must be set up in order for it to operate properly. This consists of:
- (optionally) setting up wall type additionally to the predefined types as described in Setting up a new Wall Type.
- setting up at least one "Wall" as described in Setting up a New Wall.
- setting up server addresses for the UI in the client configuration.
Setting up a new Wall Type
In general, WDM handles walls differently based on their basic regime type:
- disposal wall - a wall in which the customers can dispose the self-scanning devices after their shopping trip.
- dispensing wall - a wall from which customers retrieve their self-scanning devices. Customers can pick up self-scanning devices from this type of wall and use them while shopping.
While all disposal walls are of one (pre-defined) type, a user can set up new disposal wall types that define handicap zones and thresholds:
- Log in to GK/Retail Storemanager.
- Select the structure element for the Wall Device Manager (system type
GKR-wdm) and double-click the appropriate version.
You will see the User View of the editor for the Wall Device Manager.
- Switch to the Wall Configuration parameter group.
- Click the Wall Types button.
You will see the Wall Types editor.
- Click F5 New to create a new wall type.
- Set the following parameters:
- Name: Name of the wall type. The name has to be unique and will identify the type within the system.
- Description: Meaningful description. This description is shown in the overviews and should give you an idea of what this wall is about.
- Start Handicap Row / End Handicap Row: Start and end row of the handicap zone. Devices in this area are dispensed to customers who have been identified as disabled in some way, either by pressing the appropriate button in the Dispenser UI or by an entry in their customer data. The handicap rows should be located in the lower part of your wall.
- Threshold Available Devices: Minimum threshold of available devices on the wall. WDM will generate events, if the number of available devices in the wall will fall below this threshold.
- Threshold Offline Devices: Maximum threshold of offline devices on the wall. WDM will generate events, if the number of offline devices in the wall exceeds this threshold.
- Save your changes.
After adding the new wall type, you can use it to Setting up a New Wall.
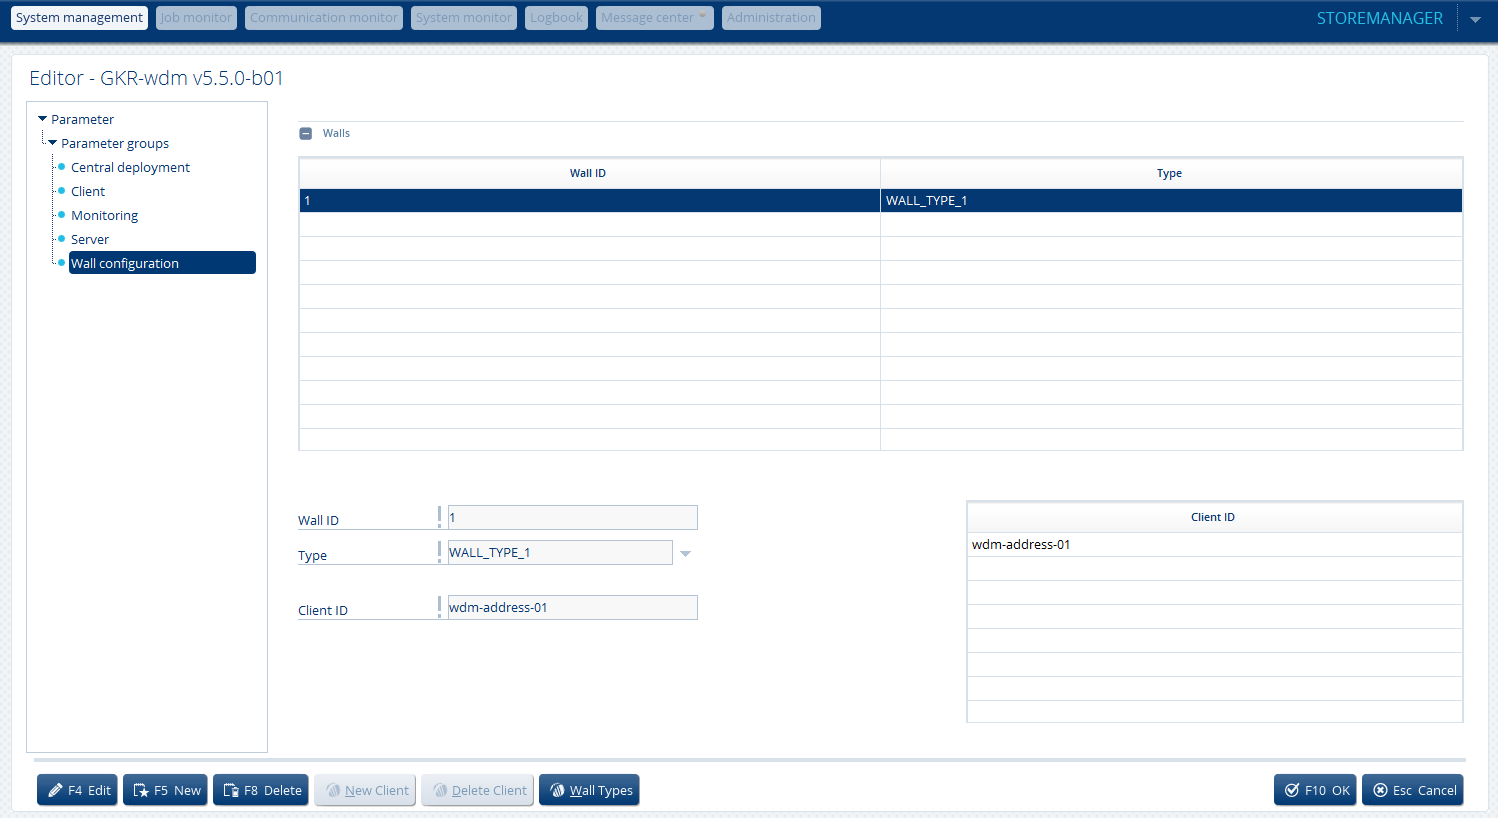
Setting up a new Wall
One WDM Server is able to operate multiple walls. To set up a new wall, you can use the corresponding GK/Retail Storemanager editor. This editor provides a user-friendly editing option for a complex XML structure.
- Log in to GK/Retail Storemanager.
- Select the structure element for the Wall Device Manager (system type
GKR-wdm) and double-click the appropriate
version.
You will see the User View of the editor for the Wall Device Manager.
- Switch to the Wall Configuration parameter group.
- Click F5 New to create a new wall.
-
Set the following parameters:
- Wall ID: A unique identifier for the wall.
- Type: Type of wall (for example, "WALL_TYPE_DISPOSAL" or "WALL_TYPE_1").
- Client ID: This is the IP or the hostname of the device dedicated to run the Dispenser UI. WDM will identify the calling device according to this data and deduct from that the wallID it is assigned to. You can assign multiple clientIDs if more devices will allow device dispensing for one wall.
- Save your changes.
Setting up the Server Address in the Client Configuration
To set up the server address, you can also use Storemanager:

- Log in to GK/Retail Storemanager.
- Select the structure element for the Wall Device Manager (system type
GKR-wdm) and double-click the appropriate version.
You will see the User View of the editor for the Wall Device Manager.
- Switch to the Client parameter group.
- Enter the address of the WDM Server.
- Save your changes.
You can validate the configuration by opening a Dispenser UI.