Take Away - Workspace
The following section provides an overview of the user interface of the take away mode.
The following screens are shown:
- Display Panel
- Operator Screen
- Entry Screen
- Tare Screen
- Payment Screen
Display Panel

The display panel contains the current weighing data of the scale. This includes
- tare weight
- net weight of the item
- price per unit of measure
- final price
Operator Screen
On the operator screen, it is possible to log in or out, activate your operator, and start or end the operator beak.
The operator screen is displayed automatically after the system user logs in. You can also switch from the entry screen to the operator screen.
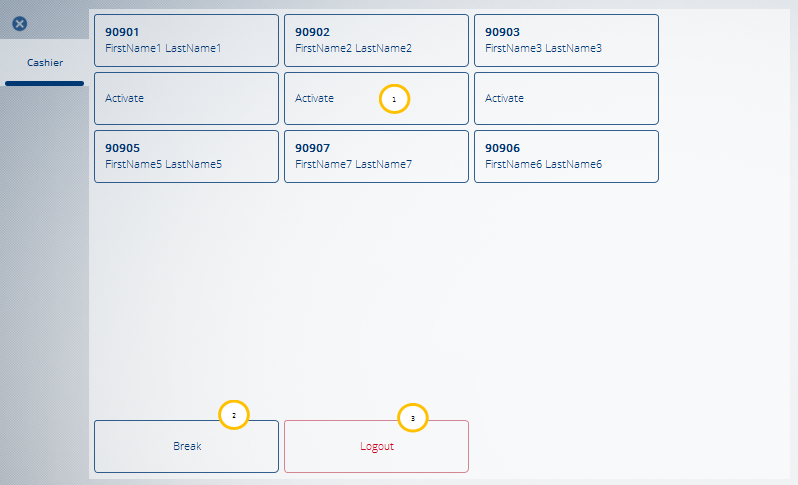
| No. | Component | Description |
|---|---|---|
| 1 | Operator buttons | Buttons of the users who are currently logged in to the POS Client. The buttons that are already active show information about the logged-in operator. The inactive buttons show the text "Activate". |
| 2 | Break | Starts and ends the operator break. |
| 3 | Logout | Logs the user out. |
Entry Screen
The entry screen is opened after you have logged in or activated your operator. On this screen, you can enter items and call other functions of the GK/Retail Omnichannel POS.

| No. | Component | Description |
|---|---|---|
| 1 | Menu, configurable | Includes functions of the GK/Retail Omnichannel POS. You can configure which functions to include in the menu. |
| 2 | Receipt Preview | Includes information on the entered items. |
| 3 | Input field | Input field for entering the item number via the numpad. |
| 4 | Quantity | Allows you to enter a quantity when entering piece items. |
| 5 | Void Line Item | Voids the selected item. |
| 6 | Tare | Switches to the tare screen. |
| 7 | Cancel Transaction | Cancels the current transaction. |
| 8 | Item | Calls the item search. |
| 9 | Operator | Switches to the operator view. |
| 10 | Total | Closes the item entry and switches to the payment screen. |
Tare Screen
The tare screen includes a range of functions for entering the tare weight. To switch to the tare screen, press Tare on the entry screen.

| No. | Component | Description |
|---|---|---|
| 1 | Direct buttons, configurable | For using fixed tare values. The type and number of direct buttons is configurable. |
| 2 | Tare Manually | For entering the tare manually. |
| 3 | Tare Weighted | Tare value reading by the load cell. |
| 4 | Tare Fixation | For fixing the tare value. |
Payment Screen
To go to the payment screen, press Total on the entry screen. This screen includes a range of functions for completing the purchase process.

| No. | Component | Description |
|---|---|---|
| 1 | Menu, configurable | Includes functions of the GK/Retail Omnichannel POS. You can configure which functions to include in the menu. |
| 2 | Receipt Preview | Includes information on the entered items. |
| 3 | Cancel | Cancels the payment process and returns to the entry screen. |
| 4 | Cancel Transaction | Cancels the purchase process and returns to the operator screen. |
| 5 | EFT | Completes the payment process by means of an EFT device (terminal). |
| 6 | Cash | Completes the payment process by means of cash payment. |