
 Single Relation Editor
Definition
An interface accessed from the Relationship Editor, that opens in as a new tab in the portal work area, by which the content administrator can modify the relation between two business objects.
Use
Access the Single Relation Editor for a specific relation either by double‑clicking the desired square in the relationship matrix area of the Relationship Editor, or selecting the relation and choosing Edit.
A result set returned by navigation among portal iViews that are based on back-end business objects, depends on the relationship between a source and a target object. The Single Relation Editor enables the content administrator to apply conditions to the relations between these business objects, further filtering the results returned by these iViews, in order to return information as relevant as possible for the user’s role.
Structure
The Single Relation Editor is divided into three parts as shown in the following illustration:
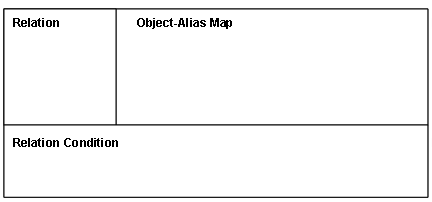
Following are details explaining the parts of the Single Relation Editor.
Single Relation Editor Structure
Title |
Description |
Relation |
Displays and allows editing of basic relation information: · Type – when opened displays the relation type as shown in the relation matrix of the Relationship Editor. The type automatically changes to manual as soon as a change is made to the relation. · Weight – field for editing the weight of the relation. For more information, see Defining Relation Weights · Relation Name – field displaying the name of the current relation. Open the drop-down list in the event of multiple relations between the two objects, and choose the desired relation. Use the buttons at the top of this section as follows: · New – creation of new relations between the current objects · Rename – if desired, renaming of relations as convenient · Delete – deletion of the current relation · Reset – clearing of all modifications done in the entire editor and reverting the direct relation, as derived from the back-end application. This button is active only for relations for which the source and target objects have a direct relation, even if that relation is currently in the background, having been deleted. In the event of multiple relations, select or clear the Default Relation checkbox at the bottom of the section to specify whether or not the selected relation is the default. |
Object-Alias Map |
A table in which aliases are mapped to instances of business objects from which data is returned. A single object may have a number of aliases, depending on the number of times instances of that object are used. Each instance of each object involved in the relation, is mapped to its own unique alias. Each instance is equivalent to an instance of the object in the FROM clause of a query. The columns of the table are as follows: · Selection column with radio button for each row · Type – containing an icon indicating the role played by the object instance in the relation. The type refers to: ¡ source – the object from which the relation begins A, in an A to C relation ¡ target – the destination object of a relation C, in an A to C relation ¡ bridge – an intermediary object needed to complete a relation B, in an A to B, B to C relation (A to C via B) · Object – containing the object name of the specific instance · Alias – containing an unique identifier for the object instance Below the table are the following buttons: · Add Alias – adds an additional instance of business object for the one displayed in the currently selected row of the table. The alias of the newly created object instance is generated automatically. · Remove Alias – removes the selected object instance · Set as Representative Alias – specifies that the selected instance represents the object for the purpose of relation resolving. If more than one instances of the source and/or target objects exist, it is the responsibility of the content administrator to select as representative the most relevant instance. Source, bridge, and target representative aliases: During runtime, it is the representative source instance, in the first of a series of relationships, that will be filtered according to the dragged value. The representative target instance, in the last of a series of relationships, determines the object from which the output fields in the Select clause will be taken, in the event of pure SQL. Although in some cases, the parameters of a specific iView may determine the output fields, regardless of the representative alias.
The first or last in a series of relationships may refer to the first or last relation in an autocomplete chain of relations, or a single direct relation. In the middle of an autocomplete set of relations, the following holds true: The alias set as representative for the source object specifies which instance of the source object is to be used in a join clause when this relation is combined with another, and where the target object in the other relation is identical to the source object in this relation. (This is relevant only when the source object has more than one alias.) The alias set as representative for the target object specifies which alias of the target object is to be used in a join clause when this relation is combined with another, where the source object in the other relation is identical to the target object of this relation. (This is relevant only when the target object has more than one alias.) Adding a bridge object: Right-click on a business object in the Business Object folder of the Portal Content Catalog, and choose Add to Object-Alias Map. |
Relation Condition |
A set of drop-down selection fields in a row, representing a relation expression: · a source object selection field listing all the object contained in the object‑alias map · an attribute field for selecting a property of the preceding source object · an operator selection field · a target object selection field listing all the object contained in the object‑alias map · an attribute field for selecting a property of the preceding target object Use the Add button to the right of the selection fields to add conditions to the relation expression in the text field located at the bottom of the editor. The text field: The actual relation condition, or WHERE clause of the query, is determined by the contents of the text area below the row of selection fields. The selection fields are a convenience for adding conditions automatically, as are the buttons for parentheses, And, Or, and Not, located to the right of the text field. The text area may be edited manually as well. You may use expressions for adding SQL functions not covered by the tools of the editor. The text area can be a powerful and flexible tool. For more information on the use of expressions, see Editing Queries. |

The Single
Relation Editor is also accessible from the context of object-based navigation
in order to modify relations between source and target objects. When accessed
from the Object-Based Navigation Editor, the Relation part of the editor is
not displayed and the Object-Alias Map uses the entire width of the work area.
For more information, see  Object Based
Navigation Editor.
Object Based
Navigation Editor.

None of the unification services check the logic of the relationships in the context of the back-end applicatons, nor the performance of data navigation based on those relationships. Therefore, carefully plan and test relationships before implementing them.
Saving Changes
After editing a relation, you must choose Save at the top of the editor to apply your changes.
See Also
For information about relations, relation resolving, and automatic relations, see: