 Creating Service Files With the Service Wizard

Creating Service Files With the Service Wizard
Use
You use this procedure to create
service files with the service wizard.
If you are developing screen-dependent applications based on Web Transactions, it is best to create service files with the service wizard, but you can also
If you are developing screen-independent applications based on ITS Flow Logic, you must
create service files manually.Prerequisites
There must be a user in the R/3 System which your service is using.
Procedure
To create a service file using the service wizard:
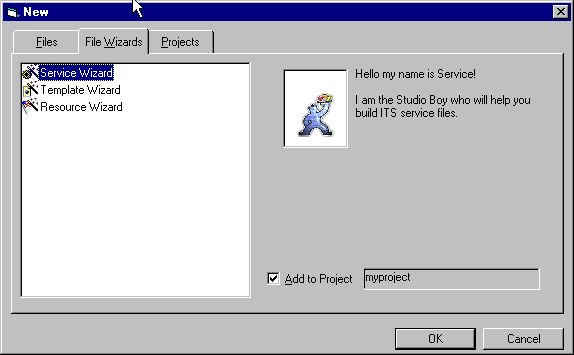
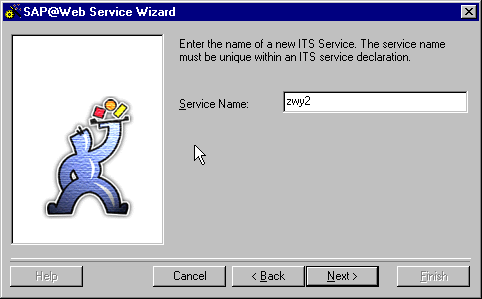
The service name can have up to 14 characters. This must be unique and should normally be the same as the corresponding R/3 transaction.
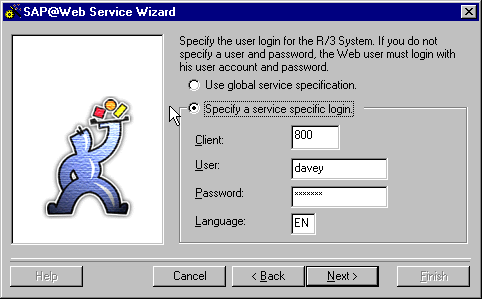
Logon information includes the client, user name, password, and logon language.
Specify whether you want to use global logon information or define service-specific logon information by selecting the appropriate option:
Option |
Procedure |
Use global service specification |
No action required. The logon information is taken from the global service file global.srvc at runtime. |
Specify a service specific login |
Enter service-specific logon information. You may wish to define a special user with limited authorizations for Web-enabled R/3 dialog transactions. This user must exist in the R/3 System. Alternatively, you can leave these fields blank and let users enter their own logon information. |
If you define service-specific logon information, remember that the language key must be:
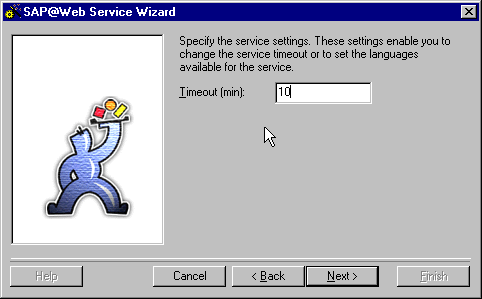
The timeout value defines the time (in minutes) after which the service terminates if no ITS session activity occurs. This is important in case the user branches to another URL without leaving the ITS session.
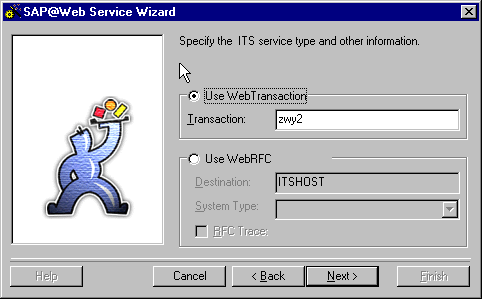
Specify whether you are calling an R/3 transaction or making WebRFC calls by selecting the appropriate option and entering the required information:
Option |
Procedure |
Use Web Transaction |
Enter the R/3 transaction name. |
Use WebRFC |
Enter the following information:
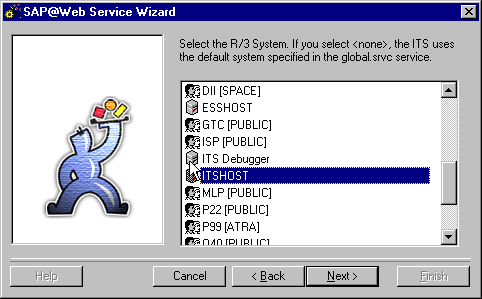
R/3 System to which you are connecting.
Target system type. The default is
Select this if you want to trace your communication protocol. |
Result
The SAP@Web Studio creates a service file called
<service>.srvc in the project directory and displays it as <service> in the Workspace – Project View.You can edit the parameter values specified in the service file with the
grid control editor. These values always override the default values in the global service file global.srvc .The SAP@Web Studio does not automatically create a theme for your new service and the service file does not contain a theme parameter, but the global service file
global.srvc initially contains the default theme parameter 99 . At runtime, this setting causes the system to search for HTML templates in a subdirectory called 99 . If the subdirectory does not exist, an error occurs. Therefore, when you create HTML templates for your service, the SAP@Web Studio automatically proposes the default theme 99 .When you have created a service file, you can
create HTML templates.