
 Maintaining Collection and Reorganization
Schemata (Standard Setting)
Maintaining Collection and Reorganization
Schemata (Standard Setting)

Use
Collection and reorganization schemata specify how long data assigned to this schema are to be stored in the Central Performance History (CPH) with which resolution. Predefined schemata are delivered with the CPH. These fulfill most requirements. You have two options for creating new schemata, or displaying or changing existing schemata:
· Use the expert setting (see Maintaining Collection and Reorganization Schemata (Expert Setting)).
· Use the standard setting described here.
In the standard setting, you cannot create new schemata from scratch. Instead, you can use an existing schema as a template for your own schema, by changing the storage period of the various aggregates. If you want to create your own schema, we recommend that you use one of the predefined SAP schemata as a template. You can recognize these templates, as they always have the prefix SAP. You will only have to use the expert setting in rare cases.
Procedure
...
1. You can call the standard setting for maintaining collection and reorganization schemata from several functions:
¡ In the overview screen of the CPH (transaction RZ23N), choose, in the Data Collection and Reorganization group box, the Maintain Schema pushbutton.
¡
On the Assign Collection and Reorganization Schemata screen (see Assigning
Collection and Reorganization Schemata to Performance Values), choose the
desired schema in the Collection/Reorganization Schemata subscreen, and
then choose Display Schema ( ).
).
¡
In the Alert
Monitor, with the maintenance functions activated, select a node, and choose
Collect MTE Class in Central Performance
History( ). A screen
displaying a list of the existing schemata appears. To display one of these
schemata, select the schema and choose Display Details ().
). A screen
displaying a list of the existing schemata appears. To display one of these
schemata, select the schema and choose Display Details ().
2.
In all of these
cases, the Display Collection and Reorganization
Schema screen appears. On this screen, you can see which
schemata exist. If you want to edit a schema or to create a new schema on the
basis of an existing schema, choose the desired schema by double clicking it,
and choose Display «
Change ( ).
).
3. The screen now has the following structure:
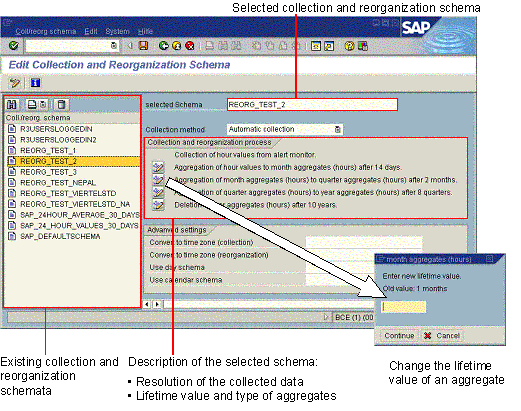
Creating or Editing a Collection and Reorganization Schema
4. At the left side of the screen, there is a list of existing schemata. The system displays the name of the selected schema in the Selected Schema field. If you want to use this schema as a template for your own new schema, enter the desired name in this input field.
5.
In the Collection and Reorganization Process group box, the
system displays the resolution of the data that is collected, and when it is
reorganized into which resolution. If you want to change one of these times,
choose Change Time ( ). The system displays a separate dialog box, in
which you can enter the new period.
). The system displays a separate dialog box, in
which you can enter the new period.
6. In the Advanced Settings group box, you can specify the time zone for the collection or the reorganization of the data and a day and calendar schema. For more information, see Aggregation, Day Schema, and Calendar Schema).
7. Save your entries.
Delete a Collection and Reorganization Schema
8.
Select the desired
schema and choose Delete Schema ( ).
).
9. Confirm the command.

If there are assignments for this schema, the system informs you of this. If you delete the schema despite this warning, the MTE classes that are assigned to this schema are no longer collected and are deleted from the CPH during the next run of the reorganization job.
See also:
Delivered Collection and Reorganization Schemata
 Central Performance
History of the Monitoring Architecture start page
Central Performance
History of the Monitoring Architecture start page