Create a Toolbar

Use
In certain forms, tables or other UI components, you may want to create a collection of buttons that initiate different actions in the workflow, such as adding a row in a table, displaying a popup window or closing a window. You can create a toolbar for a UI component on either the Layout board or the Design board.
Procedure
...
...
1. On the Layout board (recommended), right-click the edge of the UI component for which you want to create the toolbar and choose Create Toolbar from the context menu. Alternatively, you can click the Edit button to the right of the Toolbar field in the Configure Element task panel. The Create Toolbar Buttons dialog box is displayed.
2. At the bottom left, click the Add (plus) button and in the Button name field at the top, enter a name for the button.
3.
In the middle
section of the dialog box, click the  (Add) button to create an
action:
(Add) button to create an
action:
¡ A „system action“ is a predefined event, such as closing a window or inserting a row. All the available system actions are displayed in the popup menu when you add an action.
¡ A „custom action“ is a specialized action that you define, by choosing Custom action from the popup menu and entering a name for it in the Action Name column of the new row.
4. To the right of the action list, choose the values you require for that action:
○ From the Apply to drop-down list, select either Self (the component in which the button resides) another UI component in which the event should be activated (if any).
○ From the Validation drop-down list, choose None for no validation of that action, or Self, Element or Window to what item should be validation.
5.
To create a
sequence of actions for the selected control, add other actions and order them
using the  (Move Up) and
  (Move
Down) buttons.
(Move
Down) buttons.
6. If needed, add other buttons by repeating steps 2 through 5.
7. Click OK.
8. You may wish to change the order of the buttons in the layout once you have finished defining the toolbar.
9. Return to the Design board and, if necessary, rename the various connecting lines according to the event names assigned to the Custom Action buttons, respectively.
Result
At runtime, a toolbar of buttons is displayed at the top of the UI component. Each button initiates a different action.
Example
This toolbar was created for an output grid, enabling the user to add and delete lines, and scroll through the list of records:
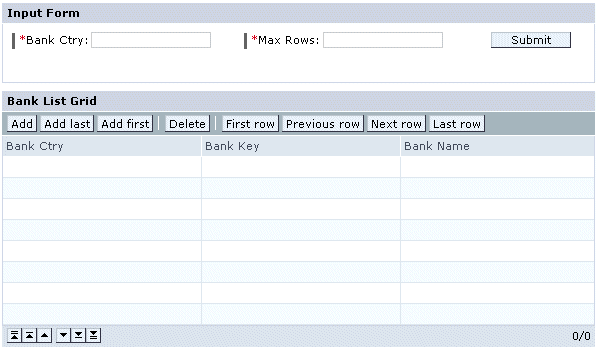
The buttons were created as system actions, as follows:

 Try this!
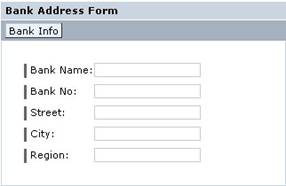
You can create a button that links to a URL by creating a hyperlink and embedding the URL in a formula. Say, for example, you want to enable the user to display information about a bank that he selects from a table of banks.
...
1. Create the BanksA iView described in Adding a Data Service for Choosing Banks.
2. On the Layout board, right-click the Bank Address Form and choose Create Toolbar from the context menu. The Create Toolbar Buttons dialog box is displayed.
3. Add a button and name it Bank Info.
4. Define a System action, choosing Hyperlink from the System action drop-down list.
5. Click the Formula button to the right of the Hyperlink address field. The Hyperlink address (Expression Editor) dialog box is displayed.
6. To create the URL for a browser search – such as in Google – first run the search in a separate browser window and copy the URL text up to the specifics of the search.
7. Paste the copied text into the text box of the dialog box, placing it within quotation marks.
8. Expand the Operators node at the bottom of the list of expression types and double-click the & (concatenation) sign. Then expand the Data Fields node and double-click on the BANK_NAME field. Check your expression; it should look similar to the following:

9. Click OK and click OK in the Create Toolbar Buttons dialog box.
10. Your toolbar should look similar to the following: