
 Adding a
Data Service for Choosing Banks
Adding a
Data Service for Choosing Banks

Use
In this example, you add a second data service to the model, to serve as input for the iView. The user will be able to input a country in the input form and select from a list of banks in that country. You also add a sort operator to sort the results returned by the first data service.
Prerequisites
You have created the model in Creating the Base Model and it is open in Storyboard.
Procedure
...
1. Copy-and-paste the first iView. This will retain your original version for future modeling.
a. Go to the Design board and at the top level (SecondExample) of your model, select the BanksA icon and copy it (clicking the Copy button in the main toolbar or by choosing Edit → Copy).
b. Paste the iView onto the workspace and rename it BanksB (using the context menu).
2. Open (drill down into) the BanksB iView and add a second data service:
a. Click the Find Data button in the task-panel toolbar and drag BAPI_BANK_GETLIST onto the Design board at the left. You may have to move the existing elements to the right first.
b. You can test the functionality of the Bank Getlist data service (choosing Test Data Service from the context menu) using US, DE or GB as input to the Bank Ctry field and any number for the Max Rows field.
3. Define the input to the new data service by dragging out from the Input port of Bank Getlist and choosing Add Input Form. The fields between the form and the data service are mapped automatically.
4. Define the output from the data service:
a. Because the data from the Bank Getlist data service should serve as input to the existing Bank Getdetail data service, the Input Form connected to the Input port of Bank Getdetail is not needed. Select it and delete it.
b. Add a sort operator:
...
a. Drag your mouse out from the Bank List output port of Bank Getlist and from the context menu, choose Sort Data. The Sort operator is added to your model.
b. Double-click on the operator to display the Configure Element task panel.
c. At the bottom of the task panel, click the Add (plus) button and from the drop-down list in the Sort by column, select BANK_NAME, to indicate that the list should be sorted alphabetically according to bank name. In the Direction column, leave the up option (meaning that the list will be sorted from A to Z).
c. Add the table view:
...
a. Drag from the output port of the Sort operator and choose Add Table View from the context menu.
b. In the Table title field of the Configure Element task panel, rename the newly-added table view icon: Bank List Table.
c. All of the fields from the Bank List output port of the Bank Getlist data service will be channeled through the Sort operator to the input port (in) of the Bank List Table. By default, all of the fields are selected for display. This is indicated in the table at the bottom of the Configure Element task panel.
d. Map the output table to the input of Bank Getdetail:
e. Drag out from the out port of Bank List Table to the Input port of Bank Getdetail.
f. Double-click the select line. A list of fields is displayed at the bottom of the Configure Element task panel. In the BANKCOUNTRY row, click in the Assigned Value column, and from the drop-down list, select the corresponding field name. This maps the input field of the data service (Input Field column) to the field that is output from the table (Assigned Value column). Do the same for the BANKKEY field.
g. Click the Input port of the Bank Getdetail data service and select the BANKKEY row. Deselect the Required checkbox at the bottom. The data service will not require that field as input from the table.
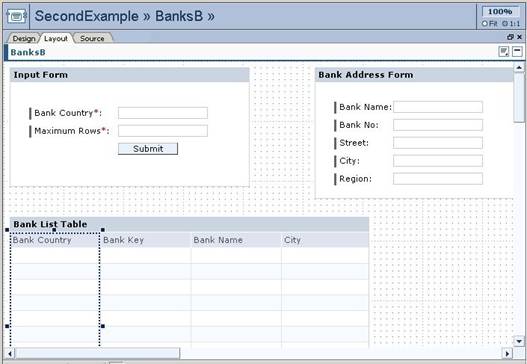
5. Rearrange the iView layout by clicking the Layout tab and making the changes you require. You should move the new Input Form to the top left, the Bank Address Form to the top right and the Bank List Table up beneath the Input Form. You may want to change the field labels as well.
6. Save the iView. It should look similar to the following:
7.
Deploy the
iView by clicking the Deploy
Model (  ) button
in the toolbar.
) button
in the toolbar.
8. Export the model (choose Model → Export to File), saving it on your hard disk for subsequent use in this example.