
 Modeling Hierarchies

Use
If you have an active hierarchy in an SAP BI query, you can model display and limited navigation of the hierarchy into your Visual Composer model.
Visual Composer's table view element does not support a tree display, which is typically required for hierarchy navigation. You can work around this and support limited hierarchy navigation by modeling and programming drill actions into a table view toolbar with the use of the SAP BI Web Design API.
Prerequisites
Visual Composer reads a hierarchy setting saved in an SAP BI query to know that a hierarchy is enabled and active for a characteristic. In the BEx Query Designer, make sure the Activate Hierarchy Display setting is enabled in the characteristic properties and saved in the query before you proceed.
For more information about the BEx Query Designer, see the online documentation at:
http://help.sap.com → SAP NetWeaver Library → SAP NetWeaver by Key Capability → Information Integration by Key Capability → Business Intelligence → BI Suite: Business Explorer → Query Design: BEx Query Designer
Procedure
...
Model the basic elements:
...
On the Find Data Services task panel, select the SAP BI system in which your query is located, and find the query that contains the hierarchy-enabled characteristic.
Note that for each hierarchy-enabled characteristic, two additional fields are created in the Result folder for an SAP BI query:

CHARACTERISTIC_node_level provides the value for the hierarchy node level of the selected row. The root node is level 1.
CHARACTERISTIC_node_status provides the value that corresponds to the hierarchy node drill state:
E - expanded
C - collapsed
L - leaf node
Select the query itself and drag it to the workspace (see Using a BI System as a Data Service).
In the workspace, connect a start point to the query's Input port.
Connect a table view to the Output port, and select the fields you want to display in the table. Make sure that your hierarchy-enabled characteristic is selected as one of the fields (you do NOT need to select the special *_node_level and *_node_status fields).
Add drill buttons to the table view:
Next, model the two buttons that will perform hierarchy navigation.
Double-click the table view to access the Configure Element task panel.
Select Show in the Toolbar dropdown list to enable toolbar display for the table.
Click Edit to edit the toolbar.
In the Create Toolbar Buttons dialog box, click Add Button and create two buttons with the following settings:
Button name=Drill Down
Action type=Custom action
Custom action=DRILLDOWN
Button name=Drill Up
Action type=Custom Action
Custom action=DRILLUP
Click OK to save the toolbar with the new buttons and close the dialog box.
Program the drill down action:
In Storyboard, drag a line to connect the Out port of the table view to the Input port of the query.
Select this line, and in the Configure Element task panel, select drilldown from the Event name dropdown list.
At the bottom of the task panel, select the Assigned Value column next to the WEBAPI field, and from the dropdown list, select Enter formula.
In the Assign Value dialog box, enter the Web Design API commands that will drill to the second hierarchy level and at the same time filter by the selected hierarchy node.
Start with this formula as a template:
(Note: There is a space after FILTER_COLLAPSE)
Replace the three instances of CHAR_TECH_NAME with the technical name for your characteristic.
CHAR_key represents the key of the currently selected characteristic member. You replace this with your value, prefixed with the ID of the table view, by using the data fields provided:
Expand the Data Fields node, then expand the Output Table node.
Drag the key field of your hierarchy-enabled characteristic into the text editor and place it in the correct location in the formula.
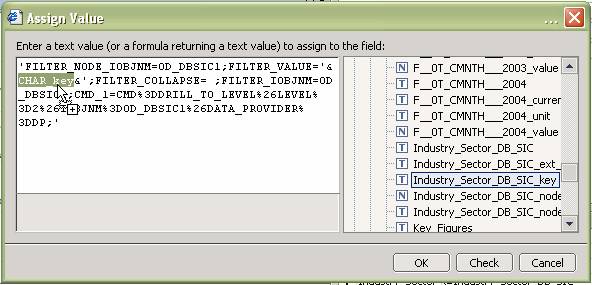
Click Check to validate the formula, and if valid, click OK to save the changes and close the dialog box.
Program the drill up action:
Repeat step 3 to create a drill up event. At step 3.d, use the Web Design API command to drill to the level of the currently selected hierarchy node, without filtering.
Start with this formula as a template:
Just as with the drill down commands, replace CHAR_TECH_NAME with the technical name for your characteristic (it appears in one place).
CHAR_node_level represents the node level of the currently selected characteristic member. Replace it with the right node level field of your table view:
Expand the Data Fields node, then expand the Output Table node.
Drag the node level field of your hierarchy-enabled characteristic into the text editor and place it in the correct location in the formula.
When your model is complete, with the commands modeled for both drill down and drill up, the Storyboard looks something like this:

Result
In runtime in the portal, the application looks something like this:
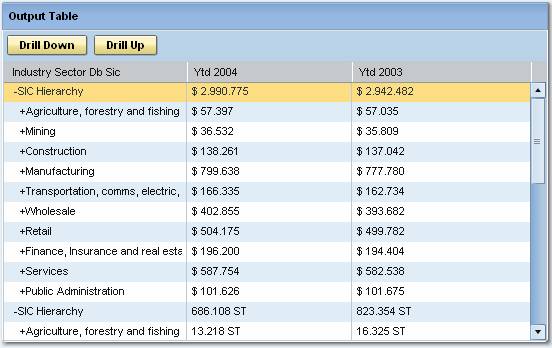
Hierarchy nodes are displayed using indentation and special flags for drill states:
Root nodes: Aligned fully left
Subnodes: Indented
Nodes that are expanded: Prefaced with "-"
Nodes that are collapsed: Prefaced with "+"
To drill down, select a node that is collapsed (prefaced with "+"), and click the Drill Down button:

The node expands and its subnodes are displayed beneath it:

You can continue drilling down into collapsed subnodes until they are fully expanded:

To drill up, select an expanded node (prefaced by "-") and click the Drill Up button. You can continue drilling up until all nodes are collapsed.
Using SAP BI Web Design API commands in procedures similar to the above, you can build additional hierarchy support into your model. For example, you can add a button that drills to level "X" (where you provide an input field for "X").