Adding a Second Data Service

Use
In this example, you enhance your Flight Reservation application by adding a second data service that retrieves the flight information based on a selection in the flight list.
Prerequisites
· You have created the model as described in Creating the Basic Model and it is open in Storyboard.
· The following data service is available from the system:
¡ BAPI_SFLIGHT_GETDETAIL
For
more information about configuring access to data services, see
 Defining
Destinations.
Defining
Destinations.
Procedure
...
1. Import a second data service to the model:
a. With the model open on the Design board, click the Search button in the task-panel toolbar.
b. Drag BAPI_SFLIGHT_GETDETAIL from the search results onto the Design board. (If BAPI_SFLIGHT_GETDETAIL is not already displayed in the search results, search for it as described in Creating the Basic Model.
2. Define the input to the second data service:
a. To enable the user to select a flight and display all of its details, the table created in the first example (Flight List table) must serve as input to the second data service (Bapi_sflight_getdetail). Therefore, connect the out port of the Flight List table to the Input port of Bapi_sflight_getdetail.
b. Right-click the select connecting line, and from the context menu choose Map Data.
c. In the Map Data dialog box, map the output fields of the Flight List table to the corresponding input fields of the data service, as follows:
Target Field |
Assigned Value |
Airlinecarrier |
Carrid |
Connectionnumber |
Connid |
Dateofflight |
Fldate |
d. Click Close.
3. Define the output from the second data service:
a. Drag out from the FLIGHTDATA output port on Bapi_sflight_getdetail, release, and from the context menu choose Form View. The Define Data dialog box is displayed.
b. Choose the following fields to be displayed in the form by clicking the Deselect All button and then clicking in the first column of the dialog box for each required field:
§ Arrtime
■ CarrID
■ Currency
■ Deptime
■ Fldate
■ Planetype
■ Price
c. Click Close.
4. Right-click the form and choose Rename. Change the form name to Flight Details.
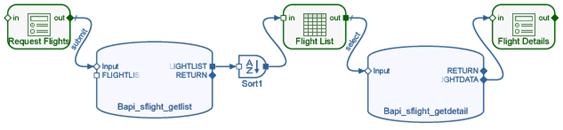
5. Save your model. It should look similar to the following:
6. Rearrange the form layout:
a. Click the Layout button and then click the Configure button in the task-panel toolbar.
b. Click the edge of the Flight Details form to select it.
c. Drag for form handles to resize the form to display all of its controls.
d. In the Label field, rename each of the form field labels as follows:
Original Field Label |
New Field Label |
Currency |
Currency |
Planetype |
Plane type |
Fldate |
Date |
Price |
Price |
Arrtime |
Arrival |
CarrID |
Airline |
Deptime |
Departure |
e. Arrange the form fields into two columns. Select the form, and in the Configure task panel, in the Columnsdropdown list, select 2.
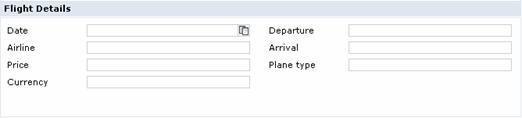
f. Drag and drop the fields to rearrange them so that they look similar to the following form:
7. Save the model.
8. Deploy the application:
a. Click the Deploy button in the task-panel toolbar.
b. Click the Deploy button in the Deploy task panel.
9. In the Results area of the Deploy task panel, expand the node of the development component you created, expand the Web Dynpronode, and click the Flights link under the Html or Flex node to run the application. Check that you can search for and select a flight, and display details about the selected flight.
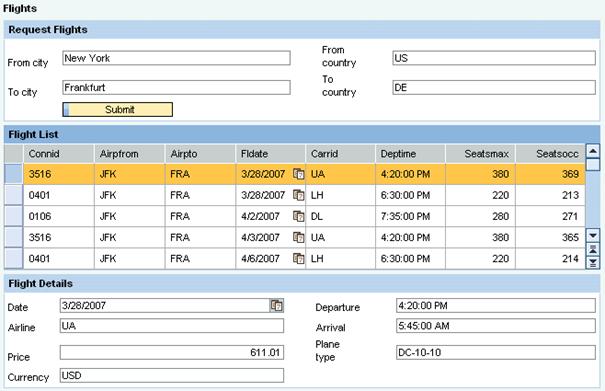
Result
The runtime application enables you to search for all flights on a specific route, then select a specific flight and display additional information for that flight. It should look similar to this: