
 Creating the Basic Model

Use
In this lesson, you create an application in which you can search for and display flights on a specific route.
Prerequisites
· You have access to the IDES system.
● You have been mapped to a user of the SAP back-end system.
● The following data service is available from the system:
¡ BAPI_SFLIGHT_GETLIST
For
more information about configuring access to data services, see
 Defining
Destinations.
Defining
Destinations.
Procedure
...
1. Begin by creating a model:
a. Choose Model → New.
b. In the Create New Model dialog box, choose the Composite View model type.
c. In the Name field, enter the name Flights for the model.
d. In the Development Component field, choose the location in which you want to save the model. If a development component does not exist, create one in the local repository as described in Creating a Model and Development Component.
e. Click OK. The Design board is displayed with an empty canvas to start adding your model content.
2. Define the model as an application:
a. Click the Configure button in the task-panel toolbar.
b. In the Configure task panel, make sure that the Define as application checkbox is selected.
Defining the model as an application means that you can run the model directly from a link in the Deploy task panel after deployment.
3. Import the data service:
a. Click the Search button in the task-panel toolbar.
b. In the Search in dropdown list, choose the IDES system (the source of the data that we need), such as IDES_R3.
c. In the Search for field, enter bapi_sflight.
d. In the Type field, make sure that Bapi/RFC is selected.
e. Click Search. A list of all data services matching the search string is displayed
f. Drag BAPI_SFLIGHT_GETLIST onto the workspace.
4. Test the functionality of the Bapi_sflight_getlist data service:
a. Right-click the data service icon and from the context menu, click Test Data Service. The Test Data Service (Bapi_sflight_getlist) dialog box is displayed.
b. Select the Input node, and enter the following field values:
§ Fromcity: New York
§ Fromcountrykey: US
§ Tocity: Frankfurt
§ Tocountrykey: DE
c. Click Test. The information for all flights to Frankfurt from New York is displayed.
d. Click Close.
5. Define the input to the data service:
a. Drag out from the Input port of Bapi_sflight_getlist, release and from the context menu, choose Form View. The Input Form icon is added to the Design board.
b. Right-click the icon and choose Rename. Change the form name to Request Flights.
6. Add a Sort operator to sort the results returned by the data service:
a. Drag out from the FLIGHTLIST output port of Bapi_sflight_getlist, release, and from the context menu choose Sort Data. A Sort operator is added to your model.
b. Right-click the Sort operator icon, and from the context menu choose Define Operator.
c. Click the Add Row (+) button, and in the first row in the Sort By column, select Fldate from the fx dropdown list.
d. Click the Add Row (+) button, and in the second row in the Sort By column, select Deptime from the fx dropdown list.
e. In the Direction column, choose Up for both rows
f. Click Close.
These settings specify that the flight list should be sorted chronologically by flight date and time.
7. Add a table view as output from the data service:
a. Drag out from the output port of the Sort operator icon, and from the context menu choose Table View. The Table icon is added to the Design board.
b. Right-click the icon and choose Rename. Change the table name to Flight List.
All of the fields from the FLIGHTLIST output port of Bapi_sflight_getlist are channeled through the Sort operator to the in port of the Flight List table. By default, all of the fields are selected for display in the Flight List table.
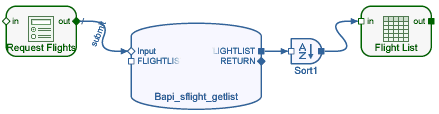
8. Choose Model → Save. At this stage, your model should look similar to the following:
9. Lay out the controls of the Request Flights form:
a. Click the Layout button.
b. Streamline the form by deleting the following controls (select each control on the Layout board and press the Delete key):
■ Airlinecarrier
■ Afternoon
■ Maxread
c. Rearrange the controls:
i. Select the Request Flights form and click Configure in the task-panel toolbar.
ii. In the Columns dropdown list, choose 2. This arranges the controls into two equal-width columns.
iii. Drag and drop the controls on the Layout board to reorder them as follows:

d. Change the control labels by selecting each control and choosing the Configure button in the task-panel toolbar at the right. In the Label field, change the label of each control as follows:
Original Label |
New Label |
Fromcity |
From city |
Fromcountrykey |
From country |
Tocity |
To city |
Tocountrykey |
To country |
10. Select the form and drag its side handles to resize it to fit the new controls layout.
11. Save the model.
12. Deploy the application:
a. Click the Deploy button in the task-panel toolbar.
b. Click the Deploy button in the Deploy task panel.
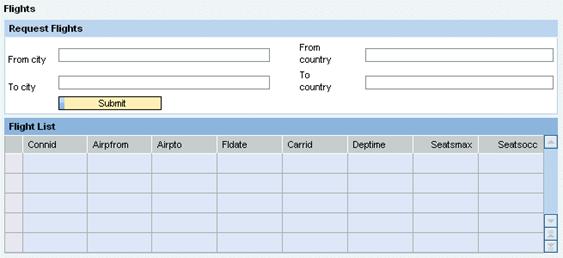
13. In the Results area of the Deploy task panel, expand the node of the development component you created, expand the Web Dynpronode, and click the Flights link under the Html or Flex node to run the application. It should look similar to this:
14. Test the runtime application using the following values:
○ From city: New York
○ From country: US
○ To city: Frankfurt
○ To country: DE
15. Export the model and save it to your local file system:
a. Choose Model → Export. The Export dialog box is displayed.
In the Model name field, the name of the open model is displayed, in the format <development component>/<model name>.
b. Click Export. The File Download dialog box is displayed.
c. Click Save.
d. In the Save in dropdown list, navigate to the folder to which you want to export the model and click Save. The model files are exported to a zip file with the same name as the model, under the folder you selected.
e. Click Cancel to close the Export dialog box.
Result
The runtime application enables you to specify the start point and destination of your flight route, and display a list of all flights that meet the specified criteria.
When you search for a flight, the application should look similar to this:
