Running Local Quality Checks with the ATC
Here is how to use the ABAP Test Cockpit (ATC) to run local quality checks of your ABAP repository objects. You run a local quality check in your development system.
Do the following, starting from one of the ABAP Workbench editing transactions (SE80, SE24, SE37, SE38, SE11, and so on):
Select the repository object to check.
In SE80, the Object Navigator, you can select an object from the navigator panel, on the left of the screen.
Tip: Put the cursor on a package to select the package and all of the objects in its package hierarchy for the ATC check run.
In all other transactions, all that you need to do is type the name of an object in the start screen. Or you can start an ATC run from the editor that is offered by the transaction (including SE80).
Start the ATC check run.
In the navigator panel of SE80, choose Check > ABAP Test Cockpit from the context menu.
Otherwise, choose Check > ABAP Test Cockpit from the object menu. That is the left-most menu in the menu bar.
Result: The ATC starts a check run. It shows you the progress of the run in the SAP GUI status line. When the run is finished, the ATC shows you the result automatically.
Work with the ATC result.
There are no problems? Then the ATC reports that all checks passed.
Otherwise, the ATC presents a list of findings, or problem messages. Priority 1 and 2 findings usually must be corrected; findings with these priorities can otherwise cause problems in a program. Your QM will tell you what the correction policy is in your organization.
Double-click on a finding to open the message details. Or click on the link in the Object Name column to edit the object. The editor opens at the location of the problem that the ATC found.
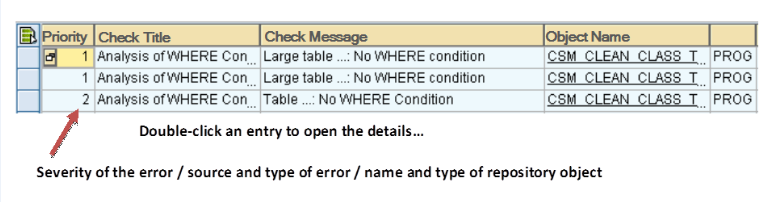 Figure 1: ATC Results List
Open the Details to see exact information on the problem. Details also offers documentation explaining the problem and lets you apply for an exemption if necessary.
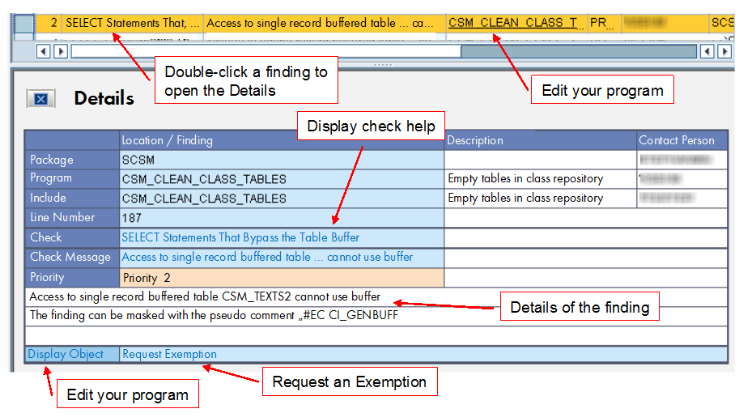 Figure 2: The Details Display for a Finding
On the Details screen, you can do the following:
See the details of the finding
Click on the Check or Check Message fields to display documentation on the finding and how to correct it
Click on the Display Object link to open an editor at the location of the problem
Click on Request Exemption if you cannot correct a problem or it is a false positive, and you need an exemption for the finding.
Depending upon how central ATC monitoring has been set up in your organization, you may not be able to apply for an exemption for a local finding. In general, you should apply for exemptions only when you are working with the current active ATC result.
Your corrections (after you transport them) and exemptions (if they are approved) are mirrored in future editions of the central ATC results.
After you have corrected a problem, you can retest it.
In the Open Findings list, mark one or more findings that you wish to retest. Choose Check Again or Check Again ... from the context menu.
The ATC re-runs all checks of the object or objects whose findings you have selected.
The new display — ATC: Differences to Previous Result — shows changes in the status of findings with a traffic-light display in the first column of the list. If your correction was successful, then the corrected finding is shown with a green icon.