
 Embedding Component Interface Views in a View
Set
Embedding Component Interface Views in a View
Set 
Procedure
To display two instances of the Web Dynpro component ImageComp in the embedding Web Dynpro component MainComp, you must first declare two component usages. You can then embed both instances of the Web Dynpro component ImageComp in the inner view set by using the corresponding component interface views.
Defining Component Usages in the Data Modeler
...
1. Choose the node TutWD_ViewComposition_Init à Web Dynpro à Web Dynpro Components à MainComp.
2.
In the
context menu, choose  Open Data Modeler.
3.
In the
Data Modeler toolbar, choose  Embed an existing component.
4.
Position the mouse pointer in the  Used Web Dynpro Components area
and click the left mouse button.
Used Web Dynpro Components area
and click the left mouse button.
· In the dialog box that appears, make the entries shown in the table below and choose Finish.
Component Usages |
||
Name |
Used Web Dynpro Component |
Lifecycle |
LeftImageCompInst |
ImageComp |
manual |

According to the Web Dynpro naming convention, component usages are named with the suffix Inst for Instance. The name of a component usage is different from the name of the corresponding Web Dynpro component in the same way that the name of an object instance differs from the name of the instantiated class.
5. Define the second component usage called RightImageCompInst in the same way, but with the lifecycle property createOnDemand instead of manual.
Note the different selection of the Lifecycle property. The instantiation of used Web Dynpro components for createOnDemand is executed automatically by the Web Dynpro runtime environment as soon as the corresponding component interface view is visible for the first time in a view assembly. However, if the Lifecycle property is set to manual, this task is the responsibility of the application developer.
In the Web Dynpro Explorer, the defined component usages of the component ImageComp are represented by two additional nodes.

Figure 1: Display of Two Defined Component Usages in the Web Dynpro Explorer
Embedding Component Interface Views in a View Set
In this next step, you use the two defined component usages to enhance the existing view composition with the two corresponding component interface views.
6. You have opened the Navigation Modeler for the Web Dynpro window MainComp.
7.
In the
toolbar, choose  Embed a view.
8. Position the mouse pointer in the Left view area and click the left mouse button.
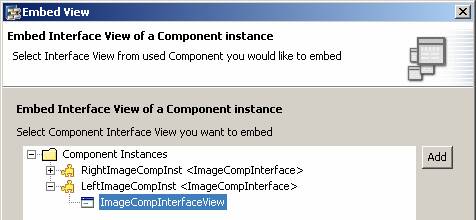
9. In the dialog box that appears, select the Embed Interface View of a Component instance radio button and choose Next.
10. In the Embed View dialog box, choose Component Instances à LeftImageCompInst à ImageCompInterfaceView and choose Finish to confirm.
11. Repeat steps 8 to 10 to embed another component interface view, provided by the second component usage RightImageCompInst, in the Right view area.
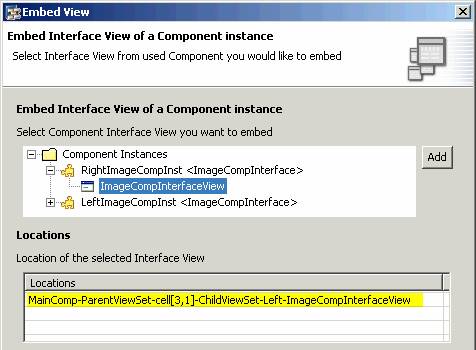
12. In the Embed View dialog box, choose Component Instances à RightImageCompInst à ImageCompInterfaceView and choose Finish to confirm.
The Locations table displays all occurrences of a component interface view within the current modeled view composition.
 .
.
Defining Navigation Links
To complete the part of the view composition modeled in the inner view set, you use the next step to define three navigation links and also embed an additional EmptyView.
13. In the Navigation Modeler, add a new EmptyView to the ChildViewSet – Right view area. Then, in the Properties perspective view, assign the property default = true to this view.
14. In the Navigation Modeler, declare the following navigation links:
Navigation Links |
|||
Start View |
Outbound Plug |
Target View |
Inbound Plug |
CompControlView |
ShowLeftCompOut |
LeftImageCompInst. ImageCompInterfaceView |
Default |
CompControlView |
ShowRightCompOut |
RightImageCompInst. ImageCompInterfaceView |
Default |
CompControlView |
ShowEmptyViewOut |
EmptyView |
ShowEmptyView |
The plug name is displayed in the Navigation Modeler as a quick info.
|
|

Result
You
can now deploy the application and call it in the Web browser by calling the
context menu for the node TutWD_ViewComposition_Init à Web Dynpro à Applications
à ViewCompositionApp
and choosing
 Deploy new archive and run.
The lower part of the browser window displays the CompControlView view, where you can create and delete the left component instance and display and hide the right component instance.
Remember that both component usages were embedded using different Lifecycle properties. Whereas the left underlying component usage is based on the Lifecycle value manual, the component usage belonging to the right interface view has the Lifecycle value createOnDemand. In the latter case, the image component is instantiated automatically by the Web Dynpro runtime environment as soon as the corresponding interface view is visible in the view assembly. Where Lifecycle = manual, the component interface view is only displayed in the view assembly when an active component instance exists for the component usage.

 Next step:
Controlling the Lifecycle of a Component Instance