 Print Setup
Use
This section informs you about the various options available for formatting a report list specially for printing. You can change the content of the report (which lists and which characteristics you want to print) as well as the layout (page breaks, underscores, and so on).
You initially define the print layout when you define the report (under the menu option
Extras
→
Print setup
). However, if you later wish to change the print settings, you can do this from the report list under the menu
Report
→
Print setup
.
Activities
You can make the settings for printing in the form definition, the report definition, and the displayed report list:
In the
form definition, you can select the rows and columns to be printed in reports that use this form by choosing
Extras
®
Drilldown printout
. Then you can display the drilldown list as it will be printed to check your settings.
In the
report definition, you can make the settings by choosing
Extras
→
Print setup
or on the
Output
and
Options
tab pages.
If you want to change the print settings later, you can do this from the
report list by choosing
Report
→
Print setup
.
These settings are only relevant for
mass printing (
Report
→
Print
, then
Mass print drilldown list
or
detail list
).
Print setup®Drilldown and detail lists
The functions found here let you set up the layout for both the drilldown and the detail list.
Mass print settings
The function
Mass print settings
lets you make settings that determine the size, content and layout of your mass printouts:
Sort characteristics
Set level of detail
Insert page breaks
Hide totals rows
Note that the functions for sorting characteristics and setting the level of detail and page breaks are dependent on one another. For example, you can set a page break after those characteristics that lie above the deepest level of detail. Consequently, you cannot sort all the characteristics again once you have set the deepest level of detail, because this could possibly invalidate the settings you made for page breaks.
Sort characteristics
lets you determine in which order the characteristics should be sorted for the printout.

The sequence of the characteristics in a report will depend on what you want to report on. For example, if you were primarily interested in the key figures for the individual sales organizations of a company code, you would place the characteristic "Company code" first and "Sales organization" second. On the other hand, if you want to see the key figures for the various company codes in each sales organization, "Sales organization" should be the first characteristic and "Company code" the second.

It is not possible to sort the characteristics which were specified in the form. Consequently, these characteristics are inactive in the sorting list (see the characteristic "Controlling area" in the graphic).

Changing the sort order of the characteristics for printouts does not change their order in the report definition. Consequently, the way the report appears on the screen is not the same as the printout.
The function
Level of detail
lets you specify how far (down to which characteristic) the system should "drill down" for the printout. The characteristics below that level are disregarded. In some cases this can reduce the size of your printout considerably.
If you only want to drill down for the first characteristic, you must select "No page break" in the
Page break
column.
The page break lets you structure your report so that it is easier to read. For example, if your report contains the characteristics "Controlling area", "Company code" and "Sales organization", you can set a page break at the company code level. This means that a new page will begin for each new company code (see also Example: Mass Print Drilldown List ).
It is recommended that you set the page break as high up in the sequence of characteristics as possible to keep the volume of the printout as small as possible.
You can hide certain totals rows of your report, either dependent on or independent of whether the totals row contains the same value as that of the next level of the hierarchy. If you choose
cond.
, the system will not print the totals for that characteristic if the same totals appear for the characteristic above it in the drilldown hierarchy. If you choose
uncond.
, the system does not print any of the totals for that characteristic.
Other Settings
You can also make a number of
Other settings
to determine the layout of your printed report.
You can decide whether the system should print the
Report parameters
, the
Header
, the
Footer
, and the
Title page
. You can maintain the header, footer and title page in the same submenu.
The header appears at the top of every printed page, while the footer appears everywhere where you explicitly defined the
Page break
.
These settings apply for both mass prints and report lists as displayed on the screen.
In the
Hierarchy sorting
box you can decide whether each totals row should appear above (
Descending
) or below (
Ascending
) the figures that make up that total. For hierarchical lists, this also determines whether the hierarchies are to be sorted in ascending or descending order.
If a report contains more columns than can fit on one page, you can decide whether the system should print row by row or several rows together. By default, the system prints several rows.
Print row by row
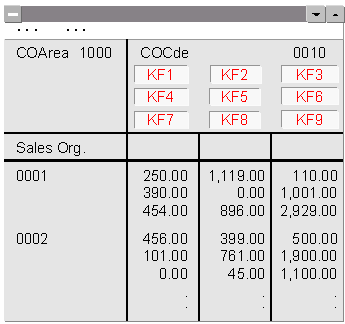
If you print a report row by row, the system groups together as many columns as it can side by side on one page. Consequently, the key figures for one row (here the characteristic value "Sales organization 0001") are spread out over several pages.

Print several rows
If you choose
Print several rows
, the columns (here the key figures 1 through 9) are printed below one another in different rows instead of next to one another. This makes it possible to print all the columns on one page. This setting is especially useful if you want to compare a large number of key figures for the same characteristic value at one glance.
Note that if you choose to print several rows, the column header takes up more space on the page, thus reducing the amount of space available for the actual data. This becomes even worse if you have also defined a header or footer for the report.
To prevent the header from taking up the entire page, the system automatically switches to row-by-row printing if the column header reaches more than six lines.
Format disp. on/off
lets you decide whether or not to print the number format that you defined for the report. You define the number format in the same menu using the function
Number format.
The number format includes the number of decimal places displayed as well as the display factor (10s, 100s, 1000s, and so on). It also determines whether "-" (minus) signs should appear before or after the number, or whether they should appear in parentheses.
If you select the
Expand all hierarchy nodes
box, the system prints all nodes of the hierarchy list in expanded form. If you do not select this field, the system prints the hierarchy list in a way so that no information is displayed more than once.
You can define the number format and total rows display for the online list separately in the
Settings
menu.
You can also display and hide the header and footer separately in the
Settings
menu.
Print layout®Drilldown list
The functions listed here are not suited for printing detail lists due to their predefined layout. Consequently, they are only available for printing drilldown lists.
Print preview
This function lets you see the effects of your print settings on the screen without having to print it out each time. The system first displays the report parameters, so that you can verify them once again.
Totals rows
This option lets you insert underscores and blank rows before or after totals rows. For underscores, you need to enter the characters that you want to appear for the underscore. You also need to enter the number of blank rows (up to 9).
In the field
Order
you can specify whether you want the underscore to appear before or after a blank row.
In the dialog box you can also define the color and intensity in which you want the characteristics to appear.
You can make all these settings separately for each characteristic.
Print setup®Column width (drilldown)
These functions let you decide how the column width for the printout should be determined.
If you choose
Optimal
, the system determines the appropriate width dynamically. The optimal column width depends on the size of the window and the size of the numbers to be printed in the individual columns. Thus you can influence the column width by making your window larger.
Set
means that you can enter a set width for each type of column (quantity or amount columns). If you have not set a column width, the system uses a default of 10 characters.
Set to default
sets the width of all the columns to the default width.
See also: