 Creating a Project with Template
Creating a Project with Template
Use
The organizational structure of the project results from the use of the work breakdown structure (WBS). You have already created a standard template during the initial system implementation phase, which you can use when you create the project using the Project Builder. The project is structured only by using WBS elements.
The Project Builder offers you a simple introduction to using the Project System and integrates all of the specific functions required to process the project. Not only can you maintain all of the data for a project structure in the Project Builder, you can also carry out Easy Cost Planning and trigger the Execution Services.
You can find a detailed description of the functions in the standard documentation for the Project System via Structures ® Project Builder.
 Project Builder
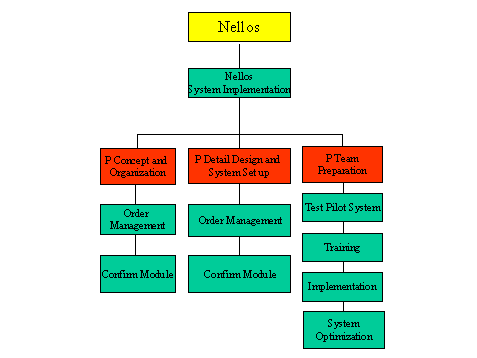
The following graphic shows you the structure of the project "Nellos". The later cost planning is carried out for those WBS elements indicated as a planning element (P).
Prerequisites
You have maintained the standard project I/0002 in your system.
Procedure
Menu path |
Accounting ® Project System ® Project ® Project Builder |
Transaction code |
CJ20N |
On first accessing the Project Builder a dialog window appears giving you information about the subsequent user-specific settings that need to be made.
The dialog box Project Builder: User-specific options appears. Here you can specify both the general settings and also which project elements you will need as templates, for example Standard templates.

You can change the user-defined settings at any time by choosing Settings ® Options.
You access the Project Builder. The screen is divided into three areas: In the top left area you are given an overview of the structure of the project you have created (in the following structure tree). Beneath this is the worklist and template area. The actual work area is on the right side of the screen.
Field |
Data |
Project definition |
I/00XX (where XX stands for any two figure number) |
Project profile |
Cost projects |
Std. proj. def. |
I/0002 |
The system creates the project and displays the structure in the screen area Structure tree. In the work area the system opens the detail screen for the project definition.
Field |
Data |
Start date |
(The current date) |
Finish date |
The current date + 3 Months |
The system displays the detail screen in the work area. The WBS element is flagged as a planning element and an account assignment element (operative indicators).
Result
The system creates the project. In the Project Builder you can find the project in the screen area Worklist under Last projects processed. In the following you plan the costs.
Planning Costs using Easy Cost Planning