 Business Scenario Editor
Use
You use the Business Scenario editor to display and change Business Scenarios. You can visualize the process flow of a Business Scenario using an interactive graphical work area and assign additional objects that define the exchange of messages.
Prerequisites
You have created a new Business Scenario or have opened an existing one.
For more information about creating objects in the Integration Builder, see the Creating a New Object section.
For more information about opening objects in the Integration Builder, see the Object Editors section.
Features
The Business Scenario editor comprises a header area and a graphical work area.
Header
The header contains the following information about a Business Scenario:
· Name
The name of a Business Scenario is unique within a namespace and is not language-specific. Blanks and special characters are not permitted in the name of an action. The name of the Business Scenario is defined when you create it and cannot be changed in the Business Scenario editor.
· Namespace
The namespace of the Business Scenario is defined when you create it and cannot be changed in the Business Scenario editor.
· Description
In this field you can enter a short description of the Business Scenario in the language you logged on in.
· Status
Displays the status of the object. For more information, see the Object Editor section of this documentation.
Graphical Work Area
Using the interactive graphical interface you can visualize the process flow of the Business Scenario and assign all the objects required. The structure of the Business Scenario editor is shown schematically in the following graphic. It also includes the various context-sensitive areas and the most important functions that can be called from the context menu.
Business Scenario Editor Graphical Work Area and Context-Sensitive Areas
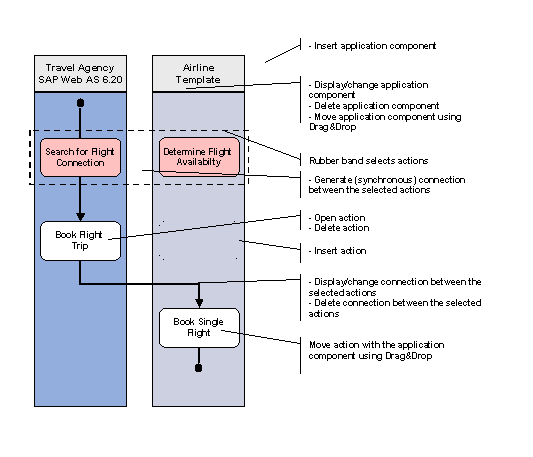
The Business Scenario objects are represented in the Business Scenario editor as follows:
· Application components are portrayed as colored vertical columns. The colors of the columns are defined according to color conventions.
· The application component column has a header where the role, the name of the product (with release), and the extended name are displayed.
· Actions are portrays as white rectangles within an application component. The vertical progression of actions from top to bottom corresponds to the logical process flow.
· Sequences are shown as vertical lines with an arrowhead beside the subsequent action. The sequence determines the order in which the actions are executed.
· Synchronous connections are shown as horizontal lines with an arrowhead at each end. The two actions involved are on the same level in the graphic. This shows that the actions that are connected by such a connection are synchronized chronologically.
· Asynchronous connections are shown as bent lines with an arrowhead beside the subsequent action. The two actions involved here are not on the same level in the graphic. The subsequent action must be beneath the source action. This shows that the actions that are connected by such a connection are independent of each other and are not synchronized chronologically.
Functions for Assigning Objects and Defining a Connection
To assign Business Scenario objects, call the functions specified below from the context menu. To call a function, position the cursor on a particular area within the Business Scenario. The individual context-sensitive areas are represented in the Business Scenario (see above). To call the editor to display or change an object, double-click the object in question in the Business Scenario.
Functions for Application Components
· Context: Graphical area is empty
¡ Insert Application Component
· Context: Application component (colored column):
¡ Display/change application component
¡ Delete application component
Functions in Actions
· Context: Application component (colored column)
· Context: A selected action
· Context: Multiple selected actions:
Functions for Connections
· Context: Two selected actions
¡ Create a connection between two selected actions
¡ Display/change a connection between two selected actions
¡ Delete a connection between two selected actions
Functions of the Graphical Editor
· See functions of the graphical editor.
Further Functions
· Create documentation for a Business Scenario
· Printing and exporting the Business Scenario
