
 Processing Area:
Case
Processing Area:
Case

Definition
Screen area on which you can create and process cases.
Use
You can use a case to map and control the decision processes in the system, which affect a particular business transaction. You manage the documents connected to this process in the case. You also control the process by including predefined process routes or ad hoc-defined process route changes (processing transaction) for decision-making and completing cases.
Structure
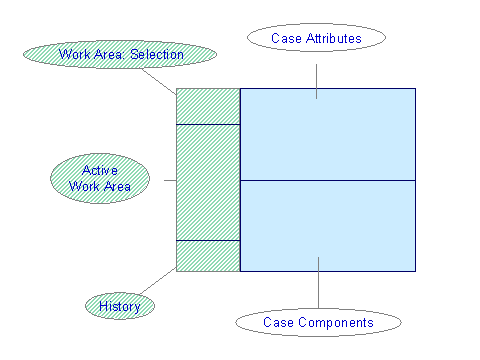
The processing area for cases is divided into two screen areas Case Attributes and Case Components.
If the electronic desk is
shown too using  Display Desk, the screen areas,
Work Area: Selection, Active Work Area and History are
displayed.
Display Desk, the screen areas,
Work Area: Selection, Active Work Area and History are
displayed.
In the
area Cases Attributes, you can select all the functions that affect the
case (such as  Print) in the function bar.
You select the individual case components in the function bar in the area Case Components. All functions that can be executed for each component are displayed in this screen area.
Case Attributes
The attributes of the document are displayed in this area. The attributes of a case are defined for each case type in Customizing. Some attributes are automatically evaluated by the system, you can evaluate all other attributes, but an entry must be made for some attributes, for others not (for example, Created by). There is input help available for some attributes such as Status.
You
can hide the attributes to use the whole screen for displaying a case
component. Select  Attributes for this. To show the
attributes again, select
Attributes for this. To show the
attributes again, select  Attributes.
Case Components
Process Route
You
select this component in the function bar  Process Route. In this component, you
define which employees are involved in processing cases. You can define the
processing type for each employee (for example co-signature) and define
whether the cases should be processed sequentially or in parallel. You can
insert the employee either sequentially
(
Process Route. In this component, you
define which employees are involved in processing cases. You can define the
processing type for each employee (for example co-signature) and define
whether the cases should be processed sequentially or in parallel. You can
insert the employee either sequentially
( Insert Sequentially) or in
parallel ( Insert Parallel).
Insert Sequentially) or in
parallel ( Insert Parallel).
The employees entered in the process route receive
a Work Item
in the folder New Cases  of their
worklist on the electronic desk for processing the case.
of their
worklist on the electronic desk for processing the case.
Contents
You select this component in the function bar  Contents. In this component, all
documents relevant to the case are displayed in the case container. You can
navigate directly to the display of a document by double clicking on
it.
Contents. In this component, all
documents relevant to the case are displayed in the case container. You can
navigate directly to the display of a document by double clicking on
it.
· Yellow Nodes
The node  Non-Sorted Elements is a type of
register folder and contains all documents that are already assigned to cases,
but have not yet been sorted into the required order. You can drag and drop
the non-sorted documents to the node Documents to sort them correctly.
The node Documents contains
all documents in the sequence required.
Non-Sorted Elements is a type of
register folder and contains all documents that are already assigned to cases,
but have not yet been sorted into the required order. You can drag and drop
the non-sorted documents to the node Documents to sort them correctly.
The node Documents contains
all documents in the sequence required.
· Gray Nodes
The gray nodes are placeholders for inserting documents in the cases (Non-Sorted Elements) and for storing them in the order you want for each document (incoming post item and document). You can also see which documents can be inserted in this place in the column Element Type. You can use the context menu of a node to select activities that can be carried out for these documents.
· Colored Nodes
Colored nodes are objects that have been inserted already. You can navigate to the display of these objects by double clicking.
Memos
You
select this component in the function bar  Memo. This component is divided into
two screen areas.
Memo. This component is divided into
two screen areas.
All memos that have been created for this case (including memos created by other employees) are displayed in the upper screen area.
You can enter new memos in the lower screen area.
Key Words
You select this component in the
function bar  Key Words. You can define key
words for the case in this component. Choose
Key Words. You can define key
words for the case in this component. Choose  Insert Key Words. You goto the
key word catalog which is structured in hierarchies. You can select and copy
one or a number of key words by double clicking. If free entry of key words is
allowed, you can assign your own key words for the case. However, these key
words are not saved in the key word catalog.
Insert Key Words. You goto the
key word catalog which is structured in hierarchies. You can select and copy
one or a number of key words by double clicking. If free entry of key words is
allowed, you can assign your own key words for the case. However, these key
words are not saved in the key word catalog.
Logs
You
select this component in the function bar  Log. In this component, a list is
displayed with all activities that have bee carried out for the
case.
Log. In this component, a list is
displayed with all activities that have bee carried out for the
case.