
 Creating a New Web Dynpro
DC
Creating a New Web Dynpro
DC

To implement a Web Dynpro application as a development component using the JDI (Java development infrastructure), you first require a corresponding development component project in the Developer Studio. Using the following instructions, you will become familiar with all the steps required to create an initial project framework, using a wizard, for a new DC project of the type Web Dynpro.
Prerequisites
· You have launched the SAP NetWeaver Developer Studio.
· You have imported the relevant development configuration into the Developer Studio. For more information, refer to Importing Development Configurations.
· You have a user for logging on to the JDI.
Procedure
To create a new DC and to check in the corresponding activity into the DTR, proceed as follows:
Logging On to the JDI
...
1. Provided you have not already done so, open the Development-Configurations Perspective through the menu path Window → Open Perspective → Other... → Development Configurations.
If you are not logged on to the JDI, the entry  OFFLINE appears in the Repository view
(Active DCs, Inactive DCs).
OFFLINE appears in the Repository view
(Active DCs, Inactive DCs).
2.
Choose
the icon from the toolbar in order to log on to the
JDI.
A logon window is displayed.
3. Enter your logon data and choose OK to confirm.
After you have logged on, the Repository view displays the imported development configuration.

Creating a Development Component Project of the Type Web Dynpro
4. Choose the Inactive DCs view and specify the relevant software component.
5. From the context menu for the software component, choose Create New DC.
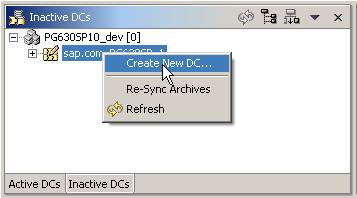
A wizard window appears where you can specify the general properties of the DC project.
6. Specify the DC project to be created.
Property |
Description |
Vendor |
Globally unique vendor ID. We recommend that you derive this ID from the vendor’s Internet domain (example: sap.com). |
Name |
Globally unique component name. Select the first segment of the name from the list box and enter the second segment according to the rules for component names. For more information, see Component Names. |
Caption |
Name by which the DC will be identified in visual tools |
Language |
Original language used to name UI elements belonging to the DC |
Domain |
ID of the development area (bank components, controlling, and so on) for which the new DC is to be created. |
Local Development Component |
Identification of the DC as a local DC. Activate this option only if the DC project is not to be checked into the DTR but is to be created locally only. In this case, there is no assignment to a DTR activity. However, you can assign the resulting local DC to project processing of an activity at a later point. |
Synch Used Archives |
Activate this option if you want to add a standard set of archives to be used by the DC to be created. The respective DC archives are then synchronized from the DTR and added to the new DC project. |
Type |
Choose Web Dynpro. |

7. Choose Next.
8. Leave the other settings unchanged and start the creation of the project with Finish.
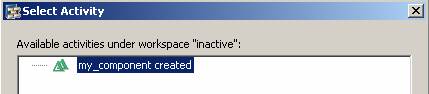
Since all the changes so far have not yet been assigned to any DTR activity, the DTR Activity dialog window appears now.
Assigning a DTR Activity

Activities are used to combine versions that belong together. Therefore, do not use any activity that already exists and belongs to another DC.
9. In the displayed Select Activity dialog box, choose New Activity...
10. For the new activity, enter a descriptive name under Display Name and add a Description.

11. Choose OK to confirm.
12. Select the new activity you created.
13. Choose OK to confirm your selection.
14. Choose Next and then choose Finish in the next window.
The wizard generates a new Web Dynpro DC project. As soon as generation is complete, the Web Dynpro Perspective is opened automatically.
Checking the Development Component into the DTR
15. In the Web Dynpro perspective, add the Open Activities view by choosing Window → Show View → Other... → Design Time Repository → Open Activities.
16. Expand the tree display and choose the Checkin option for the selected activity from the context menu.


Normally, you will check in your activity into the DTR only at a later point, that is, after generation of certain development steps that belong together.
17. Define your new template in the dialog box that appears and choose OK to confirm your entries.
Result
You have created a new Web Dynpro DC and checked in the project sources in your inactive version into the DTR.
The logical project structure of the relevant
project is displayed in the Web Dynpro Explorer. Unlike a local
project, an additional node  DC
MetaData is generated in this case. Here you enter all details that are
especially relevant for handling DCs (used DCs, public parts, and so on). The
generated project name is derived from the DC name as follows:
<Development Configuration>~<Development
Component>~<Vendor>.
DC
MetaData is generated in this case. Here you enter all details that are
especially relevant for handling DCs (used DCs, public parts, and so on). The
generated project name is derived from the DC name as follows:
<Development Configuration>~<Development
Component>~<Vendor>.
From now on, the Web Dynpro Explorer is your main starting point for all further development activities.