
 Test Environment

Use
You can check whether a complete message mapping functions at runtime once you have described it, by using the Test tab page. For this purpose, the mapping editor generates, compiles, and then executes Java source code for the message mapping.

The Integration Builder cannot yet access the value-mapping table at this point. When using the ValueMapping function (Conversions category), the value mapping is merely estimated as text output in the test results.
Prerequisites
The defined message mapping must be complete. This means that each mandatory target field must be assigned to one or more source fields. Furthermore, there must not be any unassigned arguments when using functions.
To test mapping programs in the Enterprise Services Repository, users require the role SAP_XI_ADMINISTRATOR_J2EE, SAP_XI_CONTENT_ORGANIZER_J2EE, SAP_XI_CONFIGURATOR_J2EE, or SAP_XI_DEVELOPER_J2EE.
Features
The following figure provides an overview of the different areas of the test environment:
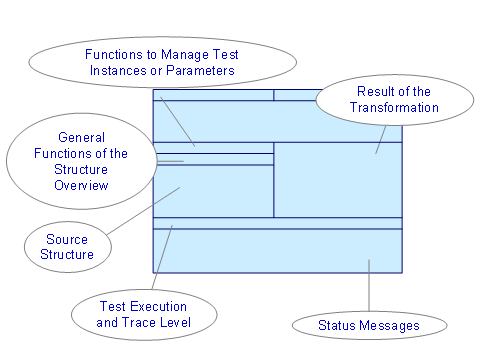
On the left-hand side, you can use the tab pages to switch between the test instance (Document tab page) and additional parameters (Parameters tab page).
Test Instances
To execute a message mapping, you require a test instance in XML that is valid according to your description of the source structure (in XSD or XML). The mapping editor generates this test instance automatically when you switch to the Test tab page for the first time.
General Functions for Test Instances
Function |
Use |
|
Loads an XML instance from a local file. |
|
Generates an empty XML instance that you can enhance easily (see below). |
|
Formats the XML document (indents, line breaks). |
|
Removes all fields from the structure of a test instance that are not used in any target-field mapping. |


You can edit the XML instances to use them in different test instances:
● Using the editor for the text view. You can manually edit elements and attributes or their values here. Use CTRL C, CTRL X, and CTRL V respectively to copy, cut, and paste parts of an XML instance.
● Using the context menu in the (Tabular) Tree View. You can copy subtrees, delete nodes, and add elements and attributes. In the tabular tree view, you can also enter values for fields in the Value column.
See also: Structure Overview
Header Parameters
The mapping runtime sets some constants that the mapping programs can use to evaluate header fields in the source message. You can query these in graphical target-field mappings by using the constants sender and receiver (see: Standard Functions), or in reused Java mappings of user-defined functions.
At design time, the mapping runtime constants are not available. For test purposes, however, you can set these constants on the Parameters tab page (located at the bottom of the Test tab page). The various data records for test parameters are managed in the same way as test instances (see below).
Managing Test Instances
Once you have loaded, generated, or entered an XML instance in the mapping editor, you can save the instance. The Integration Builder archives test instances together with the message mapping as a ZIP file. This means that you can ship test instances together with your message mapping.
Depending on the size of the source structure, XML instances can be extremely large. We recommend that you ship a maximum of three test instances together with one message mapping.
Trace Level
At runtime of a message mapping you can create messages for a trace in user-defined functions (see: AbstractTrace Object). Furthermore, if you have set the trace level to Debug, the message mapping runtime writes information for error analysis to the trace. To display trace messages in the text window for status messages in the test environment, you must select a trace level before the test.
Trace Level |
Outcome |
No Trace |
No information about the trace is displayed. |
Warning |
Trace messages are displayed that you have written to the trace by means of the addWarning() method. |
Information |
Trace messages are displayed that you have written to the trace by means of the addInfo() method. |
Debug |
Trace messages from the message mapping runtime and so on are displayed that you have written to the trace by means of the addDebugMessage() method. |
All |
All trace messages displayed |
Activities
...
1. Switch to the Test tab page and then to the Document tab page located at the bottom of the page.
On the Test tab page, the left-hand side is used to view the Source XML Instance and the right-hand side to view the result of the transformation (Target XML Instance). You have the same search and display options as for the Definition tab page, see: Structure Overview.
2. Load or generate a source instance, or enter an instance in the mapping editor, and use the functions described above to enhance the instance further.
If you have loaded an XML instance into the mapping editor, you use a copy of the instance and not the original when enhancing it in the mapping editor.
3.
To save the
XML instance, choose Add Test Instance
( ). Once you
have saved a test instance you can open it again in the Open Test Instance (
). Once you
have saved a test instance you can open it again in the Open Test Instance ( ) menu.
○ Saved test instances are included in the menu and can be opened from there.
○ You can save or delete changed test instances that you have loaded.
4.
To test your
mapping using the XML instance, choose Start Transformation ( ), which is located under the displayed
test instance.
), which is located under the displayed
test instance.
Result
If you are testing the message mapping for the first time or have modified it since the last test, the mapping editor compiles the generated Java source code. The result of the transformation is displayed on the right-hand side. Any errors that occurred during compilation are displayed in the lower text frame for Status Messages. An error may occur because a user-defined function was not syntactically correct, for example. To delete all status messages, position the cursor within the text frame and from the context menu choose Delete Messages.