
 Creating
Barcode Data
Creating
Barcode Data

Use
Each project has only one scanner node. The scanner node may have more than one data node (data group) and each data node may have multiple barcodes, displayed in the input area under "Barcodes:". Each barcode has information such as symbology, alias, data, and check digit.
Because the scanner emulator cannot scan real barcodes, all barcode data must be entered into a project before doing any scanning emulation.
Prerequisites
The scanner peripheral panel is displayed.
Procedure
...
1.
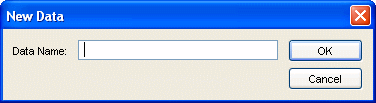
Create a new Data group by pressing the
 button. The New Data dialog box will be
displayed and prompt the user to input the name of this Data group.
button. The New Data dialog box will be
displayed and prompt the user to input the name of this Data group.
2.
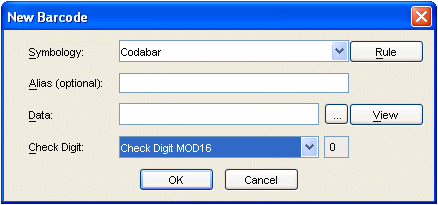
Create a barcode record for the selected
Data group by pressing the  button. The New Barcode dialog box is launched
and prompts to input information for the barcode.
button. The New Barcode dialog box is launched
and prompts to input information for the barcode.
...
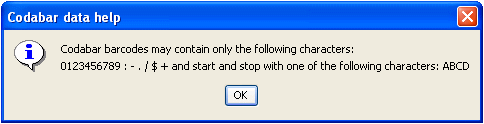
a. Select the required Symbology.

Each
symbology has its own set of rules for data. You can press the  button to show the data rules.

Below is the rule window for Codabar:
b. Input Alias (optional). This will help identify each barcode.
c. Input the barcode data.
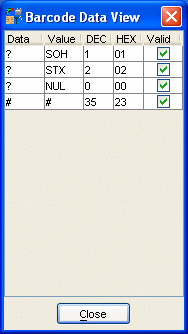
The user can
press the  button to launch the Barcode Data Entry dialog
box and get help entering valid characters. The Barcode Data Entry displays
all of the supported (valid) characters for the selected symbology. The user
can select any character, including non-printable characters, and press the
Enter key to send the character to the Data field in Barcode dialog. The same
result can be accomplished by double clicking on the desired entry. The target
position of the chosen character, in the data field, is at the last cursor
position when the button was clicked.
button to launch the Barcode Data Entry dialog
box and get help entering valid characters. The Barcode Data Entry displays
all of the supported (valid) characters for the selected symbology. The user
can select any character, including non-printable characters, and press the
Enter key to send the character to the Data field in Barcode dialog. The same
result can be accomplished by double clicking on the desired entry. The target
position of the chosen character, in the data field, is at the last cursor
position when the button was clicked.
By using the
button, the user can insert non-printable
characters as part of the barcode data.

Any
non-printable character will be displayed as “?” in the Data field
of Barcode Dialog. To see complete information behind each character, the user
can press the  button to display Barcode Data View.

The barcode data entry panel works with Unicode. If the ALT+CODE combination (where CODE refers to a number combination) is used, to input data directly from the keyboard, a 4-digit code (Unicode) is required. Remember to add a leading zero when entering ASCII characters. Otherwise, the incorrect character is produced.
The following screenshot is an example for a Code128 barcode.
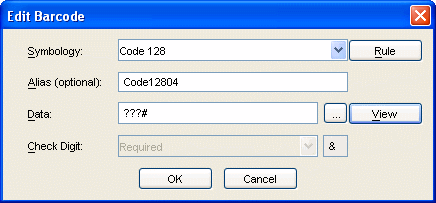
d. Set Check Digit option if it is required. The value of the check digit will be generated automatically based on the option.
The calculation of French CIP check digit for Code 39 is an approximation that may differ from the actual check digit.
e. Press OK to save and Cancel to quit.
3. Repeat step 1 and/or 2 until all desired barcodes have been created.
4.
Save the project by pressing  button.
Result
All data including data list and barcode list are stored in project file.