
 Creating a Database Table and Data
Elements
Creating a Database Table and Data
Elements

Before discussing the theory, let us first look at an example that displays how simple it is to program in ABAP. The aim of the development is to have a small program that stores names on the database, finds them again, and lists them on the screen. The first thing you require is a database table in which the names can be stored.
Creating a Database Table – Part 1
You create a database table in ABAP by creating the metadata for it in the ABAP Dictionary (SE11).
...
1. In the start window of the ABAP Dictionary, Choose the option Database table, enter MYTABLE as the name of the table you want to create, and choose Create.
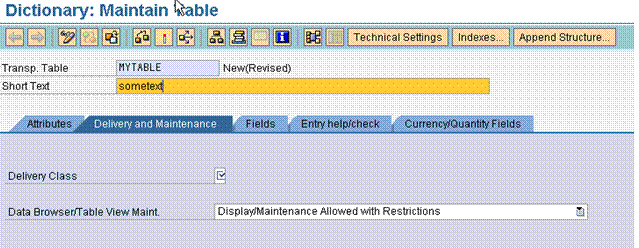
Enter a short description. In the remainder of the tutorial, you need to enter a descriptive text if the corresponding field is highlighted in pale yellow. This is no longer specially mentioned.

2. On the next screen, enter an A for Application Table in the field Delivery Class. Under Databrowser/Table View Maint, choose the entry Display/Maintenance Not Allowed. Otherwise the table could be enhanced at a later time ad you would have to observe the rules for enhancing structures according to Unicode checks.
3. Under the Fields tab, enter the table fields.
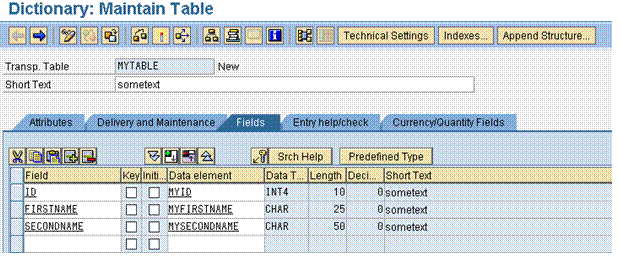
Name the key field of the table ID by marking the Key column. Name the two other fields FIRSTNAME and SECONDNAME. You must assign a data element to each field. In ABAP, a data element is an unstructured data type that also contains semantic information describing the content of the field. You can create such a document through forward navigation.
4. Enter MYID as data element for the ID field in the first row.
Creating Data Elements
...
1. When you perform a double-click, you are asked whether you wish to store the data you have entered. Confirm this. You will come across this dialog often during the remainder of the tutorial, but this description will not make special mention of this. Confirm in all these cases.
2. In the next dialog box, confirm that you want to create a data element.
3. In the Short Text field, choose a descriptive text.

4. Select Predefined Type and enter INT4. The length will be generated by the system later when you activate the data element.
You can access a data element in any program system-wide. The database data type is automatically mapped to the corresponding ABAP types.
Switch to the Field Label tab and enter the values listed on the screen below.

If your data element is represented as a table column on the UI, for example, the column heading is taken from these field labels.
5. Save your data by clicking the icon Save and, in the first dialog box that appears, choose Local Object. This means that this table cannot be transported into another system.
6. Now activate the data element by clicking the icon Activate. After you have activated it, the data element is available system-wide.
7. In the same way, create the data types MYFIRSTNAME and MYSECONDNAME using forward navigation. Choose CHARChar with length 25 as the data type for the first name and CHAR with length 50 for the last name. Choose a label of your choice. If you overwrite the lengths allowed, the system will let you know this.
8. Using the blue arrow, navigate back to table MYTALE and complete the table as described in the next section.
Creating a Database Table – Part 2
...
1. Press the Technical Settings button.

2. Type in APPLO as data class and 1 as size category.
3. Under Buffering, choose the selection Buffering not allowed. Another choice could define that individual rows or the entire table would be buffered upon access.
4. Save the table. When you do this, you will be requested to enter an enhancement type.
5. Choose the option Cannot be enhanced. In this way you decide whether and how the table can be enhanced later on with additional fields. In this particular case, you have decided that the table cannot be enhanced.
6. Choose Local Object and activate.
As soon as you have activated the table, it is created according to the metadata on the database. You have now created your first table with the ABAP Workbench. In the next step, you will write a class that create the names in this table, searches for and deletes them, and also represents the content of the table.