
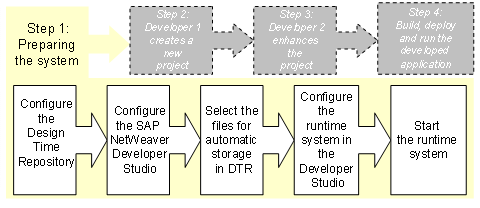
 Preparing the System

Use
In this step you set up the entire system for team-oriented development.
Prerequisites
Two machines are installed with an SAP NetWeaver Developer Studio and an AS Java on each.
Configure the Design Time Repository
Configuration of DTR Server
...
1.
Configure the users and authorizations. See
 User Management
Engine.
User Management
Engine.
2. Create two users called USER1and USER2using the User Management Engine (UME).

To do this, you do not need the user CMSadm because the Change Management Service is not used in this scenario; you must create an Admin user only if in the last step you want to grant separate authorizations for developers and administrators.
3. Create a hierarchy of workspace folders called scenario1. In it, create a workspace folder tax.
4. In the tax workspace folder, create a workspace dev.
5. (Optional) You can grant read and write permissions to both users in a new workspace – if you do not grant any permissions explicitly, the users have all rights. More information: Granting Initial Privileges.
Configure the SAP NetWeaver Developer Studio
Configuring the DTR client in Developer Studio
Before a DTR repository can be used from inside the Developer Studio, you must perform some configuration steps:
...
1. In the Developer Studio, open the Design Time Repository perspective.
From the menu path, choose Window → Open Perspective → Other → Design Time Repository.
2. Switch to the Repository Browser view. The browser view displays a single entry named OFFLINE or No Clients Configured to indicate that you are not yet connected to the DTR server.
3. Select OFFLINE and in the context menu, choose Create Client.
4. In the New DTR Client dialog that appears, specify DTRClientOfUser1 as the client name.
5. Enter the URL of the installed DTR server in the form http://<host>:<port>/dtr.
Replace <host>and <port>with the corresponding values of your DTR server instance. For example, if the DTR server has been installed as dtr-server.example.comlistening on port 50000, enter http://dtr-server.example.com:50000/dtr.
6. Enter a local root directory that is used to replicate sources to your local machine. Replace the default value with c:\DevInf. Choose OK.
7. Repeat all these steps for the Developer Studio installed on the other’s developer machine. Name the DTR client DTRClientOfUser2.
Select Files for Automatic Storage in the DTR
You can use files that are already stored in the DTR if you have them or have created new files. For the purpose of the team-oriented development tutorial, you must change the default selected files for automatic storage in DTR:
...
1. In the Developer Studio, from the menu path, choose Window → Preferences → Team → Ignored Resources.
A list of file types appears. By default, all types are selected, which means that they are not automatically added to activities and stored in the DTR.
2. If checked, uncheck the following file types:
a. .project
b. .classpath
When creating projects, the unchecked file types are added to activities to be stored in the DTR.
Configure the Runtime System in Developer Studio
...
1. In the Developer Studio, from the menu path choose Window → Preferences → SAP AS Java.
2. Select SAP AS Java is installed on local host. Choose Browse.
In the dialog that appears, select your local AS Java instance as Local Engine Installation and choose OK.
The system name, instance numbers and root paths of your engine are displayed in the Preferences dialog.
3. Choose OK.
4. Repeat all these steps for the Developer Studio installed on the other’s developer machine.
Starting and Stopping the Runtime System in the SAP NetWeaver Developer Studio
...
1. In the Developer Studio, from the menu path choose Window → Show View → Server → Servers.
2. In the root node of the engine, choose Start Local Engine to start the AS Java.
If you no longer need the AS Java, you can stop the AS Java. To do that, choose Stop Local Engine.
Next Step