
 Specifying the View Layout and the Data
Binding
Specifying the View Layout and the Data
Binding

Procedure
Defining an Input Field
1. To open the Layout editor for the view, select the view node and choose Open → View Editor. Then choose the Layout tab.
2. Navigate to the corresponding Outline view and choose Insert Child in the context menu of Root Element.
3. Choose Label from UI Element and then OK.
4. Go to its Properties and enter Name in the Value field of the text property.
5. In the context menu of Root Element, choose Insert Child.
6. Choose InputField from UI Element and then OK.
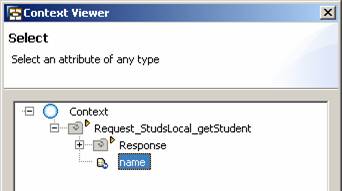
7. Go to its Properties and bind the Value field of the value property to the context attribute Request_StudsLocal_getStudent.name.
Defining a Button
1. Choose Root Element → Properties and change the layout to MatrixLayout.
2. In the context menu of the Root Element, choose Insert Child.
3. Select Button from UI Element. Go to its Properties and enter Go in the Value field of the text property.
4. Go to the onAction event and choose Create to define a new action. Enter GetStudent in the Name field. Choose Finish. The corresponding action event handler onActionGetStudent() is created in the view controller.
Defining Output Fields
...
1. Return to the Layout editor for the view.
2. In the context menu of Root Element, choose Insert Child.
3. Choose Label from UI Element and then OK.
4. Go to its Properties and enter Name in the Value field of the text property. Also choose MatrixHeadData for layoutData property.
5. In the context menu of Root Element, choose Insert Child.
6. Choose Label from UI Element and then OK.
7. Go to its Properties and bind to the Value field of the text property to the context attribute Request_StudsLocal_getStudent.Response.return.name.

8. In an analogous manner, define the further output fields.
Result

Next Step
Adding Java Code for the Controller