
 Creating a Wizard

Use
In this lesson, you learn how to change your Flight application to a wizard-like step-by-step process. You use a wizard to divide the application into separate pages between which the user can navigate.
Prerequisites
You have created the model as described in Creating an Entry List and it is open in Storyboard.
Procedure
...
1. Create the wizard container and steps:
a. On the Design board, open the Compose task panel and drag a Wizard container to an empty location. A Wizard icon is added, containing a single step.
b.
Click
the Add Step ( ) icon in the wizard container. A
second step is added.
) icon in the wizard container. A
second step is added.
Each time you click the icon, a new step is added to
the wizard. You need three steps in the wizard for this example, so click the
Add Step () icon one more time.
c. Drag each view into the appropriate wizard step, in the order in which they appear in the business process.
d. Drag the data services to reposition them below the wizard.
2. Configure the wizard:
a. On the Design board, select the wizard, and in the Configure task panel configure the wizard properties as follows:
§ Show toolbar: Select this checkbox to add a toolbar to the wizard. Adding a toolbar to the wizard enables you to add navigation buttons to the toolbar in a later step.
§ Default layer: From the dropdown list, make sure that Step1 is selected to be the step displayed by default when the wizard opens.
b. Select each step within the wizard and in the Configure task panel, in the Title field, rename each wizard step respectively: Flight Search, Flight List, and Flight Details.
The value in the Title field is displayed as the title of each wizard step during runtime.
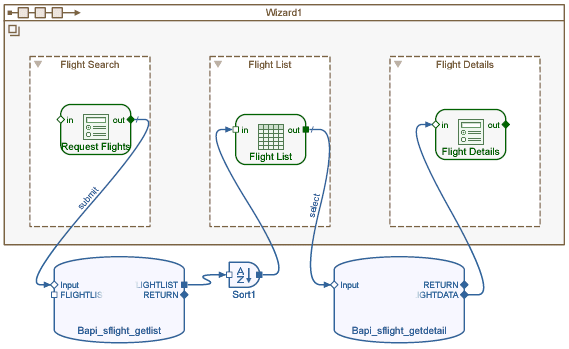
3. Save the model. It should look something like this:
4. Rename the button in the Request Flights input form and define a custom action for the button. The custom action is used to trigger data transfer and display the next wizard step:
a. On the Layout board, click the Flight Search step of the wizard in the wizard roadmap.
b. Right-click the Submit button and choose Configure from the context menu.
c. In the Text field of the Configure task panel, change the button text to Search and press Enter.
d. Right-click the Search button and from the context menu choose Action. The Define Action dialog box is displayed.
e. From the Action list, delete the Submit action (select the action and click the Delete Action (-) button).
f. Add a custom action by clicking the Add Action (+) button and choosing Custom Action from the list. Name the new action Next and click Close.

To make sure that the wizard steps are displayed in the correct order at runtime, transitions should always follow a button click and not use the default actions (for example, Submit).
5. Define a transition between the Flight Search step and the Flight List step. You use the same name for the event and transition so that when you click the Search button, the input form data is sent to the data service and the Flight List step of the wizard is displayed.
a. On the Design board, select the Flight Search step. Drag from the solid dot at the top of the Flight Search step to the flashing dot on the Flight List step, and from the context menu choose next. Note that the flashing dot is removed if you drag the pointer into a wizard step or outside of the wizard borders.
b. Select the submit line connecting the Request Flights input form to the Bapi_sflight_getlist data service and in the Configure task panel, change the Event name to next. This ties the button action to the event line.
6. Define a transition between the Flight List step and the Flight Details step, triggered by the buttons in the Flight List step. For this step, we need to add buttons to the Flight List step going backward and forward.
a. On the Layout board, select the Flight List roadmap icon to display the Flight List table.
b. Select the Flight List table and in the Configure task panel, check the Show toolbar checkbox to add a toolbar to the table.
c. In the Toolbar dropdown list, select Bottom to place the toolbar at the bottom of the wizard step.
d. From the Compose task panel, drag two Button controls to the new toolbar. The toolbar area is a strip across the bottom of the wizard, and it is outlined as you drag the button controls over it, so you can see where to place the controls.
e. In the Configure task panel, specify the properties for the first button as follows:
■ Text: Back
§ Action: Open the Define Action dialog box and choose the Back action from the Add Action dropdown list. Click Close. For this button, we can use a predefined system action rather than creating a transition and using a custom action.
f. Specify the properties for the second button as follows:
■ Text: Show Details
■ Action: Enter the text Next directly in the Action field and press Enter to create a custom action with this name.
g. On the Design board, select the Flight List step. Drag from the solid dot at the top of the Flight List step to the flashing dot on the Flight Details step, and from the context menu choose next.
7. Define a transition from the Flight Details step back to the Flight List step, triggered by the button in the Flight Details step.
a. On the Layout board, select the Flight Details roadmap icon to display the Flight Details form.
b. Select the Flight Details form and in the Configure task panel, select the Show toolbar checkbox to add a toolbar to the form.
c. In the Toolbar dropdown list, select Bottom to place the toolbar at the bottom of the wizard step.
d. From the Compose task panel, drag a Button control to the new toolbar. The toolbar area is a strip across the bottom of the wizard, and it is outlined as you drag the button control over it, so you can see where to place the control.
e. In the Configure task panel, specify the properties for the button as follows:
■ Text: Back
■ Action: Open the Define Action dialog box and choose the Back action from the Add Action dropdown list. Click Close.
8. Edit the layout of the wizard steps on the Layout board:
○ To display a specific wizard step, select the step icon in the wizard roadmap.
○ To display the contents of all the steps simultaneously, press Ctrl while you select all the step numbers in the wizard roadmap. This is useful if you want verify that certain items are aligned at the same location on different wizard steps.
○ Reposition the controls and resize the step contents as required.
9. Save the model.
10. Deploy the application:
a. Click the Deploy button in the task-panel toolbar.
b. Click the Deploy button in the Deploy task panel.
11. In the Results area of the Deploy task panel, expand the node of the development component you created, expand the Web Dynpronode, and click the Flights link under the Html or Flex node to run the application. Check that you can move between wizard steps using the toolbar buttons.
Result
The runtime application is presented as a three-step wizard. A roadmap appears at the top of the wizard using color and bold font to indicate the currently-displayed step.
The first step of the wizard should look similar to this:

The second step of the wizard should look similar to this:

The third step of the wizard should look similar to this:
