Special Functions of the Tree Structure
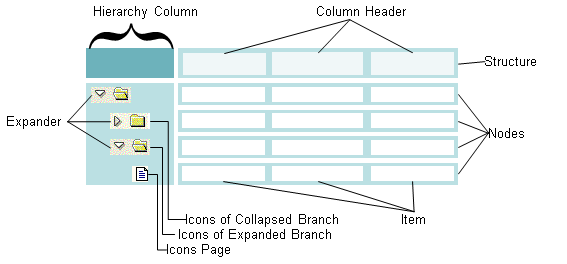
The tree structure is comprised of the following areas:
-
The Structure
The structure is defined by the initial table that you specify with the FACTORY method. It is displayed by the column header , which is the top row of the tree structure. Every node in a tree structure has exactly the structure that is defined in the initial table.
-
Hierarchy Column
The first column of the tree structure is always the hierarchy column . It is not part of the initial table. It contains symbols that the user can use to display or hide lower levels of a node. Using different icons, you are able to display whether a node is a branch with subnodes or a leaf.
By default the hierarchy column has no text. However, for each node, you are able to determine which text is to appear in the hierarchy column.
-
Node
The actual entries in the tree structure are called nodes . Every node has the same structure as the initial table. Every node is uniquely identified by a key.
A node can either be a leaf or a branch: Branches contain either more branches or leaves that are not subdivided any further as subnodes.
-
Item
Items are components of a node: Each node contains exactly as many items as are contained in the initial table. In this way you are able to compare items with the entries in a column.
Based on the deviating data model, you are able to make some settings to the tree structure that are not available in the other ALV tools.
You are able to make the following settings for hierarchy column :
-
Determining Column Header (Section: Determining Wording of the Column Header )
-
Inserting Icons into the Column Header (Section: Display Icon )
-
Determining the Tooltip for the Column Header (Section: Determining the Tooltip for the Column Header )
-
Define text for the node
-
Determine Icons for Expanded and Collapsed Branches
-
Display Leaf as Branch
You are able to make the following settings for nodes :
-
Get node objects
-
Generate, Move and Delete Nodes
-
Collapse and expand branches
You are able to make the following settings for items :
-
Determine value
-
Set Display of the Item
-
Set selectability
For all of the following functions, this is valid:
|
ALV Tool |
Display type |
Function available |
|
Simple, two-dimensional table |
Classic ABAP List |
No |
|
Fullscreen |
No |
|
|
In the Container |
No |
|
|
Hierarchical-sequential list |
Classic ABAP List |
No |
|
Tree Structure |
Fullscreen |
Yes |
|
In the Container |
Yes |
Get Node Object
Each node is represented by an object of class CL_SALV_NODE, and all of the nodes together are represented by the object CL_SALV_NODES.
You get the references to the desired node object using various getter methods:
|
Function |
Class |
Method |
|
All nodes together |
CL_SALV_TREE |
GET_NODES |
|
List of all node objects and their key |
CL_SALV_NODES |
GET_ALL_NODES |
|
Specific key |
GET_NODE |
|
|
Top node |
GET_TOP_NODE |
|
|
List of all subnodes and their key |
CL_SALV_NODE |
GET_SUBTREE GET_CHILDREN |
|
Get key for the node |
GET_KEY |
|
|
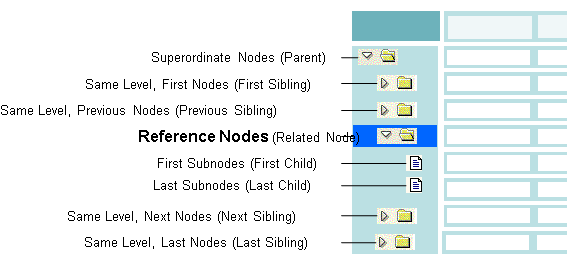
Related nodes |
GET_PARENT GET_FIRST_CHILD GET_LAST_CHILD GET_PREVIOUS_SIBLING GET_NEXT_SIBLING |
Generate, Move and Delete Nodes
While you can display whole tables with one command using the ALV tools: simple, two-dimensional table and a hierarchical-sequential list , with the tree structure, you need to generate the nodes individually. To do this, provide at least the following:
-
The contents of the node that you wish to insert. The new node must have exactly the same structure as is specified in the initial table.
-
One reference nodeEvery node is uniquely identified by a key. If there is not yet a node in the tree structure, there will still be the top node. By default, the top node has an empty character string as the key. You insert the new node at a position relative to the reference node.
-
The relationship between the new node and the reference nodeYou are able to insert the new node at one of the following positions relative to the reference node:
|
Function |
Class |
Method |
|
Add Node |
CL_SALV_NODES |
ADD_NODE |
|
Change top node |
SET_TOP_NODE |
|
|
Move node to another position within the tree structure |
CL_SALV_NODE |
MOVE |
|
Delete node with all of its subnodes |
DELETE |
|
|
Delete all nodes of the tree structure |
CL_SALV_NODES |
DELETE_ALL |
Determine text in the hierarchy column
The hierarchy column is not part of the initial table. This means you are not able to control text in it with the contents of the data table. You determine the texts in the hierarchy column for each node individually.
|
Function |
Class |
Method |
|
Determine text in the hierarchy column |
CL_SALV_NODE |
SET_TEXT |
|
Get current text in the hierarchy column |
GET_TEXT |
Determine Icons for Expanded and Collapsed Branches
By default, a node that contains subnodes is indicated by an icon that looks like a folder. The icon looks different depending on whether the node is expanded or collapsed. You are able to use a different graphic for each icon. You determine both icons for each icon individually.
|
Function |
Class |
Method |
|
Set icon for expanded branch |
CL_SALV_NODE |
SET_EXPANDED_ICON |
|
Set icon for collapsed branch |
SET_COLLAPSED_ICON |
|
|
Get icon for expanded branch |
GET_EXPANDED_ICON |
|
|
Get icon for collapsed branch |
GET_COLLAPSED_ICON |
Display Leaf as Branch
For reasons of speed, you are able to display a node as a branch even if it does not contain subnodes. When the user expands the node, you insert the subnodes.
A node that is displayed as a branch although it contains no subnodes is also called an empty folder.
|
Function |
Class |
Method |
|
Instead of displaying the icon for leaves, show the icon for a collapsed branch |
CL_SALV_NODE |
SET_FOLDER |
|
Check whether the node is an empty folder |
IS_FOLDER |
|
|
Display an expander in the empty folder |
SET_EXPANDER |
|
|
Check whether the empty folder has an expander |
HAS_EXPANDER |
When the user expands an empty folder, the event EXPAND_EMPTY_FOLDER from the class CL_SALV_EVENTS_TREE is triggered.
Expand or Collapse Branches or Hide Areas
You are able to expand and collapse the branches of the tree structure individually or together. Beyond that you are able to make a node or an item completely invisible.
|
Function |
Class |
Method |
|
Expand individual branch |
CL_SALV_NODE |
EXPAND |
|
Collapse individual branch |
COLLAPSE |
|
|
Expand all branches |
CL_SALV_NODES |
EXPAND_ALL |
|
Collapse all branches |
COLLAPSE_ALL |
|
|
Change visibility of a node |
CL_SALV_NODE |
SET_VISIBLE |
|
Check whether the node is visible |
IS_VISIBLE |
|
|
Change visibility of an item |
CL_SALV_ITEM |
SET_VISIBLE |
|
Check whether the item is visible |
IS_VISIBLE |
Change the Content of a Node or an Item
While you are modifying the contents of the two ALV tools simple, two-dimensional table and hierarchical-sequential list by making changes to the transferred table, changes also take place in the tree structure on the node or item level.
If you exchange the content of the whole node, the structure of the new one must exactly match the one specified by the initial table.
|
Function |
Class |
Method |
|
Change content of a node |
CL_SALV_NODE |
SET_DATA_ROW |
|
Get content of a node |
GET_DATA_ROW |
|
|
Change contents of an item |
CL_SALV_ITEM |
SET_VALUE |
|
Get content of an item |
GET_VALUE |
Set Display of the Item
In items of the tree structure you are able to display things other than text. With the type of the item, you are able to determine that one of the following elements be displayed in it:
-
Default setting
-
Text
-
Checkbox
-
Pushbutton
-
Link
-
Icons
For the types Checkbox (CHECKBOX), Pushbutton (BUTTON), and Link (LINK), there are events available to process interactions by the user.
The user can only change the value of checkboxes that are enabled.
|
Function |
Class |
Method |
|
Set type of an item |
CL_SALV_ITEM |
SET_TYPE |
|
Get current type of the item |
GET_TYPE |
|
|
Change value of a checkbox |
SET_CHECKED |
|
|
Check value of a checkbox |
IS_CHECKED |
|
|
Enable checkbox so that the user can change the value interactively |
SET_EDITABLE |
|
|
Check whether a checkbox is enabled |
IS_EDITABLE |
|
|
Insert icon |
SET_ICON |
|
|
Get icon |
GET_ICON |
To display an icon in an item, proceed as follows:
-
You assign the type Default (DEFAULT) to the item
-
You ensure that the content of the item is a permitted indicator for the desired icon (for example @AB@ )
-
Use the method SET_ICON in the CL_SALV_ITEM class.
-
When the user changes the value of a checkbox, the event CHECKBOX_CHANGE from the class CL_SALV_EVENTS_TREE is triggered.
-
If the user clicks on an item of type Pushbutton (BUTTON) or Link (LINK), the event LINK_CLICK from the class CL_SALV_EVENTS_TREE is triggered.
Set selectability of an item
By default, the user is able to select an item by clicking on it or by pressing the tab key. You are able to determine that users cannot select an item.
|
Function |
Class |
Method |
|
Set selectability of an item |
CL_SALV_ITEM |
SET_ENABLED |
|
Check selectability |
IS_ENABLED |