Connecting to Provider Systems
You can define the connections to systems for Universal Worklist. These systems provide
work items via UWL
Connectors. Universal Worklist Systems page is accessible from Portal via
navigation to  System Administration
  System Configuration Universal Worklist and Workflow Universal Worklist Administration
  .
.
For these systems, the following steps must be performed before registering a connector:
- Create a user having SAP_BC_UWL_SERVICE role in the back-end system.
- Define your SAP system on the portal.
- Create a system alias to uniquely identify the system
- Define exact settings for technical connections
- Define how users are mapped
- Test system connections
- Configure an RFC Destination
- Log on the portal as administrator (http://<host>:<httpport>/nwa)
- Navigate to Configuration Destinations . The list with the available destinations is displayed
- To create a new RFC destination, choose the Create
button. In the dialog that appears, enter:
A valid name for the destination with the portal system alias and the type of connector <SYSTEM ALIAS>$<UWL CONNECTOR TYPE>. For example, NXONE$WebFlowConnector.
In the Destination Type field enter RFC. - Fill in the following details for the RFC destination:
- System ID. For example, NXO
- Load balancing - choose Yes
- Message Server enter the message server host
- Logon Group. For example, PUBLIC
- Language. For example, EN.
- Authentication type. For example, Logon ticket.
- Client. For example, 001.
- User Name
- Password
- Choose Save.
- To test the RFC destination, choose Ping Destination.
Creating, Editing and Activating UWL Connectors
Universal Worklist can retrieve work items from systems. To manage a UWL connector:
- Log on to the portal as an administrator ( http://<host>:<httpport>/irj ).
- Navigate to System Administration System Configuration Universal Worklist and Workflow Universal Worklist Administration .
The Universal Worklist Systems list appears. Here you can define the UWL connectors.
- To add a new entry, choose New. To the properties of an existing connector, select (highlight) a row and choose Edit.
- To save the current connector settings, choose Save.
- You can define as many connections as needed by repeating the above steps.
Connector parameters description and use:
|
Parameter |
Description and Use |
|---|---|
|
System Alias |
The name of the alias for the back end system, as defined in the Portal System Landscape. |
|
Connector Type |
Defines the connector type. For example: WebFlowConnector. For more information, see UWL Connectors . Note
For connector types WebFlowConnector or AlertConnector item types have to be registered with the UWL service after defining a new system connection. For more information, see: Register Work Item Types. |
|
Web Dynpro Launch System |
Enter the Web Dynpro system name if the SAP NetWeaver Application Server for the system is not the same as the one running the Web Dynpro. Leave empty otherwise. For more information, see: SAPWebDynproLauncher . |
|
User Roles |
Restricts who can get work items via the user role. For example, you can assign a portal role here, such as buyer. Only users with the role buyer will see items from the provider system in UWL. You can have multiple user roles separated by semi-colon. For more information, see User Roles below. |
|
Configuration Groups |
Leave this blank, when working with the default UWL iView. You can add a number of configuration groups separated by commas but only one configuration group per iView. For more information see section Configuring a Large System Landscape below. |
|
Delta Pull Channel Refresh Period (in Seconds) |
For more information, see: Enabling Delta Pull Mechanism. |
|
Delta Pull Channel Snapshot Refresh Period (in Seconds) |
Obsolete. Do not use! |
|
Use Cache |
Deselect this check box in case you want to switch the cache off. Switching the cache off is supported for BPEMUWLConnectors and custom connectors. For more information, see: Switching off the UWL Cache. |
|
Retrieve Custom Attributes Using Primary Pull |
Select this to force synchronous loading of custom attributes. For more information, see: Using Primary Pull to Retrieve Custom Attributes. |
|
Refresh Completed Items |
Select this to enable refresh of completed items. For more information, see: Enabling Refresh of Completed Items. |
For more information, see Register Work Item Types .
Activating / Deactivating Connections
For a registered system, you can activate or deactivate a connection to the back end systems using the respective buttons listed under the column Connections .
User Roles
By specifying user roles for the portal users, it can be restricted as to who gets the work items in UWL. For example, you can assign a portal role to a user, such as buyer . Only users with the role buyer will see items from a system, for example, NCC74205 in UWL.
User roles and Configuration Groups are not mutually exclusive.
Example Scenario
The following description and figure illustrate the purpose of the Universal Worklist Systems list registration. It shows the case where two UWL iViews have been defined.
The following figure illustrates the connections and access rights for the two types of users:
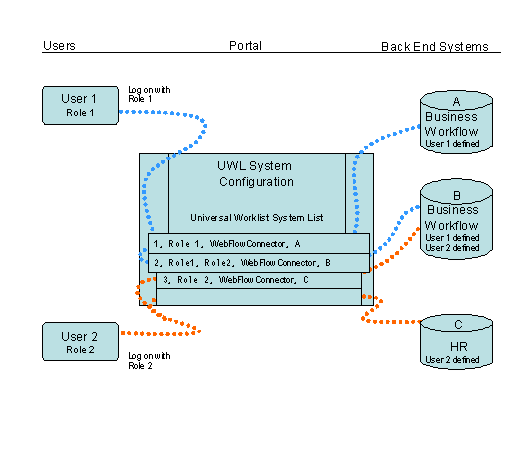
Suppose you have three back end servers: A, B, and C. Each server has a Business Workflow application running.
Users with role 1 are given access to servers A and B, but not C.
But only, users with role 2 have access to C.
User 1 with role 1, logs onto the default UWL iView and must be connected to back end servers A and B. User 2 with role 2, logs onto the UWL iView and must be connected to back end servers B and C.
To achieve this scenario, the Universal Worklist System Systems list can be configured as shown in the following table.
|
Roles |
Connector |
System Alias |
|---|---|---|
|
Role 1 |
WebFlowConnector |
A |
|
Role 1, Role 2 |
WebFlowConnector |
B |
|
Role 2 |
WebFlowConnector |
C |
Configuring a Large System Landscape
This feature is for backward compatibility only. The recommended way is to use user roles for connections.
When UWL is first installed, one UWL iView is defined. The System Configuration Group property for that iView is empty (blank). This means that no System Configuration Group is named, but in effect there is only a single group. The default behavior for the blank setting is this: when any user logs onto the UWL iView, UWL tries to log that user onto all registered back end systems.
When a large number of systems are accessed during log on, the overall portal load is increased. Also, the user receives error messages from those back end systems that have no user account for the particular UWL user.
For large system landscapes do the following:
-
Partition back end systems into groups. This is accomplished by creating additional UWL iView instances, each of which refers to a specific group of back end systems.
The group is defined, using the System Configuration Group iView property.
-
Then use the value of the System Configuration Group property when registering back end systems by placing it in parameter Configuration Group , when you register the SAP system.
Example Scenario
The following description and figure illustrate the purpose of the Universal Worklist Systems list registration. It shows the case where two UWL iViews have been defined.
Suppose you have three back end servers: A, B, and C. Each server has a Business Workflow application running.
Regular users are given access to servers A and B, but not C. Only managers have access to C. Managers also access B in the course of their work.
Two UWL iViews are configured:
-
The default iView with the System Configuration Group property set to the value regular .
-
An added iView with the System Configuration Group property set to the value restricted .
The following figure illustrates the connections and access rights for the two types of users.

User 1 logs onto the default UWL iView and must be connected to back end servers A and B. User 2 logs onto the Manager UWL iView and must be connected to back end servers B and C.
To achieve this scenario, the Universal Worklist System Systems list can be configured as shown in the following table.
|
Name |
Configuration Group |
Connector |
System Alias |
|---|---|---|---|
|
1 |
Regular |
WebFlowConnector |
A |
|
2 |
Regular, Restricted |
WebFlowConnector |
B |
|
3 |
Restricted |
WebFlowConnector |
C |