Context
The layout of the first view is structured in this step and a simple
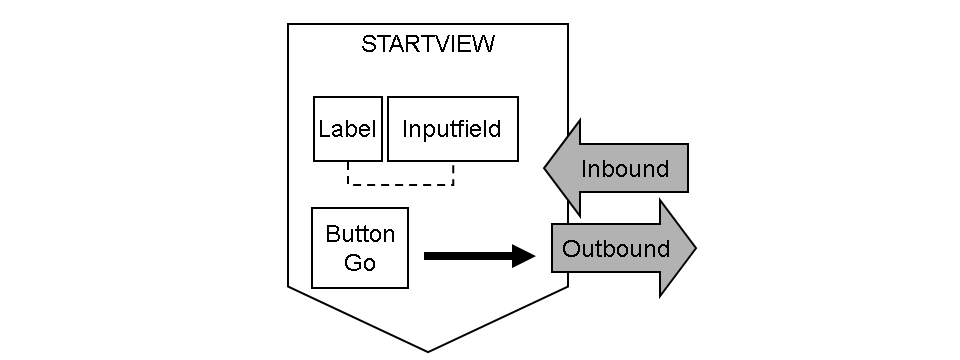
Action is implemented. The user should be able to trigger navigation to the
RESULTVIEW by clicking a button on the
STARTVIEW . To achieve this, the view requires an
outbound plug . A suitable element must then be added to the layout of the view and connected to the outbound plug using a method call. An additional inbound plug ensures that navigation can be set up from the second to the first view.
The layout of the view also needs a InputField so that it can accept user input.
Procedure
- In change mode double-click on the name of your first view in the view node of the object list.
The
Layout tab of your view is displayed.
- In the context menu of
ROOTUIELEMENTECONTAINER choose the entry
Insert element .
- To insert an element of type
Label, enter a suitable name for the element (such as
LABEL_1 ) and choose
Label from the input help for the type line. Confirm your entries.
- Open the context menu of the
ROOTUIELEMENTECONTAINER again and choose
Insert Element... .
- The next element is to be an input field, so enter a suitable name (such as
INPUT ) and choose
InputField
InputField from the list of element types.Confirm your entries.
- Now select the element of the type
Label in the element list below the
ROOTUIELEMENTECONTAINER .
The properties table for this element contains the line
labelFor .
- Open the input help for this line and choose the element of the type
InputField , which you have just created. The element
LABEL_1 is now bound to the input field.
- Open the context menu of
ROOTUIELEMENTECONTAINER , and create a
Button with a suitable name (such as
BUTTON ) in the same way and save your work.
The required layout elements of the first view are now available; next you create the two plugs that are required.
- Switch to the
Outbound Plugs tab page and enter the name of the new plug (such as
OUT1 ) in the table. Save your entries.
- Now switch to the
Inbound Plugs tab page and enter the name of the new plug (such as
IN1 ) in the table. Save your entries.
Now that both the layout elements and the required plugs have been created, all that is missing is the link between the
BUTTON button with the
OUT1 outbound plug.
- Switch back to the
Layout tab page and select the
ROOTUIELEMENTECONTAINER entry in the element hierarchy below the
HEADER .
In the table below the hierarchy you can maintain the properties and link the selected element.
- First choose the
text property and enter a suitable text (such as
Go ) in the
Value row. This text will be displayed on the button later.
- Below the
Events header, choose the
OnAction row.
You must now create an action for this
event , which calls the outbound plug of the view when you the
Button button is chosen.
-
Pressing the button on the far right-hand side of this row starts a create dialog for such an action.
-
Enter a name for the new action (for example,
GOTOOUT1 ).
-
Select the outbound plug that will be used to exit from the view when the user chooses
Button .
As you have created only a dingle outbound plug for the view, only this one view is available for selection.
-
Save your entries.
This automatically creates an
ONACTIONGOTOOUT1 method for your new action, which is later called when the
BUTTON button is pressed.
Double-click the action you created in the table to be taken to an editor. The development environment has already generated the call of the outbound plug in the corresponding method, so you do not have to program it yourself here.
- Save your entries.
Results
In this step, on the one hand you have assembled the simple layout of the first view of your application, and on the other hand you have ensured the navigability of the view by creating plugs. Furthermore, you have linked both of these to each other by linking the
Button interface element to a navigation call to an outbound plug of the view.
The context of the view has not been considered up to now. It is therefore the subject of
Step 3: Context Mapping for the First View