Creating Views
Database views are dynamic logical tables composed from data taken from database tables that are part of the physical database schema. You can specify how data from original tables is combined into a view using join conditions and where clauses.
You use this procedure to create database views. You can create view columns, join conditions, and WHERE clauses graphically, by directly writing an SQL statement, and by completing the required information in the relevant tabs in the view editor.
Database views are dynamic logical tables composed from data taken from database tables that are part of the physical database schema. You can specify how data from original tables is combined into a view using join conditions and WHERE clauses. Join conditions combine data from two or more tables depending on the join type. The default join type is the “inner join” . Inner joins find the intersection of two tables. Another join type is the “left outer join” . This join type returns all values from left table with matching values from right table. A WHERE clause returns data that matches a certain condition.
You have:
-
Opened the Dictionary perspective in the SAP NetWeaver Developer Studio
-
Created your tables
More information: Creating Tables
Creating Views
-
In the Dictionary Explorer , select the Dictionary DC that stores your tables.
-
In the context menu, choose
 New
New  View
View  .
.The New Database View wizard opens.
-
Specify a prefix and a suffix to define the name of the view, then choose Next .
-
Select the tables to be included in the view, then choose Next .
-
Select the columns to be included in the view, then choose Finish .
The SAP NetWeaver Developer Studio creates the database view and opens it for editing.
-
To save your changes, choose Save .
Editing Views Graphically
Once you create a database view, the database view editor opens the view and displays the tables and columns included in the view.
When you edit views graphically, each operation you perform updates the relevant tabs in the editor.
-
Add tables to the view.
-
Choose the
 pushbutton.
 -
In the Show Tables dialog, select the tables to add to the view, then choose OK .
The database view editor updates the graphical representation of the view with the new tables.
-
-
Remove tables from the view.
-
Choose the graphical representation of the table.
-
In the context menu, choose Hide .
-
-
Add columns to the view.
-
Choose the graphical representation of the table.
-
In the context menu, choose Add Columns to Database View .
The Add View Columns dialog opens.
-
Select the columns to be added to the view, then choose OK .
-
-
Create a join condition.
-
Choose the
 pushbutton.
 -
Click the view column in the table you want to join and drag the cursor to the view column of the second table.
The database view editor creates the join connection and updates the view with two lines. The first line connects the tables and denotes the type of the join condition, for example, Inner Join . The second line connects the view columns and denotes the conditional operator type, for example, equal sign (=).
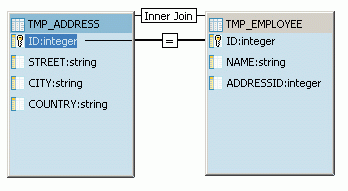
ExampleThe following view includes two database tables, TMP_ADDRESS and TMP_EMPLOYEE . There is a join condition between the two ID columns in the tables.
By default, the database view editor creates inner join conditions with the equality operator.
-
(Optional) Change the join condition type.
-
Double-click the join type.
The join type shows a dropdown list with the available join condition types.
-
Select the appropriate join condition type.
The database view editor updates the graphical representation of the view.
Example Note
NoteThe database view editor also updates the Join Conditions tab and the SQL Statement tab.
-
-
(Optional) Change the join condition operator.
-
Double-click the conditional operator.
The conditional operator shows a dropdown list with the available join condition types.
-
Select the appropriate operator from the dropdown list.
Example Note
NoteThe database view editor also updates the Join Conditions tab and the SQL Statement tab.
-
-
-
Delete a join condition.
-
Choose the join condition.
-
In the context menu, choose Delete .
-
-
To save your changes, choose Save .
Editing Views with the View Editor Tabs
-
To add join conditions to the view, choose the Join Conditions tab.
-
Choose Add Join Condition .
-
Select the tables, corresponding columns, and conditions, as necessary.
-
-
To add WHERE clauses, choose the Where Clause tab.
-
Choose Add Where Clause .
-
Select the table, column, operator, value, and condition, as necessary.
-
-
Edit the view columns.
-
Choose the View Columns tab and make the changes, as necessary.
You can add or delete view columns, and change the view columns order.
-
Choose the SQL Statement tab and enter the appropriate statements to change the view.
-
-
To save your changes, choose Save .