
 Setting Image Print Size

Use
When you publish an image to a printed publication, it is placed onto the paper using the image print size you specify for the image, as described in this section.
Procedure
To set the image print size of one or more images (for publications):
1. In the Records pane, select the image record(s) whose print size you want to set.
2. Double-click on the Print Size cell in the Record Detail pane, or choose Objects ® Image ® Set Print Size from the main menu to open the Image Print Size dialog shown in the figure below.
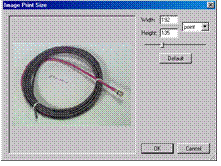
3. Select the unit from the drop-down list:
○ Q
○ points
○ didots
○ millimeters
○ picas
○ ciceros
○ inches
4. Type a numeric value for the print width or height of the image, or use the slider and the image preview to visually size the image.

The maximum print size you can specify for an image is based on: (1) the number of pixels in the image divided by (2) the Default Image DPI repository property.
5. Click OK to close the Image Print Size dialog.
Click the Default button to restore the image to its default size based on the global repository properties.
To simultaneously set multiple images to the same publication size, select more than one image before opening the Image Print Size dialog. In this case, the maximum size you can set is the minimum of all the selected images (since their sizes may be different), you are permitted only to set a value for the height, with the width driven by the height (since their aspect ratios may be different), and the image preview displays the Multiple Images icon.
To resize the Image Print Size dialog itself, drag any of the edges or corners of the dialog to the desired size.