
 Modify Mask Command

Use
The Modify Maskcommand provides another way to add or remove records from one or more masks. This method is required if you want to: (1) modify a mask with a list of records identified in a file; (2) modify multiple masks at the same time; or (3) create a new mask.
Prerequisites
The file must be a plain text (ASCII) file with one entry per line. The first line is the field name, followed by lines containing values for that field (each value on a new line).

For example, a text file containing the following four lines could be used to add or remove three products with the specified SKU numbers:
SKU
45008
46009
46880
Procedure
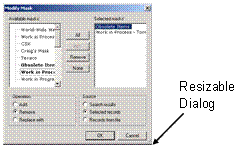
When you use the Modify Mask command to modify the records in a mask, MDM opens the Modify Mask dialog, and then updates the masks based on the option settings you specify (table below).
Option |
Radio Button |
Description |
Mask |
|
Select the masks from the drop-down tree. |
Operation |
Add |
Add records to the selected mask. |
Remove |
Remove records from the selected mask. |
|
Replace With |
Replace the records in the selected mask. |
|
Source |
Search Results |
Modify the mask with the search results. |
Selected Records |
Modify the mask with the selected records. |
|
Records from File |
Modify the mask with records from a file. |
To use the Modify Mask command to add records to a mask or remove records from a mask:
1. If you are going to add (or remove) a group of records from the Recordspane to (or from) a mask, select the records before choosing the Modify Maskcommand.
2. Choose Records ® Modify Mask from the main menu to open the Modify Mask dialog shown in the figure below.
3. Select one or more masks from the tree of available masks.
4. Select the desired Operation to add, remove, or replace records:
¡ Add
¡ Remove
¡ Replace With
5. Select the desired Source of the records to add, remove, or replace:
¡ Search Results
¡ Selected Records
¡ Records from File
6. Click OK to close the Modify Mask dialog.
7. If you are modifying the mask from a list of records in a text file, the Windows file Open dialog appears for you to choose the file.
To use the Modify Mask command to add a new mask, or delete or rename an existing mask:
...
1. Choose Records ® Modify Mask from the main menu to open the Modify Mask dialog shown in the figure above.
2. Right click on the existing mask you want to delete or rename, or after or below which you want to add a sibling or child.
MDM displays the context menu shown in the figure below.

3. Choose from the context menu as follows:
|
¡ Add Sibling |
– add a mask as a sibling after selected mask |
|
¡ Add Child |
– add a mask as the last child of selected mask |
|
¡ Delete |
– delete the selected mask |
|
¡ Rename |
– rename the selected mask |

You cannot add a child to an existing mask that already has records in it.
4. Click OK to close the Modify Mask dialog.
You can also add a new mask or delete or rename an existing mask in Hierarchy mode when the current table is the Masks table.