Processing Internal Tables
1. Displaying Internal Tables
You can display and change the contents of internal tables (including nested tables) at runtime in the Debugger. The Debugger also provides information about the table type, table key, and the amount of memory it requires.
Procedure
Choose Table from any display mode in the Debugger. The table display appears. ENTER the name of an internal table in the Internal table field, or select a table by double-clicking its name in the source code. Activate one of the execution types to analyze the source code.
Example:
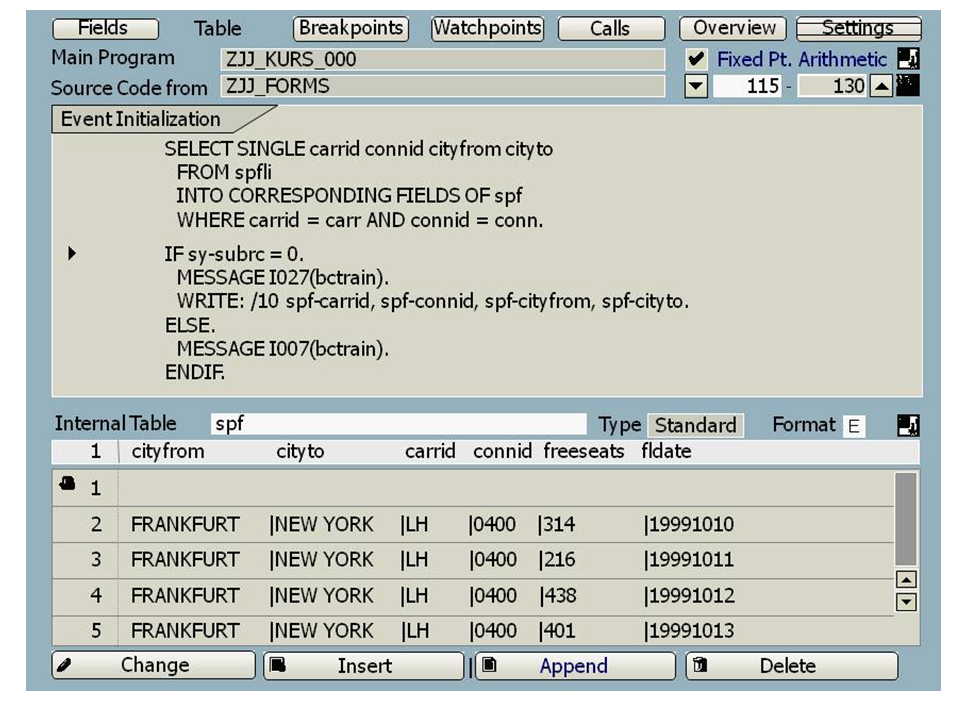
Header
 If the internal table has a header line, it is indicated by this icon. If you double-click the icon, the system opens the
Structured field display. This contains the names of the components, their current values, and the technical data of the table.
If the internal table has a header line, it is indicated by this icon. If you double-click the icon, the system opens the
Structured field display. This contains the names of the components, their current values, and the technical data of the table.
Scrolling Vertically
The table lines are numbered. The first column of the header is ready for input. Here you can enter the first displayed line of the table and scroll line-by-line. You can also scroll using the scroll icons in the standard toolbar.
Scrolling Horizontally
 You can use the scroll buttons to scroll through the table horizontally. If the table is too wide for all of it to be displayed, use the scroll keys, or move the column headers.
Moving Column Headers
Using the column headings you can change the order in which fields are displayed. To do so, simply overwrite the text in the header line with the names in the order in which you want them to appear. To remove a field from the display, delete its field name from the header. If you enter the name incorrectly, the system displays a sequence of question marks. If there is not enough room to display the entire field, the system shortens the field and displays the < character to inform you.
Shifting a Column to the Left
If you double-click a column heading, the table display shifts to the left. None of the columns to the left of the selected column heading are then visible. However, you can restore them to the display by scrolling horizontally.
Displaying a Table Type
Next to the table name, the Type field contains the table type. This may be standard, hashed, or sorted.
Changing the Display Format
As with the field display, you can change the display format in the internal table display mode. The Format field usually contains the value E (for display in columns with relevant formatting). However, it can also take the value X (hexadecimal display), or C (character display).
Offset/Length Access
In the column headers, you can make offset and length specifications for character-type components.
Resizing the Table Excerpt
 Click this button to increase the size of the table excerpt that is displayed. Three lines of ABAP source code are displayed, and the rest of the screen is used to display lines of the internal table.
 Click this button to reduce the table display to five lines. The rest of the screen is used to display the ABAP program code.
Displaying Memory Use
To find out how much memory internal tables occupy, choose
 Goto
Goto  Status Display Memory Usage
  . Choose
Change Settings to display a window, in which you can choose the
Internal Tables button.
. Choose
Change Settings to display a window, in which you can choose the
Internal Tables button.
Finding References
By choosing the appropriate icon next to the table name, you can list all data objects that reference the same table body. Due to the sharing introduced with Release 6.10, this can be more than one data object.
Table History
By choosing the appropriate icon next to the table name, you can list the names of all internal tables displayed in the current Debugger session and display them by double-clicking. The display starts from the line number and the component with which the selected table was last displayed.
2. Changing Internal Tables
You can change the contents of internal tables in the Debugger at runtime. You can edit, create, or delete tables. You can call these functions through appropriate pushbuttons or through the context menu. The Change, Insert, and Append functions are field-specific, and can only be used for a single field at a time.
Deleting Rows
With the left mouse button, select any field in the row to be deleted and then click the Delete pushbutton. Alternatively, you can display the context menu by pressing the right mouse button. The Delete Table Row function is then available.
Adding a Row
The Insert and Append functions allow you to add a new row to an internal table. The Append function adds a new row at the end of the table while the Insert function positions the new row in front of the selected row.
A new row is added at the end of the table if you choose the Append pushbutton or select the Insert Table Row function from the context menu. Afterwards, you can enter a value into the first field of the new row and save it by pressing the Enter key. If you make no specification, the first field of the new row receives the initial value suitable for the type in question. Irrespective of the specification in the first field, all the other fields in the new row are assigned their appropriate initial values. These can be overwritten using the Change function.
A new row is inserted at an arbitrary position in the internal table when you select a row in the internal table using the left mouse button and then choose the Insert pushbutton or the Insert Table Row function in the context menu. Afterwards, the new row will be inserted directly in front of the selected row. The procedure for entering field values and changing them is the same as for the Append function.
Changing Fields
Select the field to be changed using the left mouse button and then press the Change pushbutton or choose the Change Table Field function in the context menu. Afterwards, the selected field will be ready for input and can then be overwritten with another value. You can save the entered value by pressing Enter.