 Defining Header Mapping
You use this procedure to mask the names of systems within your landscape while communicating with an external business partner in a B2B scenario. Since you cannot show the names of internal systems to the external partner, you allow the partner to see only the names of the exposed communication components in the received messages. Using header mapping, you can mask the system details in the message header with parameters such as Sender Party, Sender Communication Component, Receiver Party, and Receiver Communication Component, which an outgoing message carries in its header. You can either select a specific system and party name or allow dynamic determination of values for the header mapping parameters by using Xpaths or Context objects.
The figure below shows how the header mapping is used in a B2B communication and is followed by an explanation:
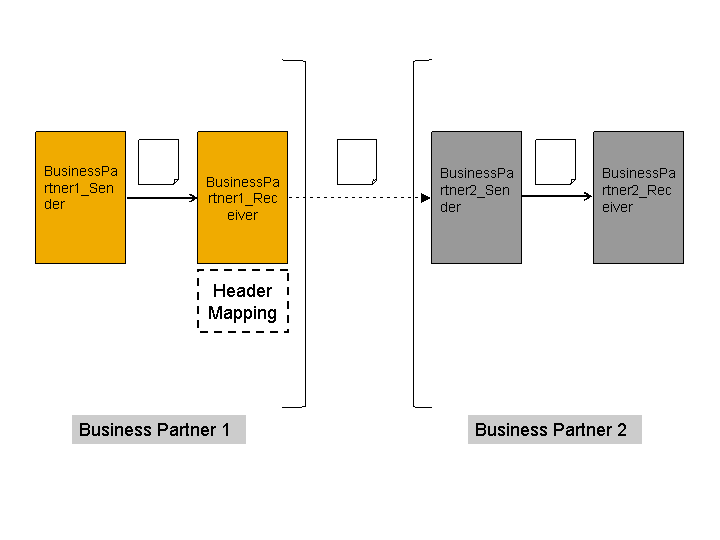
In the figure above, two integration flows are configured, one with the landscape details of Business Partner 1 and the other with landscape details of Business Partner 2, to enable B2B communication. When Business Partner 1 sends messages to Business Partner 2, the BusinessPartner1_Receiver system forwards the message to BusinessPartner2_Sender system. When the message is sent across the landscape, the header Mapping feature at the BusinessPartner1_Receiver system masks the internal system details in the message header of the outgoing message. So, the message received by Business Partner 2 sees only the masked names for the system details of Business Partner 1.
Prerequisites
You have created an integration flow in your Integration Directory and configured the systems, interfaces and channels.
You have assigned an adapter to the receiver channel that supports header mapping.
 Note
NoteThe following receiver adapters support header mapping:
CIDX Adapter
RNIF Adapter 1.1
RNIF Adapter 2.0
Plain HTTP Adapter
IDoc Adapter
End of the note.
Procedure
In the Model Configurator editor, select the receiver channel.
In the Properties view, choose the Header Mapping tab.
Choose the Sender Communication Component field and select the type of value, either an Xpath, Context Object or Service.
Choose Browse... and select a corresponding value.
NoteIf you have chosen Service and the selected sender communication component belongs to a party, the Sender Communication Party is auto-filled.
End of the note.Perform steps 3 and 4 for Receiver Communication Component and Receiver Communication Party.
Save the changes.