
 Binding Tables to the Controller Context of a
View
Binding Tables to the Controller Context of a
View 
At the top level, the dataSource property of the table UI element must be bound to a value node with a cardinality of 0…n or 1…n, which at runtime represents a list of node elements. Each of these node elements corresponds to a single row in the table. The selected table rows are specified using node selection (subsets of node elements). The currently selected row corresponds specially to the lead selection of the value node.
The table columns are specified using the TableColumn UI element as a subnode of the Table UI element. This UI element specifies the number, sequence, header cells, and width of each table column.
The table content is specified for each column using the associated cell editor (for example, using an InputField or TextView UI element). Note that this cell editor does not only enable cell editing. You can also use the cell editor to trigger events (Button) or display texts or images (TextView, Image).
The Web Dynpro tools enable you to add table columns with a context reference (for example, using the UI element TableColumn – Caption – InputField) by providing wizards that automatically create the necessary data binding between UI element properties and context elements. This includes, for example, data binding between the property text in the InputField UI element of a column cell and the value attribute to be displayed in it.
Procedure
Customer Table
...
1.
In the context menu
for the UI element  CustomerTable[Table],
choose Create Binding. To display the data structures stored in the
controller context at runtime in the two tables Customers and Orders
for Customers, you now use the concept for data binding.
CustomerTable[Table],
choose Create Binding. To display the data structures stored in the
controller context at runtime in the two tables Customers and Orders
for Customers, you now use the concept for data binding.
2. In the dialog box that appears, select the Address context node.
You add columns by selecting the Value node that contains the value attributes to be displayed. In this case, this is the dependent value node Address.
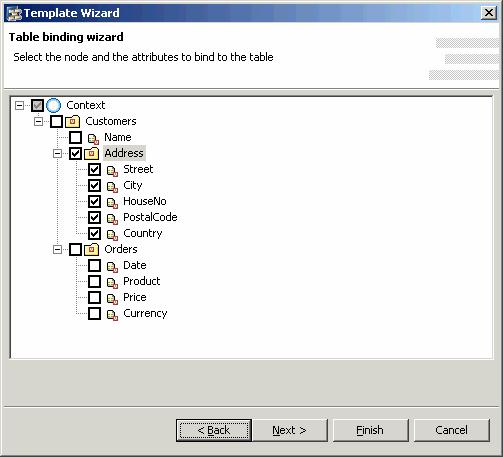
3. Choose Next >.

In this dialog box, you can define how the table data is displayed in the Editor column. In the example application, you only want to display the table data, not edit it. Therefore, each column requires the UI element TextView as the cell editor (Editor column). This is already entered as the default value and you do not have to define it any further.
4. Choose Finish.
In the Outline display, the CustomerTable UI element is enhanced by the corresponding columns. Each column contains two UI elements for displaying the column header (Caption) and the column cell (TextView).
Add the column for the customer name as follows:
5.
In the context menu
for the UI element CustomerTable[Table],
choose Insert Column. The TableColumn UI element is named
automatically.
6. In the Outline perspective view, select the newly created TableColumn UI element and enter the value CustomerTable_Name in the perspective view Properties for the id attribute.
7. In the same way, rename the Caption UI element belonging to the new table column as CustomerTable_Name_Header.
8.
Enter the value
Name in the text property of the  CustomerTable_Name_header[Caption] UI element.
9.
In the
Outline perspective view, use Drag&Drop to move the added
TableColumn UI element to the uppermost position in the CustomerTable[Table].
10.
In the context menu
for the UI element  CustomerTable_Name[TableColumn], choose Insert
Celleditor.
CustomerTable_Name[TableColumn], choose Insert
Celleditor.
11. Give the UI element the Id CustomerTable_Name_Editor and choose the type TextView from the dropdown list.
12.
Bind the
text property of the UI element  CustomerTable_Name_Editor[TextView] to the value attribute Customer.Name.
You must now
ensure that the dataSource property of the UI element CustomerTable[Table] is bound to the Customers value node, since the value attributes to be
displayed are located in both the Address value node and in the
superordinate Customers value node.
13.
In the
Outline perspective view, choose the UI element CustomerTable[Table].
14. Bind the dataSource property to the Customers value node .
Order Table
...
1.
In the context menu
for the UI element OrderTable[Table],
choose Create Binding.
2. In the dialog box that appears, choose the Orders context value node and choose Finish to confirm.
Choose Finish. The Order table is filled with the UI elements for four new columns.
Result
You have now bound the two tables CustomerTable and OrderTable to the controller context of the view. In the View Designer, the view looks like this:

 Now proceed to the technical program aspects
in Implementing the
Controller Context of a View.
Now proceed to the technical program aspects
in Implementing the
Controller Context of a View.