
 Creating a Client JavaServer Page
Procedure
To create a JavaServer Page (JSP) that calls the deployable proxy, proceed as follows:
...
1. In the EJB Explorer tab in the Web Services perspective, choose File ® New ® Project ® J2EE ® Web Module Project.
2. In the dialog window that appears, enter the name of the Web project and choose Next ® Finish.
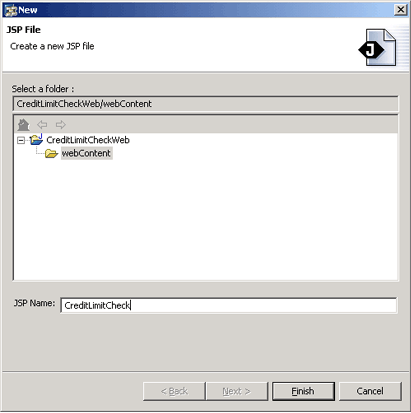
3. Select the name of the WEB project from the frame on the left and choose New ® JSP from the context menu. Enter the required data.
4. Add a Web service client API.
Select the name of the project and choose Add Web Service Client API Library from the context menu. This enables you to use the client API of the deployable proxy. Choose OK.

5. Implement the JSP.
Open your Web project and then open webContent, which contains the created JSP file. Double-click the file to open a UI containing two tabs – Preview and Source – on the right. Open the Source tab.

Implement the JSP file:
a. Create an instance of InitialContext for accessing the proxy bound in the J2EE Engine Naming System. Use the InitialContext constructor without any parameters:
InitialContext ctx = new InitialContext();
b. Look up the proxy using the context name with which it is bound in the Naming System. It must contain java:comp/envprefix.
c. Get a logical port for accessing a service endpoint. You can find the available service endpoints in your Proxy Project; under the proxy you had created, open SEIs.
To get the default logical port, use:
CreditLimitCheckViDocument port = (CreditLimitCheckViDocument) obj.getLogicalPort(CreditLimitCheckViDocument.class);
Alternatively, you can specify which logical port to get by passing the name as a parameter:
CreditLimitCheckViDocument port = (CreditLimitCheckViDocument) obj.getLogicalPort("DEFAULTPort_Document", CreditLimitCheckViDocument.class);
d. Invoke the business method.
CreditLimitCheckResponse result = new CreditLimitCheckResponse();
result = port.creditLimitCheck(request.getParameter("idNumber"));

<%@ page import="javax.naming.InitialContext" %> <%@ page import="javax.rmi.PortableRemoteObject" %> <%@ page import="com.sap.demo.proxy.CreditLimitCheckViDocument" %> <%@ page import="com.sap.demo.proxy.CreditLimitCheck" %> <%@ page import="com.sap.demo.proxy.types.CreditLimitCheckResponse" %>
<% InitialContext ctx = new InitialContext(); CreditLimitCheck obj = (CreditLimitCheck) ctx.lookup("java:comp/env/CreditLimitCheckProxy"); CreditLimitCheckViDocument port = (CreditLimitCheckViDocument) obj.getLogicalPort("DEFAULTPort_Document", CreditLimitCheckViDocument.class); CreditLimitCheckResponse result = new CreditLimitCheckResponse(); result = port.creditLimitCheck(request.getParameter("idNumber")); if (result.getScore() == null) { result.setScore(" "); } if (result.getCreditLimit() == null) { result.setCreditLimit(" "); } if (result.getLimitCurrency() == null) { result.setLimitCurrency(" "); } if (result.getValidTo() == null) { result.setValidTo(" "); }%> |
6. Add JNDI mappings.
You have to define a reference from your JSP to the J2EE Engine interface or service components. This way, components of your Web application can look up server components and use their functions. Alternatively, you have to create a reference from the JSP to the proxy.
Open the web-j2ee-engine.xml file and choose References. Then, select the jndi mapping folder and choose Add to add a new server component reference. Enter the required data:
a. Application local JNDI name – This is the name that you use in the JSP code to look up the server component. It is relative to the java:comp/env context.
b. Server component type – Choose the type of the reference. The types can be service or interface depending on the component type that is referenced.
c. Server component JNDI name – Enter the name with which this component is bound to the J2EE Engine Naming System. The following convention is used:
/wsclients/proxies/<ProviderName>/<ApplicationName>/<ProxyName>
<ApplicationName> is the name of the proxy application generated during the build of the Enterprise Archive file of the Deployable Proxy Project. The application automatically gets the same name as specified for the proxy project. If the application name contains a slash (/), it must be replaced with a tilde (~).
<ProxyName> is the fully-qualified proxy name, that is, proxy package name and proxy application name.
d. Optionally, enter a description in the Description field.

7. Add a URL Pattern.
Open web.xml, choose Mapping ® Servlet Mappings followed by Add. In the displayed dialog box, select your JSP and choose OK. Enter “/” in the URL Pattern field.

8. Build the Web archive (WAR) file.
Select the Web project and choose Build WEB Archive from the context menu.
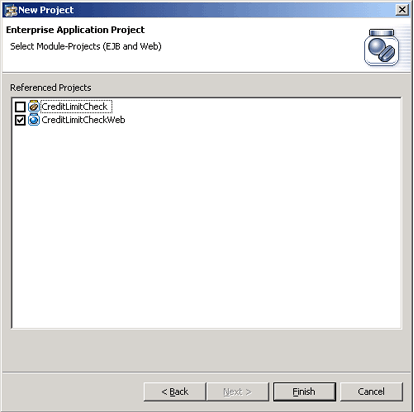
9. Create an Enterprise Application Project from which the JSP can be generated in the form of an EAR file and deployed.
Choose File ® New ® Project ® J2EE ® Enterprise Application Project. Enter the required data and choose Next. In the dialog box that is displayed, select the Web project to create a reference to it and choose Finish.
10. Create a reference to the proxy.
After step 6, you have defined the reference that is to be bound to your Web application’s naming environment. However, to be able to load classes of the referenced proxy interface, you must also set a reference at classloader level. That is, you must set a reference to the corresponding server component in the application-j2ee-engine.xml descriptor in your Enterprise Application Project. To do this, open the application-j2ee-engine.xml editor of the created EAR project and choose General ® References ® Add® Create New.
Enter the corresponding data:
a. Reference target – this is the component to which you want to create a reference.
b. Reference type – hard means that your application will not be started if the component is not started. Weak means that it will be started whether the proxy application is deployed or not, but it will not be useable until the proxy is started.
c. Reference target type – this is the type of the component to which you are creating a reference.
d. Provider name – enter sap.com.

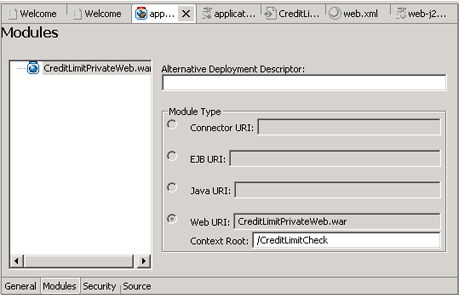
11. In the EAR project, select application.xml ® Modules and select the WAR file from the modules list. In theContext Root, enter a new value.
12. Build and deploy the EAR file.
Select the EAR project and choose Build Application Archive from the context menu. Then select the generated EAR file and choose Deploy on J2EE Engine from the context menu.
You can test the JSP under http://<host>:<port>/<contextRoot>