
 Implementing the View Composition
Use
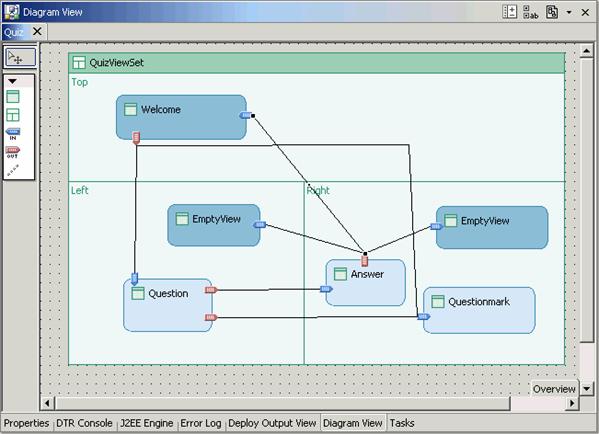
By defining the view composition, you specify all view assemblies in a Web Dynpro application that can be accessed at runtime by navigation. The view composition for this example application looks as follows:

Prerequisites
You have created an empty Web Dynpro project in which you want to implement the view composition. You are in the Web Dynpro Explorer in SAP NetWeaver Developer Studio.

You can graphically trace the development process in the graphic Navigation Modeler tool. Open the Navigation Modeler by choosing Edit in the context menu in Web Dynpro window Quiz.
You can also use the following procedure, which is graphically supported in the Navigation Modeler.
Procedure
To compose the view, you need to visually insert the following:
● T-Layout view set in the window of the Web Dynpro component
● Views: Welcome, Question, QuestionMark, and Answer
● Two empty views
● Insert inbound plugs and outbound plugs
● Exit plug for terminating a Web Dynpro application
● Insert navigation links for defining view assembly changes
Integrating a View Set in a Web Dynpro Window
When you created the new Web Dynpro component Quiz, the system generated a corresponding window with the same name. You now have to insert a view set as a container for individual views in this window.
1. Double-click the Web Dynpro window Quiz node in Web Dynpro Explorer to start Navigation Modeler. This then appears in the Diagram View.
2. Remove the Welcome view that was embedded here when the Quiz components were created. In the context menu for this view, now choose Delete.
3. In toolbar on the left, choose Create Viewset. Place the cursor anywhere on the user interface of the Diagram View and left-click.
4. Enter a name for the new view set – for example, QuizViewSet.
5. Choose TLayout as ViewSetDefinition and choose Finish.
6. In the Web Dynpro Explorer, choose WebDynpro ® Web Dynpro Components ® Quiz ® Windows ® Quiz ® QuizViewSet.
7. Assign 50% to the QuizViewSet view set under Properties of VerticalSashPosition and 50 to HorizontalSashPosition.
Along with the graphical representation of the Navigation Modeler, the new view set QuizViewSet is displayed together with the three view areas Left, Right, and Top below the Quiz window node in the Web Dynpro Explorer.
Embedding Views in View Areas
Embed four new views and two empty views in the existing view areas. Use the following views for the procedure described below:
View Area |
View Name |
Properties - default |
Top |
Welcome |
true |
Left |
Question |
false |
Left |
No entry (= empty view) |
true |
Right |
Answer |
false |
Right |
QuestionMark |
false |
Right |
No entry (= empty view) |
true |
...
1. In the Navigation Modeler toolbar, select the Embed View icon.
2. Place the cursor on the view area where you want to embed the new view and left-click.
3. Choose Embed New View and enter a descriptive view name for it. If you want to create an empty view, choose Embed Empty View and Finish.
4. In Web Dynpro Explorer, select the newly added view – for example, WebDynpro ® Web Dynpro Components ® Quiz ® Windows ® Quiz ® QuizViewSet ® Left ® Question. Display the corresponding Properties view.
5. Assign the appropriate entry according to the above table to view property default. This specifies which view within the view area is displayed in the first view assembly.
The newly created views are displayed under the corresponding view area nodes. The views that you have not declared as empty views also appear under the view node.
Adding Inbound and Outbound Plugs to Views
You have to add inbound plugs and/or outbound plugs to the individual views before you can define the navigation structure. An inbound plug is automatically generated for the empty views that you have created. Perform the following procedure for the view listed below:
View Name |
Inbound Plug Name |
Outbound Plug Name |
Welcome |
EndQuizIn |
StartQuizOut |
Question |
ShowQuestionIn |
ShowAnswerOut |
QuestionMark |
ShowQuestionMarkIn |
|
Answer |
ShowAnswerIn |
EndQuizOut |
...
Choose Create Inbound Plug or Create Outbound Plug in the context menu of the view node to which you want to assign the new plug. Alternatively, you can define inbound plugs and outbound plugs in the Navigation Modeler.
Defining the Exit Plug for the Component Interface View
To exit the application and navigate to an external Web page, such as www.sap.com, you need to add an exit plug with a URL parameter to interface view QuizInterfaceView in Web Dynpro component Quiz. The Quiz component should be seen as an external visual representation of a window (internal visual representation of a Web Dynpro component).
...
1. In your project’s overview tree, choose WebDynpro ® Web Dynpro Components ® Quiz ® Component Interface ® Interface Views. Double-click interface view QuizInterfaceView.
2. Switch to the Plugs tab.
3. Choose New (next to the table with the outbound plugs). Enter a descriptive name for the new outbound plug, for example, GotoUrl, and choose Exit Plug.
4. Select the new outbound plug GotoUrl and choose New next to the parameter table. Enter the name Url (case-sensitive) for the new parameter and choose string as the type.
Defining Navigation Links
Now define the navigation links to uniquely specify the view composition within the quiz window. You always define a navigation link that starts from the outbound plug of the start view and points to the inbound plug of the target view. Create the following navigation links using the procedure described below:
Start View |
Outbound Plug |
Target View |
Inbound Plug |
Welcome |
StartQuizOut |
QuestionMark |
ShowQuestionMarkIn |
Question |
ShowQuestionIn |
||
Question |
ShowQuestionMarkOut |
QuestionMark |
ShowQuestionMarkIn |
ShowAnswerOut |
Answer |
ShowAnswerIn |
|
Answer |
EndQuizOut |
Welcome |
EndQuizIn |
EmptyView (View-Area Left) |
ShowEmptyView |
||
EmptyView (View-Area Right) |
ShowEmptyView |
...
During the creation process, note that several navigation links can start from a single outbound plug. The individual navigation links do not have names. Navigation is programmatically started when an outbound plug is triggered; the assigned navigation links are then executed.
1. In the context menu for the outbound plug of the start view, choose Create Navigation Link A list appears with all possible target views and the inbound plugs contained in them. The view area in which the target view is contained is displayed in brackets next to the target view.
2. Select the target view and the corresponding inbound plug.
Result
You have implemented the view composition for the quiz application and can now continue designing the various view layouts.
 Continue by designing a view
layout.
Continue by designing a view
layout.