
 Designing a View Layout
In this step, you will design the user interface that is used for input and for sending the e-mail message. You enhance the view layout of the EmailFormView view to include the relevant user interface elements, such as labels and input fields. Then you perform the data binding between the UI element properties and the model attributes. Finally, you bind the SendEmailaction to the button for sending the e-mail.It is much easier to add an email input form if you use the Form-Template-Wizard.
Prerequisites
· You have created the SendEmailaction for the EmailFormView view.
· The structure of your project WebDynpro_EmailWSis currently displayed in the Web Dynpro Explorer.
Procedure
Creating a layout for the EmailFormView view
The following describes how to design the layout of the EmailFormViewview in the View Designer of the Web Dynpro tools.Afterwards, the view will look like this:

a. Open the EmailFormView view in the View Designer by clicking the Layout tab.
b. The View Designer displays a existing default text. Simultaneously, the Outline view displays a list of the UI elements included. If you select an element in the Outline view or on the Layout tab, its associated element properties are shown in the Properties view.
c. First, adapt the individual properties of the two existing UI elements:
Property |
Value |
For the root element RootUIElementContainer |
|
Properties of TransparentContainer – layout |
GridLayout |
For the TextView element named DefaultTextView |
|
Properties of TextView – design |
header1 |
Properties of TextView – text |
Web Dynpro e-mail service |
LayoutData – hAlign |
center |
LayoutData – paddingBottom |
large |
d. Add a Group UI element named EmailFormGroup. To do this, go to the context menu and choose the entry InsertChild above the root element RootUIElementContainerof the Outline. Make the following settings:
Property |
Value |
For the Group UI element EmailFormGroup |
|
Properties of Group – design |
sapcolor |
Properties of Group - layout |
MatrixLayout |
Properties of Group – scrollingMode |
none |
Properties of Group – width |
70% |
LayoutData – hAlign |
center |
for the Caption UI element EmailFormGroup_Header |
|
Properties of Caption - text |
|
e. The email input form consists of several pairs of Label and InputField UI elements as well as a button for sending the email message. This form can be added easily by using the Form-Template-Wizard for Web Dynpro tools in the view layout.
a. In the view layout, select the UI element EmailFormGroup and then choose the entry Apply Template in the context menu.
b. Choose the Form icon in the dialog box and then choose Next.
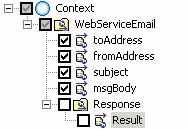
c.
Select
the context node WebServiceEmail, as well as all context attributes
contained in the node. The checkboxes Response and Result must
not be checked:
d. In the next step, change the order of the user interface elements (using the arrow keys) to fromAddress, toAddress, aSubject and msgBody.
e. Select the editor TextEdit for the attribute msgBody and then press Finish.
f. After that, change the text property for the individual Label-UI-elements to From, To, Subject and Message.
g. Select the UI element msgBody_label and set its property LayoutData – vAlign to the value top.
h. In the Group-UI element FormGroup, add a pushbutton und and carry out the stated settings.
Property |
Value |
Button SendButton of type Button |
|
tooltip |
Send Email |
LayoutData - colSpan |
2 |
Properties of Label – layoutdata |
MatrixHeadData |
LayoutData – hAlign |
center |
Data Binding to the View Context
Data binding between the UI elements in the email form and the corresponding context elements was already defined automatically during the previous step in the Form Template Wizard.
...
Binding Action to onAction Event of the UI Element SendButton
...
So that the email message (entered on the client side) can be sent to the Web service (on the server side) using the view controller, a server round trip must be triggered by the SendEmail action. To do this, you bind the onAction event of the Button UI element SendButton to the action you have created, SendEmail.
a. To do this, create the following binding:
Property |
Value |
For the SendButton pushbutton of type Button |
|
Event – onAction |
SendEmail |
You bind the action to a user interface element event using the selection list in the right column in the Properties view.

Next Step:
Creating Implementation for Web Service Connection