
 Creating
the Tile: Business Partners
Creating
the Tile: Business Partners 
Use
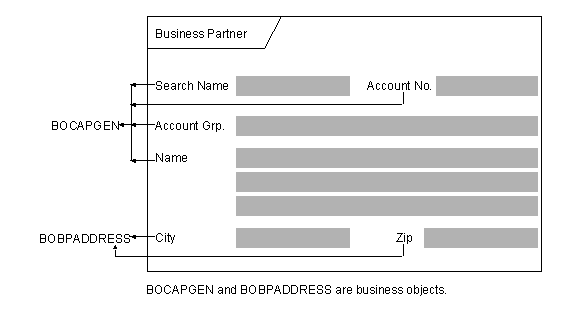
This example describes how to create the Business Partner tile. The following graphic illustrates the layout required for displaying business partner details:
Prerequisites
You have:
· Identified the required properties of the business objects, BOCAPGEN and BOBPADDRESS
· Modeled the business relationship COLADRCS between the business objects
· Switched to the required change list
Procedure
1. In the Solution Explorer, expand the Tiles node, click the Detail node with the secondary mouse button, and choose New.
The Add Object dialog box appears.
2. Select the Detail template, add a name for the tile, and then choose Open.

The name must be namespace compliant.
The Tile Designer window appears.
3. In the Properties panel in the Caption field, type Business Partner.
4. From the Solution Explorer under the Business Objects node, drag the business objects, BOCAPGEN and BOBPADDRESS and drop them in the Tile Designer area.
The controls corresponding to the properties of the business objects appear on the tile. The business anchors, Customer and Address, appear in the Anchors view in the Document Outline window.
5. In the Anchors view, drag the Address business anchor and drop it under the Customer business anchor to define the data dependency.
 Customer business anchor
 Address business anchor
6. In the Anchors view, choose the Address business anchor.
7. In the Properties panel, enter the following values for the properties as shown in the following table.
Property name |
Value |
Data source |
BOBPADDRESS |
Data source type |
Business object |
Supply type |
By Relation |
Supply Relation |
COLADRCS |
8. Save the tile.
Result
You have created the Business Partner tile. You can now include the Business Partner tile in the required tile set.