
 Creating Your System Data
Container
Creating Your System Data
Container

Introduction
In most practical test environments, eCATT resides on a central test system and runs tests against remote systems in the test landscape.

To access these remote systems, eCATT uses standard RFC destinations. However, these RFC destinations are never referenced directly within a test script – that would minimize the reusability of the test script. Instead, the RFC destinations are assigned to logical names in a system data container, and it is these logical names that are used in the test script.
Your Test Landscape
For this tutorial, your system landscape consists of a system containing the transaction EC_TUTORIAL_SAPGUI. If you do not have access to a second system containing this transaction, simply use an RFC destination in the eCATT system that points to the eCATT system itself.

Prerequisites
In the eCATT system, you require an RFC destination for the system under test. Here we will call the RFC destination TUTORIAL. This should be an type 3 connection. You can use transaction SM59 to maintain RFC destinations. Make sure that you can log on to the system using the RFC destination.
Procedure
1. Start transaction SECATT.
2. On the eCATT initial screen, select the System Data radio button and enter a name for your new system data container in the field beside it. For this tutorial, we will refer to it as TUTORIAL_SDC. You may have to prefix the name (for example, with Z) if you are in a customer namespace.
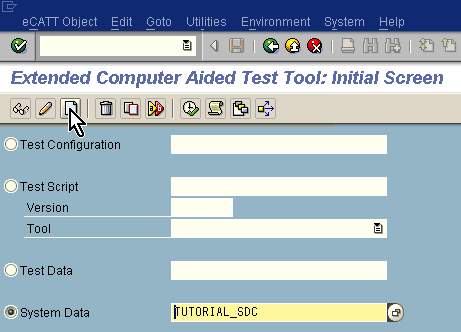
3. Choose the Create Object icon as shown above. This will open the editor for the system data container.
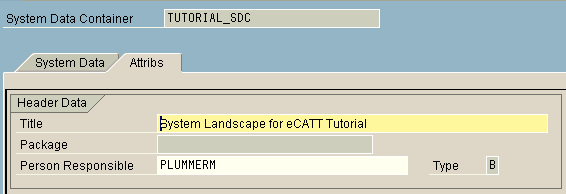
4. On the Attributes tab, enter a title for the system data container – for example, System Landscape for eCATT Tutorial.
5. Change to the System Data tab. You will see a default target system called NONE. However, you are not going to use it in this tutorial.
6. Append a row for your new target system.
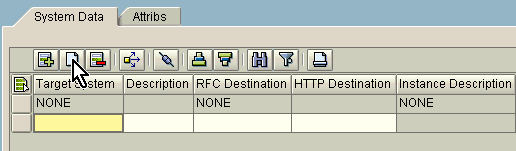
7. Enter a name for the target system (here we use TARGET_1), and use the F4 help to enter the RFC destination TUTORIAL.

8. Choose Enter. The Instance Description field will be filled automatically.
9. Save your system data container.
Result
You have created your system data container. It does not do anything by itself – you will use it later to enable your tests to run against the remote system defined in the RFC destination.