

 Creating and Changing Monitors
Use
You can quickly and easily create your own
monitors that meet your own special requirements. If, for example, you want to monitor the interaction between your CPUs, the operating system paging, and the dialog response time of your SAP R/3 Systems, you can create an Alert Monitor that contains only these monitoring tree elements (MTEs). You can decide whether this monitor covers one or more SAP R/3 Systems.To be able to create a monitor, you must first create a tree structure. You have the following options for the individual nodes:
 Static MTE Selection
You can explicitly select MTEs for your monitor. Only the selected MTEs are added to the monitor, and the selection of the MTEs is not updated.
 Rule-Based MTE Selection
You can use the rule-based MTE selection (dynamic selection) to create your own monitor. In this case, the Alert Monitor inserts all MTEs that meet a certain

You can combine static and rule-based MTE selection in the same monitor.
 Virtual MTEs
You can define virtual MTEs to structure your monitor. Virtual nodes are used as titles or headings in the Alert Monitor. They have no function other than to group monitoring tree elements visually. For example, you can create virtual MTEs as titles for different groups of actual MTEs in your monitor.
Prerequisites
To be able to create or change a monitor, you must first activate the maintenance functions.
Procedure
|
Function |
Menu Path |
|
Create monitor |
Choose the monitor set in which you want to create the monitor; ensure that it is a monitor set that you can modify ( |
|
Change monitor |
Expand the monitor set and choose the monitor that you want to change; choose Monitor (set) ®
Change ( You can also change a monitor that has already been started by choosing Monitor ®
Change ( |
|
Function |
Procedure |
|
Insert static MTE selection |
Choose the required MTEs from the list of Selectable MTEs |
|
Insert rule-based MTE selection |
Choose the node under which you want to insert a rule-based node; choose Edit ®
Create Node ( |
|
Insert a virtual MTE |
Choose the node under which you want to insert a virtual node; choose Edit ®
Create Node ( |
|
Change node |
Select the relevant node; choose Edit ®
Change Node ( |
|
Display node |
Select the relevant node; choose Edit ®
Display Node ( |
|
Delete node |
Select the relevant node; choose Edit ®
Delete Node ( |
The following rules apply to the sequence of nodes in the monitoring tree:
 ). If you are creating a new monitor, the system prompts you to enter a name for your monitor.
 Example
The following graphic shows a simple rule-based monitor definition (for more information about the possible rules and display options, see
Rule MTEs: Rule Descriptions and Use):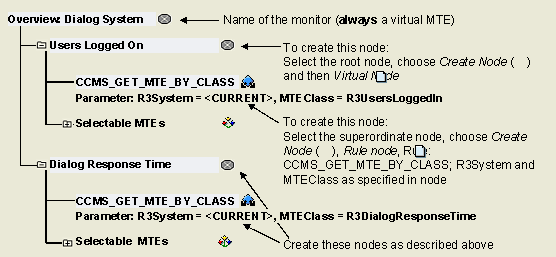
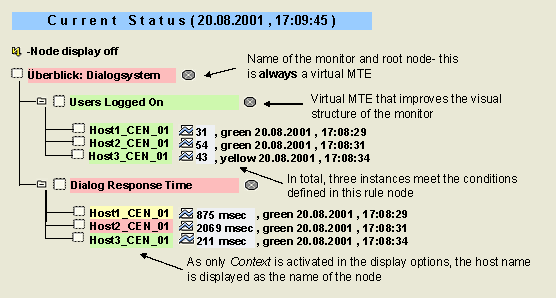
If you choose Generate Monitor () for this monitor definition, the system displays the following monitor:
 ); choose Monitor(set) ®
Create (
); choose Monitor(set) ®
Create ( ).
). ).
). ).
). ). The system displays different properties depending on the type of node.
 ). The node is deleted, along with its subnodes.