 Workflow Examples
Workflow Examples
The directory ...\SAPforms\Samples contains two examples (
APPROVE.VBP , CUSTOMER.VBP ) of approval workflows that illustrate the functions for starting workflows and processing work items.These workflows cover the scenarios: Process notification of absence (
WS 30000161 ) and Example workflow for customer creation ( WS 20000084 ).
Also compare the documentation to workflow
Scenarios
In both scenarios, an employee starts a form as an
EXE file on a local PC. He or she completes the form and sends it to the R/3 System by clicking the Submit button. This example is designed for communication via RFC. In other words, an online connection to the R/3 System is required.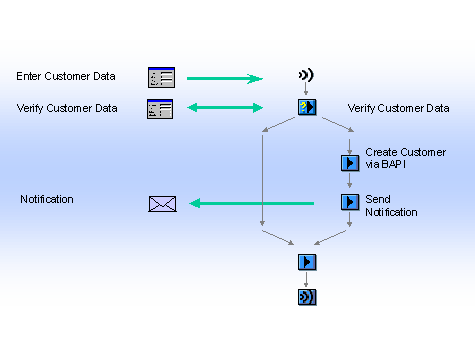
Example: Scenario WS 20000084 (Simplified)
The employee receives the message "Your request has been submitted successfully" . The corresponding workflow is then started in the R/3 System. The employee responsible for approving the notification then receives a work item in his or her Workflow inbox. If he or she chooses Execute, the work item starts the form again. This time, however, only values are displayed. The form now also contains a Reject and an Accept button. Depending on the superior’s decision, the employee receives a rejection or an approval in his or her workflow inbox.

For the scenario example workflow for creating customers ( WS 20000084 ) to function, the file CUSTOMER.TXT must also be located in the directory, in which the executable EXE -file (the form) is located, as the form reads initial values from this file. The file is stored in the directory ...SAPforms\Forms.
It concerns the data for state, reference customer sales organization, division and distribution channel ("*"). Except for state this data is system-specific and must be determined separately. In order for the example to work, you must maintain the appropriate data for your system in the file CUSTOMER.TXT. See also: Determining a Reference Customer.
Process Flow
To use these examples, you need to carry out the following steps:
The structure of the workflow
The additions to the VB code required for this scenario have already been integrated and commented. These are, for example, the program lines (
One of the scenarios described above is then started.