Sales Controlling Object (On Premise Only)
Replicate sales controlling object master data inbound to SAP Fieldglass from SAP S/4HANA.
Prerequisites
Replication of sales controlling object (sales order) is for SAP S/4HANA on premise only.
Context
In SAP Fieldglass the sales controlling object is a cost object. The 'Cost Center Upload' connector is used to replicate the sales controlling object from SAP S/4HANA to an SAP Fieldglass cost center entity.
The connector details are as follows:
|
Connector Details |
Cost Center Upload |
Comments/ Notes |
|---|---|---|
|
Real Time vs. Batch |
Real Time |
|
|
Transfer Method |
Web Services |
|
|
File Type |
JSON |
|
|
Version |
API-A-V1.0 |
|
|
Field Layout / Data Mapping |
Refer to the upload column transform mapping below. |
When configuring the Cost Center Upload for sales controlling object, refer to the following example.

Procedure
- Follow the instructions below and in the setup wizard to configure the connector, choosing Next to advance through the setup pages.
-
Enter a custom connector name.
-
Add the pre-processor as shown next.
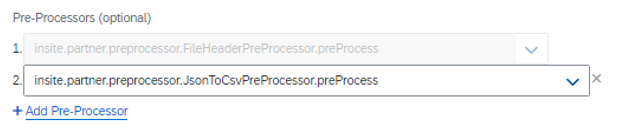
-
On the Upload Column Transform tab of the connector, fields and values must be added. Refer to the following mapping tables to create the upload column transform.
In the following Upload Column Mapping, copy the name value to the description.
Add Native Fields Standard Column Name
File Column Name
Script
Default Value
Account Category
SalesOrder
Cost Center Name
TransformUtil.ifElseCondition($_Cost Center Name$_.equals("") || $_Cost Center Name$_ == null ,"SO" + "-" + $_Sales Order Id$_ + "-" + $_Sales Order Item Id$_, $_Cost Center Name$_);
Currency
ALL
Include All Expense Flag
Yes
Include All Task Flag
Yes
Reason
MDI integration close
-
- Create a new End Point with the following values:
-
Enter the ID, such as MDI_SalesOrder_Company Code. (Precede Company Code with _ (underscore).)
-
Enter the Category as webservice.
-
For Activity, choose Active.
-
Enter the following Additional Fields:
End Point Additional Fields Name
value_text
__webservice_transport_class
insite.onemasterdata.transport.OneMasterDataWebserviceTransporter
apiVersion
/v0/odm/4.0.0
clientId
<client ID value>
clientSecret
<client secret value>
limitHint
20
serviceEndPoint
The end point you created in the previous step,
since
For a new setup, use initial. The system will generate this value after it's created.
tokenIssuerEndpoint
https://<system URL>/oauth/token
Refer to the following image:

-
- Add a new Subscription with the following values:
Subscription Details Field
Details
Type
Upload
Connector
MDI_SalesOrder_Company Code
End Point
MDI_SalesOrder_Company Code (refer to "MDI_SalesOrder_Company Code End Point Config" in the section above)
Parameters
one_mds_salesorder
Subscriber
insite.subscription.OneMasterDataWebserviceUploadSubscription (required value).
Notification Email
Optional field.
Delivery Time
Series of selections that set the scheduling for the subscription. You can choose multiple values in the boxes using CTRL- or SHIFT- clicks. Set this subscription to run once daily.
Time Zone
Choose a value where the subscription runs.
Status
Choose Enabled.
Refer to the following image:
