 Quick Start: Designing a Business Scenario

Use
This section provides you with a step-by-step guide to defining a simple Business Scenario. In the process, you will learn about the graphical modeling options available, how to insert application components, how to create actions, and how to define synchronous and asynchronous connections.
Prerequisites
· A software component version
Select a software component version in the navigation area of the Integration Builder.
You can do the following:
¡ Use an existing software component version
¡ Import a software component version from the System Landscape Directory
· A namespace in the software component version
You can do either of the following:
¡ Use an existing namespace
Procedure
Creating the Business Scenario and inserting the application component
...
1. Expand the subnode of the selected namespace in the navigation area of the Integration Builder.
2.
Select the
Business Scenario node and choose New ( ) from the context menu.
3. In the Create New Object dialog, enter the name of the Business Scenario (FlightTripBooking) and confirm by choosing Create. The new Business Scenario is opened in change mode.
4. In the field Description, enter Book Flight Trip.
5. To insert an application component for the travel agency, position the cursor on the graphical area and choose Insert Application Component from the context menu. The system displays the Insert Application Component dialog.
6. Select the radio button Not Defined in System Landscape Directory. The entry Template appears in the Product field. Product templates can be used if you do not want to specify a particular product specification.
7. In the Role frame (Name field), enter Travel Agency.
8. Confirm your specifications by choosing OK. The application component for the travel agency then appears as a colored vertical column in the graphical display area of the Business Scenario editor.
9. To insert the Airline application component, position the cursor on the graphical display area to the right of the travel agency application component and repeat steps 6 and 7. Enter Airline as the role of the application component. You have now defined the application components required in the Business Scenario.
Defining Actions
...
1.
Select the
Actions node in the navigation area for the selected namespace and
choose New ( ) from the
context menu.
) from the
context menu.
2. In the Create New Object dialog, enter the name of the action (BookFlightTrip) and confirm by choosing Create. The new action is opened in change mode.
3. In the field Description, enter Book Flight Trip.
4. In the Use group, choose the option Not Defined (Template) and save your entries.

You can only use the new action in the travel agency and airline application components you created if you select this option.
The new action is created in the same software component version in which you created the Business Scenario.
5. To create additional actions, repeat steps 1-4.
¡ Action 2: Name ReserveSingleFlight; description Reserve Single Flight
¡ Action 3: Name PerformBookingForSingleFlight, description Book Single Flight
Save your entries each time. Unsaved actions cannot be used in the Business Scenario.
Inserting actions and defining connections in the Business Scenario
...
1. Navigate to the Business Scenario.
2. To insert an action in the Travel Agency application component, in the graphical work area of the Business Scenario editor, position the cursor on the colored column of the application component and choose Insert Action from the context menu.
In the Select Action dialog, select BookFlightTrip from the list of actions. The selected action is inserted in the application component. To move the action within the application component, use Drag&Drop by holding down the left mouse button. Move the action to the top of the application component column.
3. Next, insert ReserveSingleFlight at the top of the airline application component column, followed by PerformBookingForSingleFlight.
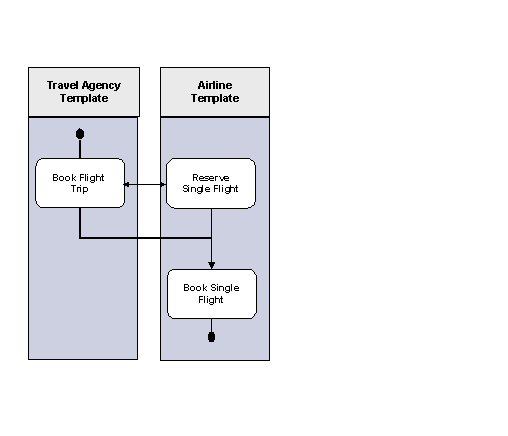
4. Lay out the actions as shown in the graphic above.
5. To create a synchronous connection between Book Flight Trip and Reserve Single Flight, proceed as follows:
Select both actions using the rubberband and then choose Create Connection Between Selected Actions from the context menu. The system calls the dialog for creating connections.

For more information about rubberbands and the other graphical functions of the Business Scenario editor, see the Functions of the Graphical Editor section.
The relative position of the two actions means that the type of connection is automatically defined as synchronous. You do not need to make any further specifications. When you choose OK, the dialog closes and a line is inserted between the selected actions to indicate synchronous communication.
6. To create a asynchronous connection between Book Flight Trip and Book Single Flight, proceed as follows:
Select the two actions as described in step 5. The relative position of the two actions means that the type of connection is automatically defined as asynchronous.
7. To create a sequence between Reserve Single Flight and Book Single Flight, proceed as follows:
Select the two actions and insert a connection. The relative position of the two actions means that the type of connection is automatically defined as Sequence.
8. To define start and end actions, proceed as follows:
Position the cursor on the Book Flight Trip action, and choose Define Action as Start Action from the context menu. The system inserts a start point above the action. Next, position the cursor on the Book Single Flight action, and choose Define Action as End Action from the context menu. The system inserts an end point beneath the action.
Defining interfaces and creating an example connection
...
1.
In the
graphical work area of the Business Scenario editor, double-click the Book
Flight Trip action. The system calls the action editor. If the editor is
not already in change mode, switch to change mode by choosing Switch
Between Display and Edit Modes ( ).
).
2.
In the
Outbound Interfaces frame, choose Insert Empty Line Below Selected
Line ( ). Enter
FlightBookingReserveOut as the name of the interface in
the name field. Leave the namespace field on the right empty.
). Enter
FlightBookingReserveOut as the name of the interface in
the name field. Leave the namespace field on the right empty.
3.
You must now
generate your new interface. To do so, position the cursor on the name field,
and choose New ( ) from
the context menu. They system calls the dialog for creating new objects. The
object type Message Interface has already been selected. Select a
namespace for the message interface and confirm your specifications by
choosing Create.
) from
the context menu. They system calls the dialog for creating new objects. The
object type Message Interface has already been selected. Select a
namespace for the message interface and confirm your specifications by
choosing Create.
4. The system calls the Message Interface: Change dialog. Enter Reserve Single Flight in the Description field. In the Attribute frame, choose Outbound for the direction and Synchronous for the mode. Save the interface.
Note that the interface is still not completely defined and cannot therefore be activated in the change list.
5. Using the tab pages at the bottom of the screen, navigate back to the action editor and save the changed Book Flight Trip action.
6. Navigate to the Business Scenario editor and double-click the Reserve Single Flight action. Following the procedure described in step 2, create a new Inbound Interface in this action with the name FlightBookingReserveIn.
7. Create the interface in the Message Interface: Change editor as described in step 3, but this time enter Reserve Single Flight in the Description field and specify the direction as Inbound. The mode is already set to synchronous. Save the interface and the Reserve Single Flight action.
8. Navigate to the Business Scenario editor and open the connection editor for the synchronous connection by double-clicking the connection line between the Book Flight Trip and Reserve Single Flight actions. The following interfaces are displayed at the bottom of the editor:
¡ Outbound interface created in the Book Flight Trip action
¡ Inbound interface created in the Reserve Single Flight action
9. Assign the interfaces to the connection by selecting both interfaces. To do so, select the corresponding check boxes. Choose OK to confirm.
10. Save the Business Scenario.
